
This demo is created to get the basic understanding of WebAPI. We will be creating a RESTful Web API using Visual Studio 2017.
Before going through this, I assume you have a basic understanding of the following.
- What is WebAPI
- .NET Visual studio 2017
- ASP.NET Core
- Dapper for SQL queries
- Postman
The very first step to start the project is to create a table in the SQL database. You can use any databases like MySQL or SQL Express. For demo purposes, I am using SQL Server.
Use the below SQL script to create a table used in this demo.
- CREATE TABLE [dbo].[Employee](
- [EmployeeId] [int] IDENTITY(1,1) NOT NULL,
- [Name] [varchar](20) NOT NULL,
- [City] [varchar](20) ,
- [Department] [varchar](20),
- [JoinDate] date
- ) ON [PRIMARY]
- GO
- SET ANSI_PADDING OFF
- GO
Now, open VS 2017 and create a new project, as shown below.
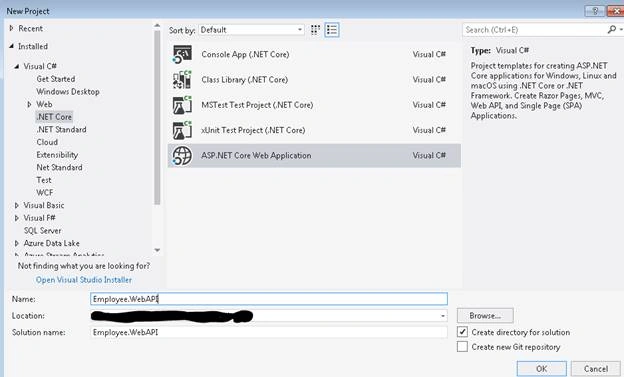
Select the API (Project template for RESTFull HTTP service). Please uncheck HTTPS as we are not using it here for demo purposes. Also, you can select Docker support by selecting "Enable Docker support", however, we will install it later using NuGet Package Manager.
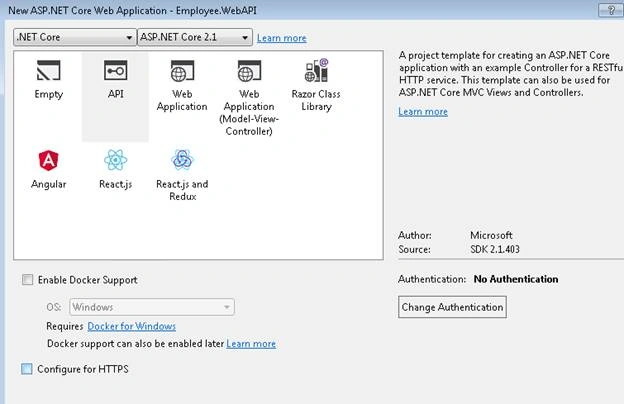
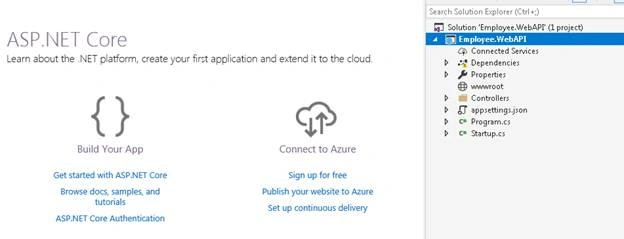
Click OK and VS will create a project template for you, as shown below.
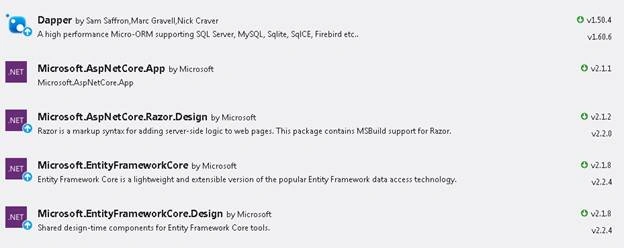
Under Solution Explorer, go to Dependencies and install the following packages required for this project. Please note that we are not using the latest builds for these packages as it is creating compatibility issues in building the WebAPI using VS 2017 template.

Once completed, add a folder named "Models" under the Project folder and add a class Emp.cs.
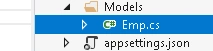
Add the following lines of code to the Employee class.
- public class Emp
- {
- public int EmployeeId;
- public string EmployeeName;
- public string EmpCity;
- public string Department;
- }
Now, we have to add a data layer to get the data from the database. We already installed Dapper in our project. Dapper is having extension methods to fetch and store the data from the database. To read more about the package, please follow the link below.
Also, you can use ADO.NET or any other connection manager if you don’t want to use this method to connect to your database.
Here, we are creating a simple Interface and class to get the data from the database. To do so, add a folder “DataAccess” and add the following two classes to it.
- IDataProvider.cs : Interface
- EmpDataAccess.cs: Data Access

- Task<IEnumerable<Emp>> GetAllEmployees();
- Task<Emp> GetEmployee(int empid);
To provide the features to get all employee and to search employee using employee id, we have to add the following code for EmpDataAccess class.
Make sure to use the following references for EmpDataAccess class.
- using Employee.WebAPI.Models;
- using System.Data.SqlClient;
- using System.Data;
- using Dapper;
- public class EmpDataAccess: IDataProvider
- {
- private readonly string connectionString = "your connection";
- public async Task<Emp> GetEmployee(int Id)
- {
- string _sql = "select * from Employee where EmployeeID =1=@eid order by dt_updated desc";
- using (var sqlConnection = new SqlConnection(connectionString))
- {
- await sqlConnection.OpenAsync();
- var dynamicParameters = new DynamicParameters();
- dynamicParameters.Add("@eid", Id);
- return await sqlConnection.QuerySingleOrDefaultAsync<Emp>(
- _sql,
- dynamicParameters,
- commandType: CommandType.Text);
- }
- }
- public async Task<IEnumerable<Emp>> GetAllEmployees()
- {
- string _sql = "select * from Employee";
- using (var sqlConnection = new SqlConnection(connectionString))
- {
- await sqlConnection.OpenAsync();
- return await sqlConnection.QueryAsync<Emp>(
- _sql,
- null,
- commandType: CommandType.Text);
- }
- }
- }
Add the following code to your interface.
- public interface IDataProvider
- {
- Task<IEnumerable<Emp>> GetAllEmployees();
- Task<Emp> GetEmployee(int empid);
- }
Please note that to pass the dynamic parameter using Dapper, we have to set the query variable.
- dynamicParameters.Add("@eid", Id);
Now, the back-end part is almost done and we have to expose these functions over HTTP or HTTPS. To do so, we have to create a controller in our project.
It’s always better to create a controller from the project template. Since we used VS 2017, we already have one default controller; however, we are not using that one (But keep it for reference). We will be adding a new controller that is more meaningful to our project, as EmployeeController.
Adding a controller is easy but you need to understand what type of controller you want to use for your project. Add a Scaffold template from available types or you can add a blank class and use it as a controller.
In this project, we are using empty API Controller. Once you have added a controller using a template, update the controller with the following code.
Here, we are changing the API URL to more meaningful names.
- namespace Employee.WebAPI.Controllers
- {
- //[Route("api/[controller]")]
- [ApiController]
- public class EmployeeController : Controller
- {
- private IDataProvider empDataProvider;
- public EmployeeController(IDataProvider _empDataProvider)
- {
- this.empDataProvider = _empDataProvider;
- }
- [HttpGet]
- public async Task<IEnumerable<Emp>> GetAllEmployee()
- {
- return await this.empDataProvider.GetAllEmployees();
- }
- [Route("api/Employee/GetEmp")]
- [HttpGet]
- public async Task<Emp> GetEmp(int empid)
- {
- return await this.empDataProvider.GetEmployee(empid);
- }
- }
- }
Now, try to build and run the project. You might get into the following issues while trying to call the Employee service using POSTMAN.
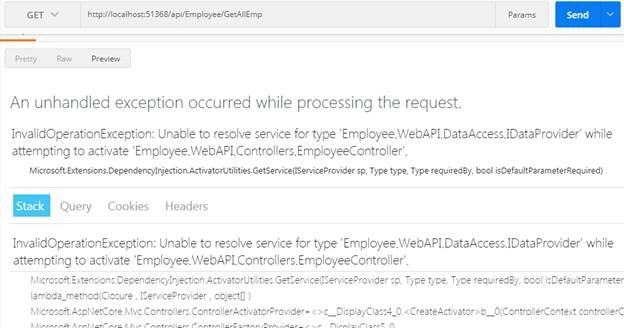
Open the StartUp.cs class and register the implementation type for the new controller service.
- services.AddMvc().SetCompatibilityVersion(CompatibilityVersion.Version_2_1);
- services.AddTransient<IDataProvider, EmpDataAccess>();
Once done, run the application and test the Web API using POSTMAN.
Below are the two URL to test the application.
To get all employees, run "api/Employee/GetEmp" as defined in the controller route.

To fetch an employee based on the Employee number.
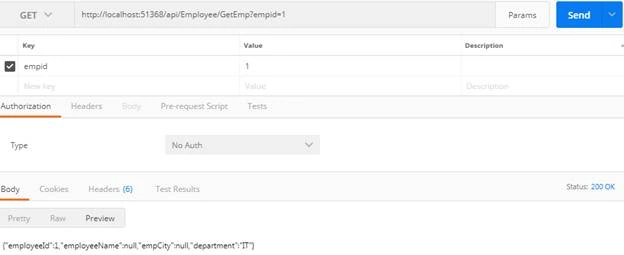
You can observe that you are able to get the data from the Web API, however, EmployeeName and EmpCity are showing as NULL even if you have good value in the database. This is because our model Emp class in not bound with the database table and there is no mapping defined as well.
- {
- "employeeId": 1,
- "employeeName": null,
- "empCity": null,
- "department": "IT"
- }
We will sort out these issue in later reads. If you want to fix the problem, simply change the Model Emp class as below.
- public class Emp
- {
- //public int EmployeeId;
- //public string EmployeeName;
- //public string EmpCity;
- //public string Department;
- public int EmployeeId;
- public string Name;
- public string City;
- public string Department;
- }
Here is the JSON result after updating the Emp classs.
- {
- "employeeId": 1,
- "name": "John",
- "city": "New York",
- "department": "IT"
- }
Join the conversation! Your thoughts help the community grow.