
Introduction
- getDeviceId() gets device id that is of String type.
- getSimSerialNumber() gets the simserial number that is of String type.
- getNetworkCountryIso() gets the network country ISO that is of String type.
- getSimCountryIso() gets the sim country ISO that is of String type.
- getDeviceSoftwareVersion() gets the Device Country ISO that is of String type.
- getVoiceMailNumber() gets the voice mail number that is of string type.
- getSimOPeration number() returns the sim operation number that is of String type.
- getNetwork() gets the network that is Integer type.
- getPhoneType() gets the phonetype that is of integer type.
Use the following permission in the Android Manifest.xml file:
- <uses-permission android:name="android.permission.READ_PHONE_STATE"></uses-permission>
Step 1
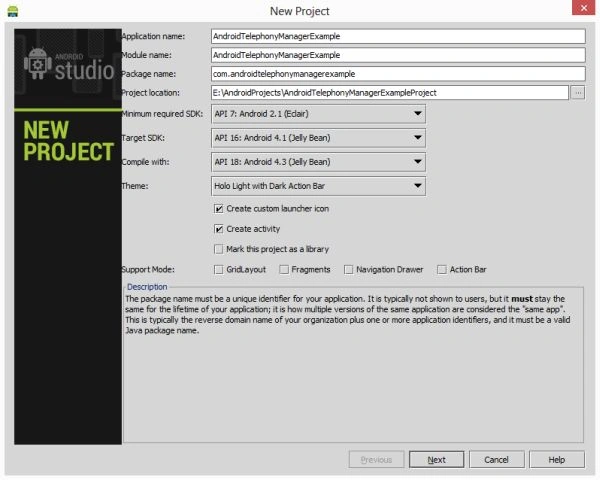
Create a project like this:
Create an XML file with the following:
- <RelativeLayout xmlns:android="http://schemas.android.com/apk/res/android"
- xmlns:tools="http://schemas.android.com/tools"
- android:layout_width="match_parent"
- android:layout_height="match_parent"
- android:paddingLeft="@dimen/activity_horizontal_margin"
- android:paddingRight="@dimen/activity_horizontal_margin"
- android:paddingTop="@dimen/activity_vertical_margin"
- android:paddingBottom="@dimen/activity_vertical_margin"
- tools:context=".MainActivity">
- <TextView
- android:id="@+id/textView"
- android:layout_width="wrap_content"
- android:layout_height="wrap_content"
- android:textSize="15dp"
- android:text="Phone Details"
- android:layout_centerHorizontal="true"
- />
- </RelativeLayout>
Step 3
Create a Java file with the following.
In this, you will create a TelePhonyManager object and call the methods regarding the details you want to show on the activity.
- package com.androidtelephonymanagerexample;
- import android.content.Context;
- import android.os.Bundle;
- import android.app.Activity;
- import android.telephony.TelephonyManager;
- import android.view.Menu;
- import android.widget.TextView;
- public class MainActivity extends Activity {
- TextView textView;
- String setType;
- @Override
- protected void onCreate(Bundle savedInstanceState) {
- super.onCreate(savedInstanceState);
- setContentView(R.layout.activity_main);
- textView = (TextView) findViewById(R.id.textView);
- TelephonyManager telephonyManager = (TelephonyManager) getSystemService(Context.TELEPHONY_SERVICE);
- String deviceId = telephonyManager.getDeviceId();
- String simSerialNumber = telephonyManager.getSimSerialNumber();
- String networkCountryIso = telephonyManager.getNetworkCountryIso();
- String simCountryIso = telephonyManager.getSimCountryIso();
- String deviceSoftwareVersion = telephonyManager.getDeviceSoftwareVersion();
- String voiceMailNumber = telephonyManager.getVoiceMailNumber();
- String simOperatorName = telephonyManager.getSimOperatorName();
- int networkType = telephonyManager.getNetworkType();
- if(telephonyManager.getPhoneType()==1)
- {
- setType="GSM";
- }
- textView.setText("deviceid:" + deviceId + "" + "\n simSerialNumber:" + simSerialNumber + "" + " \n networkCountryIso :" + networkCountryIso + "" + "\n simCountryIso :" + simCountryIso +
- "" + "\n deviceSoftwareVersion :" + deviceSoftwareVersion + "" + "\n voiceMailNumber :" + voiceMailNumber + "" + "\nNetworkType: " + networkType + "" + "\nsimOperatorName: " +
- simOperatorName+""+"\nphoneType:"+setType+""+"\nnetworkType:"+networkType);
- }
- @Override
- public boolean onCreateOptionsMenu(Menu menu) {
- // Inflate the menu; this adds items to the action bar if it is present.
- getMenuInflater().inflate(R.menu.main, menu);
- return true;
- }
- }
Step 4
Provide the following permission in the Android Manifest.xml file:
- <?xml version="1.0" encoding="utf-8"?>
- <manifest xmlns:android="http://schemas.android.com/apk/res/android"
- package="com.androidtelephonymanagerexample"
- android:versionCode="1"
- android:versionName="1.0" >
- <uses-sdk
- android:minSdkVersion="7"
- android:targetSdkVersion="16" />
- <application
- android:allowBackup="true"
- android:icon="@drawable/ic_launcher"
- android:label="@string/app_name"
- android:theme="@style/AppTheme" >
- <activity
- android:name="com.androidtelephonymanagerexample.MainActivity"
- android:label="@string/app_name" >
- <intent-filter>
- <action android:name="android.intent.action.MAIN" />
- <category android:name="android.intent.category.LAUNCHER" />
- </intent-filter>
- </activity>
- </application>
- <uses-permission android:name="android.permission.READ_PHONE_STATE"></uses-permission>
- </manifest>
Step 5
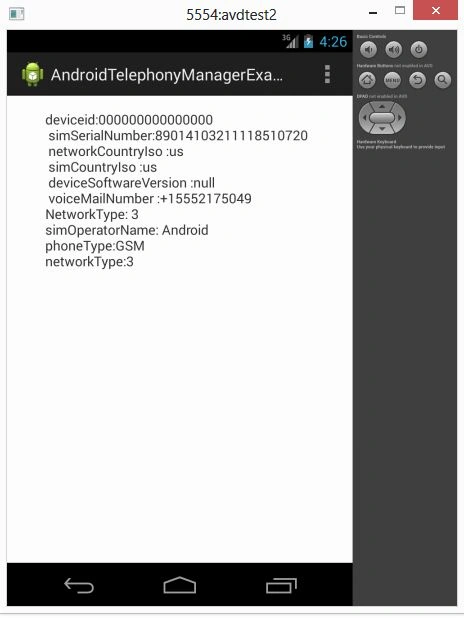
All the details regarding the phone:
Join the conversation! Your thoughts help the community grow.