

We can change it with the help of UI Kit Framework.
Now lets get started,
- Open Xcode.
- Click on Create a new Xcode project.
- Now select Single View Application.
- Click -> Next.
- Enter -> Product Name and Other blank fields (if any).
- Now select the location where you want to save your project and click on Create.
Write/copy the following code in ViewController.h.
- #
- import < UIKit / UIKit.h >
- @interface ViewController: UIViewController
- {
- UIDatePicker * DatePicker;
- UIPickerView * Picker;
- NSArray * CountryArray;
- NSArray * heightInch;
- NSArray * heightFeet;
- }
- @property(strong, nonatomic) IBOutlet UITextField * dateSelectionTextField;
- @property(strong, nonatomic) IBOutlet UITextField * countryTextField;
- @property(strong, nonatomic) IBOutlet UITextField * heightTextField;
- @end
Copy all in same sequence in ViewController.m
- #
- import "ViewController.h"
- @interface ViewController() < UIPickerViewDataSource, UIPickerViewDelegate >
- @end
- @implementation ViewController
- @synthesize dateSelectionTextField, countryTextField, heightTextField;
- - (void) viewDidLoad
- {
- [super viewDidLoad];
- // Do any additional setup after loading the view, typically from a nib.
Now firstly we are going to allocate DatePicker and set input of dateSelectionTextField to DatePicker.
- //For DatePicker
- DatePicker =
- [
- [UIDatePicker alloc] init
- ];
- DatePicker.datePickerMode = UIDatePickerModeDate; //You can change Picker mode here
- [self.dateSelectionTextField setInputView: DatePicker];
Same for Picker but with some custom colour changes.
- //For Picker
- Picker =
- [
- [UIPickerView alloc] init
- ];
- Picker.delegate = self;
- Picker.dataSource = self;
- [Picker setShowsSelectionIndicator: YES];
- Picker.tintColor = [UIColor blackColor];
- Picker.backgroundColor = [UIColor colorWithRed: 153.0 green: 204.0 blue: 255.0 alpha: 2];
These Arrays holds the values of content in Picker.
- //Arrays
- CountryArray =
- [
- [NSArray alloc] initWithObjects: @ "USA", @ "India", @ "France", nil
- ];
- heightFeet =
- [
- [NSArray alloc] initWithObjects: @ "3", @ "4", @ "5", @ "6", @ "7", @ "8", nil
- ];
- heightInch =
- [
- [NSArray alloc] initWithObjects: @ "0", @ "1", @ "2", @ "3", @ "4", @ "5", @ "6", @ "7", @ "8", @ "9", @ "10", @ "11", nil
- ];
This is to set InputView of TextField.
Note: One Picker allocation can be used for multiple text fields.
- //ForPicker
- [self.countryTextField setInputView: Picker];
- [self.heightTextField setInputView: Picker];
Now will make a Toolbar which will provide ease to user to go to another textfields.
- //For ToolBar
- UIToolbar * toolBar =
- [
- [UIToolbar alloc] initWithFrame: CGRectMake(0, 0, 320, 45)
- ];
- [toolBar setTintColor: [UIColor blueColor]];
- UIBarButtonItem * doneBtn =
- [
- [UIBarButtonItem alloc] initWithTitle: @ "Done"
- style: UIBarButtonItemStyleDone target: self action: @selector(Done)
- ];
- UIBarButtonItem * space =
- [
- [UIBarButtonItem alloc] initWithBarButtonSystemItem: UIBarButtonSystemItemFlexibleSpace target: nil action: nil
- ];
- UIBarButtonItem * prevBtn =
- [
- [UIBarButtonItem alloc] initWithImage: [UIImage imageNamed: @ "765-arrow-left.png"] style: UIBarButtonItemStylePlain target: self action: @selector(previous)
- ];
- UIBarButtonItem * nextBtn = [
- [UIBarButtonItem alloc] initWithImage: [UIImage imageNamed: @ "766-arrow-right.png"] style: UIBarButtonItemStylePlain target: self action: @selector(next)
- ];
- prevBtn.width = 20.0;
- nextBtn.width = 70.0;
- [toolBar setItems: [NSArray arrayWithObjects: prevBtn, nextBtn, space, doneBtn, nil]];
Now this will add the toolbar to textfields.
- //for date textfield
- [self.dateSelectionTextField setInputAccessoryView: toolBar];
- //for country textfield
- [self.countryTextField setInputAccessoryView: toolBar];
- //for Height textfield
- [self.heightTextField setInputAccessoryView: toolBar];
- }
This gives Action to Done button on toolbar.
- //For Date picker
- -(void) Done
- {
- //for date picker only
- NSDateFormatter * formatter =
- [
- [NSDateFormatter alloc] init
- ];
- [formatter setDateFormat: @ "dd/MMM/YYYY"];
- self.dateSelectionTextField.text = [NSString stringWithFormat: @ "%@", [formatter stringFromDate: DatePicker.date]];
- [self.dateSelectionTextField resignFirstResponder];
- //forPicker
- [self.countryTextField resignFirstResponder];
- [self.heightTextField resignFirstResponder];
- }
Now these are the required method for PickerView.
- //For Picker
- -(NSInteger) numberOfComponentsInPickerView: (UIPickerView * ) pickerView
- {
- if ([countryTextField isFirstResponder])
- {
- return 1;
- } else if ([heightTextField isFirstResponder])
- {
- return 2;
- } else
- return 1;
- }
- - (NSInteger) pickerView: (UIPickerView * ) pickerView numberOfRowsInComponent: (NSInteger) component
- {
- if ([countryTextField isFirstResponder])
- {
- return [CountryArray count];
- } else if ([heightTextField isFirstResponder])
- {
- if (component == 0)
- {
- return [heightFeet count];
- } else {
- return [heightInch count];
- }
- }
- return 1;
- }
- - (NSString * ) pickerView: (UIPickerView * ) pickerView titleForRow: (NSInteger) row forComponent: (NSInteger) component {
- if ([countryTextField isFirstResponder])
- {
- return [CountryArray objectAtIndex: row];
- } else if ([heightTextField isFirstResponder])
- {
- if (component == 0)
- {
- return [heightFeet objectAtIndex: row];
- } else
- {
- return [heightInch objectAtIndex: row];
- }
- }
- return 0;
- }
- - (void) pickerView: (UIPickerView * ) pickerView didSelectRow: (NSInteger) row inComponent: (NSInteger) component
- {
- if ([countryTextField isFirstResponder])
- {
- self.countryTextField.text = [CountryArray objectAtIndex: row];
- } else if ([heightTextField isFirstResponder])
- {
- [heightTextField setText: [NSString stringWithFormat: @ "%@' %@''", [heightFeet objectAtIndex: [Picker selectedRowInComponent: 0]],
- [heightInch objectAtIndex: [Picker selectedRowInComponent: 1]]
- ]];
- }
- }
You may have a question that why these if-else statements are used?.
So the answer is, they are providing different values and different Textfields via Same Picker.
Now lets go ahead, the following coding is providing action to previous and next buttons on toolbar.
- -(void) previous {
- if ([countryTextField isFirstResponder])
- {
- [self.countryTextField resignFirstResponder];
- [dateSelectionTextField becomeFirstResponder];
- } else if ([heightTextField isFirstResponder])
- {
- [self.heightTextField resignFirstResponder];
- [countryTextField becomeFirstResponder];
- }
- }
- - (void) next
- {
- if ([dateSelectionTextField isFirstResponder])
- {
- NSDateFormatter * formatter =
- [
- [NSDateFormatter alloc] init
- ];
- [formatter setDateFormat: @ "dd/MMM/YYYY"];
- self.dateSelectionTextField.text = [NSString stringWithFormat: @ "%@", [formatter stringFromDate: DatePicker.date]];
- [self.dateSelectionTextField resignFirstResponder];
- [countryTextField becomeFirstResponder];
- } else if ([countryTextField isFirstResponder])
- {
- [self.countryTextField resignFirstResponder];
- [heightTextField becomeFirstResponder];
- }
- }
This is an important method which prevents the values of different textfields from mixing up.
- -(void) textFieldDidBeginEditing: (UITextField * ) textField
- {
- [Picker reloadAllComponents];
- }
- - (void) didReceiveMemoryWarning
- {
- [super didReceiveMemoryWarning];
- // Dispose of any resources that can be recreated.
- }
- @end
ALL DONE IN CODING PART
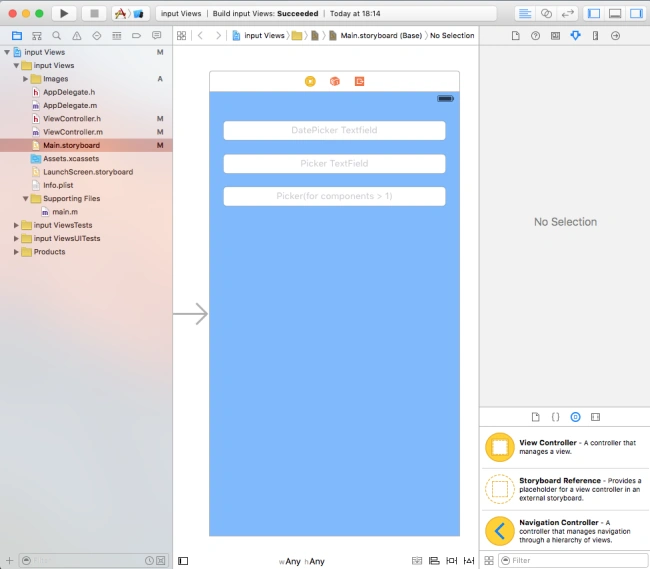
Open Main.storyboard
- Drag a TextField in ViewController and resize it.
- You can change its Alignment to Centre.
- Set new Referencing Outlet named “dateSelectionTextField” and delegate.
- In same way add two more textfields.
- Set Properties and delegates there.
Now take a deep breath and run your Project.
Your storyboard will look like the following screenshot,
Date Formats
@"dd/mm/yyyy" for 20/08/2015.
@"dd/MMM/YYYY" for 22/Nov/2015.
@"dd/MMM/YYYY hh:min a” for 19/Nov/2015 03:10
Asfend YarPosted Mar 3, 2016, 3:32 PM
good sardar gee
Banketeshvar NarayanPosted Nov 21, 2015, 11:38 AM
nice share