

Introduction
Hope you all are doing well, first of all, thank you so much for reading my previous blogs:
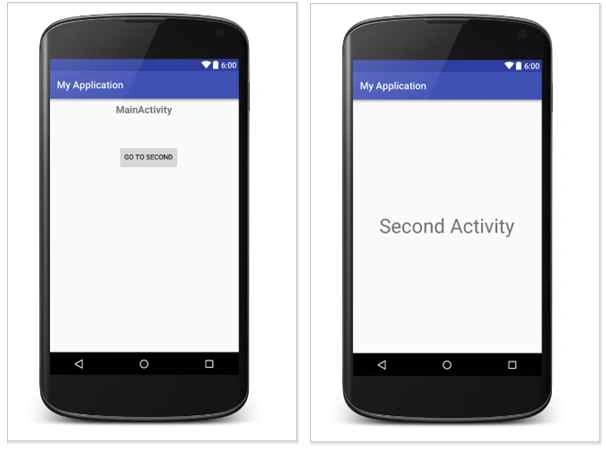
Today we will learn about the Activity in Android, how to switch from one activity to another activity, what the activity life cycle is, how to create activity in android and how to destroy an activity.
Activity in the android is a service provided by the android to handle different pages, basically, activity is the portion of the application that shows on the front end, and the UI shows the Activity so that you can place all your Widgets on it. An activity is a single screen in android. It is like a window or frame of Java.
Every activity has its own life cycle that whenever any activity is created it has to be destroyed as well after completing the works. Every new activity should be registered in the menifest.xml file as I have explained in the first part of article series: Learning Android Application Development - Day 1.
What is Activity?
What is Activity Life Cycle?
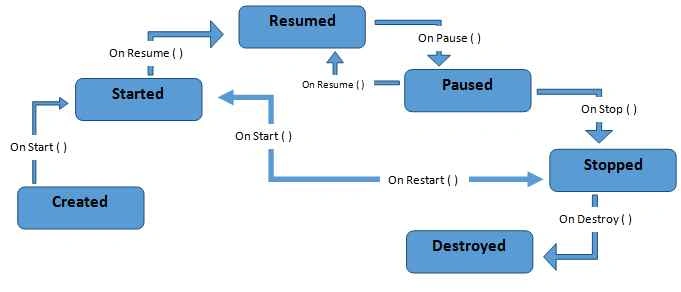
The Activity life cycle has 7 stages or methods and these are mentioned below -
- onCreate ( )- This method is called in onCreate() method when an activity starts.
- onStart ( )- This method is called when it becomes visible to the user.
- onResume( )- This method is called when the activity starts interacting with the user.
- onPause( )- This method is called when the user wants to switch to another activity.
- onStop( )- This method is called when activity no longer visible to the user.
- onRestart( )- This method is called when the user wants to restart the activity.
- onDestroy( )- This method is called before the activity is destroyed.
Activity Life Cycle
How to create Activity in MainActivity.java?
- package com.example.activitylifecycle;
- import android.os.Bundle;
- import android.app.Activity;
- import android.util.Log;
- import android.view.Menu;
- public class MainActivity extends Activity
- {@
- Override
- protected void onCreate(Bundle savedInstanceState)
- {
- super.onCreate(savedInstanceState);
- setContentView(R.layout.activity_main);
- Log.d("my_lifecycle", "onCreate Method is invoked");
- }@
- Override
- protected void onStart()
- {
- super.onStart();
- Log.d("my_lifecycle ", "onStart Method is invoked");
- }@
- Override
- protected void onResume()
- {
- super.onResume();
- Log.d("my_lifecycle ", "onResume Method is invoked");
- }@
- Override
- protected void onPause()
- {
- super.onPause();
- Log.d("my_lifecycle ", "onPause Method is invoked");
- }@
- Override
- protected void onStop()
- {
- super.onStop();
- Log.d("my_lifecycle ", "onStop Method is invoked");
- }@
- Override
- protected void onRestart()
- {
- super.onRestart();
- Log.d("my_lifecycle ", "onRestart Method is invoked");
- }@
- Override
- protected void onDestroy()
- {
- super.onDestroy();
- Log.d("my_lifecycle ", "onDestroy Method is invoked");
- }
- }
I am using here Log Tag so that you can see in your logcat that how and when the activity is created, stopped and destroyed.
- package com.example.lucifer.myapplication;
- import android.app.Activity;
- import android.content.Intent;
- import android.os.Bundle;
- import android.view.View;
- import android.widget.Button;
- public class MainActivity extends Activity {
- @Override
- protected void onCreate(Bundle savedInstanceState) {
- super.onCreate(savedInstanceState);
- setContentView(R.layout.activity_main);
- Button b = (Button) findViewById(R.id.second_activity_button);
- b.setOnClickListener(new View.OnClickListener() {
- @Override
- public void onClick(View v) {
- Intent intent = new Intent(MainActivity.this,SecondActivity.class);
- startActivity(intent);
- }
- });
- }
- }
activity_main.xml
- <LinearLayout xmlns:android="http://schemas.android.com/apk/res/android"
- android:id="@+id/layout_login"
- android:layout_width="fill_parent"
- android:layout_height="wrap_content"
- android:orientation="vertical"
- android:layout_gravity="top">
- <TextView
- android:id="@+id/heading_main"
- android:layout_height="wrap_content"
- android:layout_width="wrap_content"
- android:text="MainActivity"
- android:textSize="20sp"
- android:textStyle="bold"
- android:layout_gravity="center_horizontal"
- android:layout_marginTop="10dp"
- />
- <LinearLayout
- android:layout_width="match_parent"
- android:layout_height="wrap_content"
- android:layout_marginTop="60dp"
- android:orientation="horizontal"
- android:layout_gravity="center_horizontal" >
- <Button
- android:id="@+id/second_activity_button"
- android:layout_gravity="center"
- android:layout_width="wrap_content"
- android:layout_height="wrap_content"
- android:layout_marginLeft="140dp"
- android:text="Go to Second" />
- </LinearLayout>
- </LinearLayout>
- package com.example.lucifer.myapplication;
- import android.app.Activity;
- import android.os.Bundle;
- public class SecondActivity extends Activity {
- @Override
- protected void onCreate(Bundle savedInstanceState) {
- super.onCreate(savedInstanceState);
- setContentView(R.layout.second_activtiy);
- }
- }
second_activtiy.xml
- <?xml version="1.0" encoding="utf-8"?>
- <LinearLayout xmlns:android="http://schemas.android.com/apk/res/android"
- android:layout_width="match_parent"
- android:layout_height="match_parent"
- android:orientation="vertical"
- android:gravity="center">
- <TextView
- android:layout_width="wrap_content"
- android:layout_height="wrap_content"
- android:id="@+id/my_text"
- android:gravity="center"
- android:text="Second Activity"
- android:textSize="40dp"/>
- </LinearLayout>
AndroidManifest.xml
- <?xml version="1.0" encoding="utf-8"?>
- <manifest xmlns:android="http://schemas.android.com/apk/res/android"
- package="com.example.lucifer.myapplication">
- <application
- android:allowBackup="true"
- android:icon="@mipmap/ic_launcher"
- android:label="@string/app_name"
- android:supportsRtl="true"
- android:theme="@style/AppTheme">
- <activity android:name="com.example.lucifer.myapplication.MainActivity">
- <intent-filter>
- <action android:name="android.intent.action.MAIN" />
- <category android:name="android.intent.category.LAUNCHER" />
- </intent-filter>
- </activity>
- <activity android:name=".SecondActivity">
- </activity>
- </application>
- </manifest>
Thank you so much for reading.
Summary
I hope you all are enjoying learning android. Next time I will be back with something new about Android.
Keep learning, Happy coding!
Santhakumar MunuswamyPosted Nov 22, 2015, 11:16 AM
Good one
Ratnesh SinghPosted Nov 8, 2015, 6:28 AM
Nice....
Madhuram SrivastavaPosted Oct 26, 2015, 10:03 PM
yes Isham Khan sir next part will come with details of tools and how to install that tools on which you can work for different platforms
Isham KhanPosted Oct 26, 2015, 3:37 PM
waiting...
Madhuram SrivastavaPosted Oct 26, 2015, 5:35 AM
thank you Isham Khan sir , next part wil come soon :)
Madhuram SrivastavaPosted Oct 26, 2015, 5:34 AM
thank you Sibeesh Venu sir :)
Madhuram SrivastavaPosted Oct 26, 2015, 5:34 AM
thank you Harshad Pansuriya sir
Isham KhanPosted Oct 26, 2015, 2:50 AM
nice.. wtng for next
Sibeesh VenuPosted Oct 26, 2015, 1:18 AM
Nice Share
Harshad PansuriyaPosted Oct 26, 2015, 12:33 AM
Nice one
Madhuram SrivastavaPosted Oct 25, 2015, 10:09 PM
thank you Nilesh Jadav sir :)
Nilesh JadavPosted Oct 25, 2015, 9:41 PM
Good Share sir !
Madhuram SrivastavaPosted Oct 25, 2015, 11:06 AM
thanx Santhakumar Munuswamy sir
Madhuram SrivastavaPosted Oct 25, 2015, 10:51 AM
thank you so much Mahesh Chand sir for guiding me , in next part i will surely tell about the tools and platforms and tell how to install them , thank you so much for appreciation sir.
Mahesh ChandPosted Oct 25, 2015, 10:39 AM
This is nice, Madhuram. I like your approach to beginners start from Day 1 and continue next and next. I am sure it will benefit developers who wants to get into or learn Android programming. I think in one area of your articles, like a note or something, you need to tell people what tools they need to install to get this working. Also what operating system they can use to build their Android apps. Keep up the good work!
Santhakumar MunuswamyPosted Oct 25, 2015, 10:37 AM
Good Article