

Introduction
In this article, I explain the Linear Layout in Android. In Linear Layout we can use two types of views, one is horizontal and the other is vertical. When we want a linear design or simple design, we use this type of Linear Layout otherwise a Relative Layout is usually used in Android view displays.
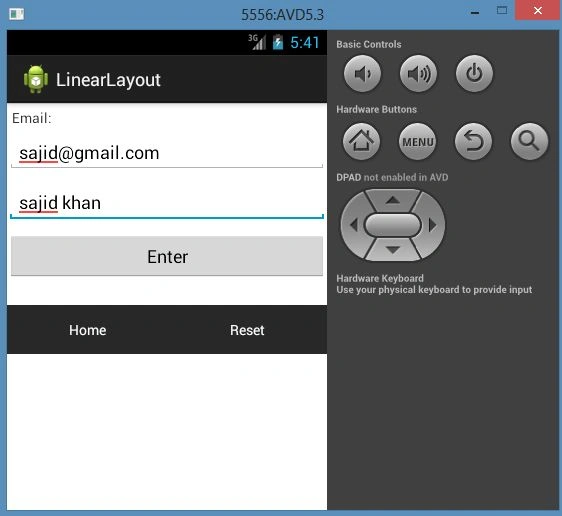
Here I will show you how to use a Linear Layout in Android. In this article I will take a Linear Layout and one inner Linear Layout as shown in the output below, the main layout will be a vertical layer and the inner one will be a horizontal layer.
Step 1
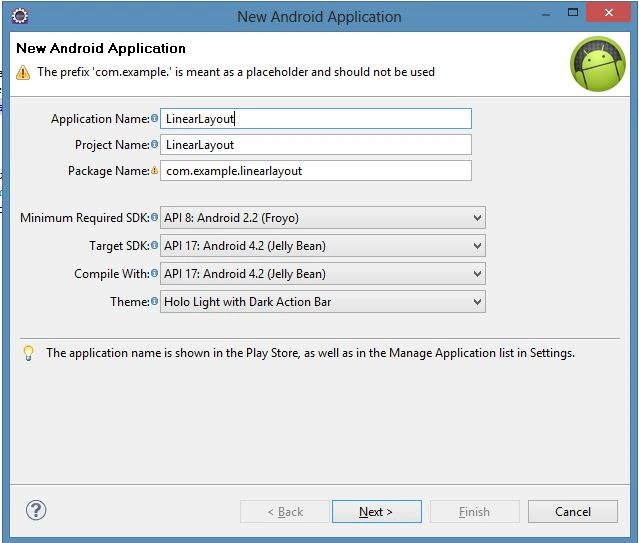
First of all, create a new Android application project as shown below.
Step 2
Now open the XML file as "res/layout/activity_main.xml" and update it with the following code. This XML code is only for the Linear Layout and the view inside it.
- <?xml version="1.0" encoding="utf-8"?>
- <!-- Parent linear layout with vertical orientation -->
- <LinearLayout
- xmlns:android="http://schemas.android.com/apk/res/android"
- android:orientation="vertical"
- android:layout_width="match_parent"
- android:layout_height="match_parent">
- <TextView
- android:id="@+id/textview1"
- android:layout_width="fill_parent" android:layout_height="wrap_content"
- android:text="Email:" android:padding="5dip"/>
- <EditText
- android:id="@+id/edittext1"
- android:layout_width="fill_parent"
- android:layout_height="wrap_content"
- android:layout_marginBottom="10dip"
- android:text="@string/email" />
- <EditText
- android:id="@+id/edittex2"
- android:layout_width="fill_parent"
- android:layout_height="wrap_content"
- android:layout_marginBottom="10dip" />
- <Button
- android:id="@+id/enter_btn"
- android:layout_width="fill_parent"
- android:layout_height="wrap_content"
- android:text="Enter" />
- <!-- Child linear layout with horizontal orientation -->
- <LinearLayout android:layout_width="fill_parent"
- android:layout_height="wrap_content"
- android:orientation="horizontal" android:background="#2a2a2a"
- android:layout_marginTop="25dip">
- <TextView
- android:id="@+id/home_btn"
- android:layout_width="fill_parent"
- android:layout_height="wrap_content"
- android:layout_weight="1"
- android:gravity="center"
- android:padding="15dip"
- android:text="Home"
- android:textColor="#ffffff" />
- <TextView
- android:id="@+id/reset_btn"
- android:layout_width="fill_parent"
- android:layout_height="wrap_content"
- android:layout_weight="1"
- android:gravity="center"
- android:padding="15dip"
- android:text="Reset"
- android:textColor="#ffffff" />
- </LinearLayout>
- <TextView
- android:id="@+id/result_txtview"
- android:layout_width="fill_parent"
- android:layout_height="match_parent"
- android:text=" " />
- </LinearLayout>
Step 3
Now Open the "MainAcivity.java" file and update it with your logic.
- package com.example.linearlayout;
- import android.R.string;
- import android.app.Activity;
- import android.app.backup.RestoreObserver;
- import android.os.Bundle;
- import android.view.Menu;
- import android.view.View;
- import android.view.View.OnClickListener;
- import android.widget.Button;
- import android.widget.TextView;
- public class MainActivity extends Activity {
- Button home_btn,entr_btn,rst_btn;
- TextView tv1,tv2,rslt_tv;
- String tv,s1,s2;
- @Override
- protected void onCreate(Bundle savedInstanceState) {
- super.onCreate(savedInstanceState);
- setContentView(R.layout.activity_main);
- tv1=(TextView) findViewById(R.id.edittext1);
- tv2=(TextView) findViewById(R.id.edittex2);
- entr_btn=(Button) findViewById(R.id.enter_btn);
- home_btn=(Button) findViewById(R.id.home_btn);
- rst_btn=(Button) findViewById(R.id.reset_btn);
- rslt_tv=(TextView) findViewById(R.id.result_txtview);
- entr_btn.setOnClickListener(new OnClickListener() {
- @Override
- public void onClick(View v) {
- // TODO Auto-generated method stub
- s1= tv1.getText().toString();
- s2=tv2.getText().toString();
- rslt_tv.setText(s1+s2);
- }
- });
- }
- @Override
- public boolean onCreateOptionsMenu(Menu menu) {
- // Inflate the menu; this adds items to the action bar if it is present.
- getMenuInflater().inflate(R.menu.activity_main, menu);
- return true;
- }
- }
Step 4
Open the "strings.xml" file and update it as given below.
- <?xml version="1.0" encoding="utf-8"?>
- <resources>
- <string name="app_name">LinearLayout</string>
- <string name="hello_world">Hello world!</string>
- <string name="menu_settings">Settings</string>
- <string name="email"></string>
- <string name="button"></string>
- </resources>
Step 5
Output
In the output you will see in the Outer Linear Layout I defined a vertical text view, two edit texts, one button and one inner Linear Layout with two horizontal buttons inside it.
Join the conversation! Your thoughts help the community grow.