

Introduction
In this post, I will be explaining the following.
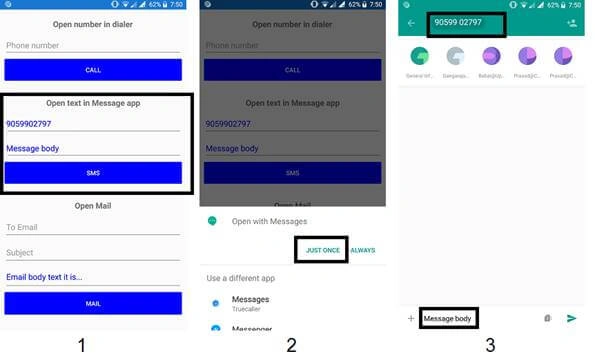
- How to open text through “Messages” application once we click the Message button.
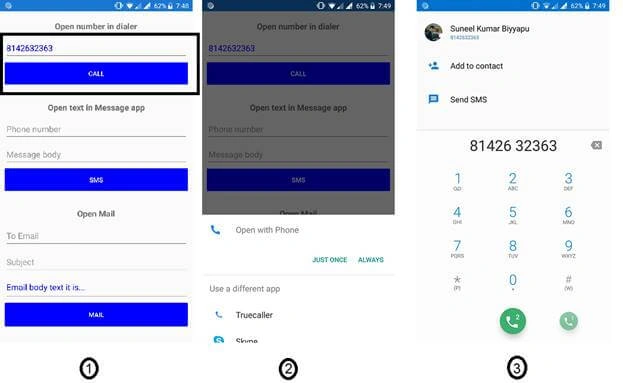
- How to open “dialer with phone number” once we tap/click on Dial button.
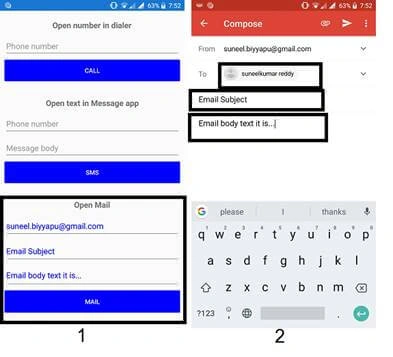
- How to open mail application with populated data once we provide all to mail(s), Email subject and Email body.
Prerequisites
- Windows or Mac machine.
- Based on the operating system, respective Visual Studio has to be installed in it.
- Require Android and iOS devices
How can we achieve this functionality?
We can achieve this functionality using Device.OpenUri() method.
Explanation
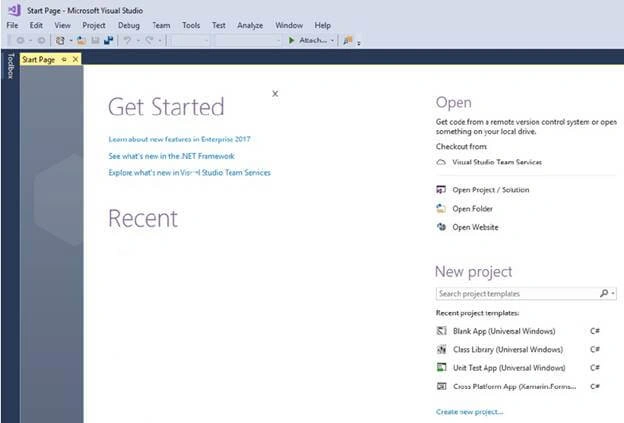
- In the Start screen, launch Visual Studio. This opens the start page of Visual Studio like below.
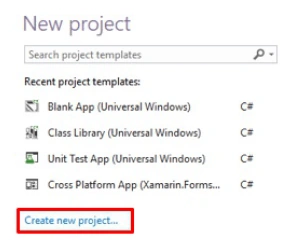
- In Visual Studio, click "Create new project…" to create a new project.
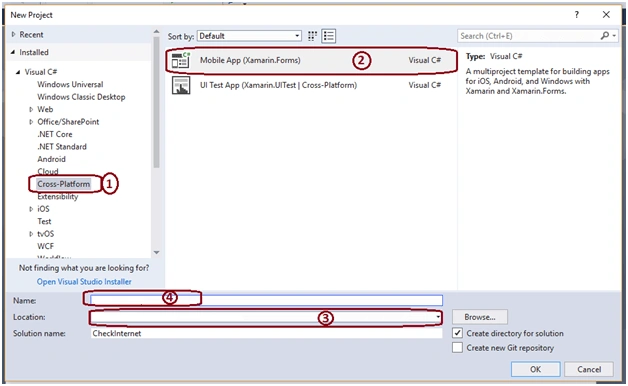
- In the New Project dialog, click Cross-Platform, select the Mobile App (Xamarin.Forms) template, set the Name and Solution name to PhoneDialerSample, choose a suitable location for the project, and click the OK button.
Now, the project has been created.
- In PCL/NET Standard project, open XAML and paste the following code inside content page.
- <ScrollView HorizontalOptions="FillAndExpand" VerticalOptions="FillAndExpand">
- <StackLayout Padding="0,20,0, 0">
- <Label Text="Open number in dialer"
- FontAttributes="Bold"
- FontSize="Medium"
- HorizontalOptions="Center" />
- <Grid Padding="10,5,10,30">
- <Grid.RowDefinitions>
- <RowDefinition Height="*" />
- <RowDefinition Height="*" />
- </Grid.RowDefinitions>
- <Grid.ColumnDefinitions>
- <ColumnDefinition Width="*" />
- </Grid.ColumnDefinitions>
- <Entry x:Name="entryPhoneNumber"
- Placeholder="Phone number"
- Keyboard="Numeric"
- TextColor="Blue"
- Grid.Row="0" Grid.Column="0"></Entry>
- <Button Text="Call"
- TextColor="White"
- BackgroundColor="Blue"
- HorizontalOptions="FillAndExpand"
- Clicked="ButtonCallClicked"
- Grid.Row="1" Grid.Column="0"></Button>
- </Grid>
- <Label Text="Open text in Message app"
- FontAttributes="Bold"
- FontSize="Medium"
- HorizontalOptions="Center" />
- <Grid Padding="10,5,10,30">
- <Grid.RowDefinitions>
- <RowDefinition Height="*" />
- <RowDefinition Height="*" />
- <RowDefinition Height="*" />
- </Grid.RowDefinitions>
- <Grid.ColumnDefinitions>
- <ColumnDefinition Width="*" />
- </Grid.ColumnDefinitions>
- <Entry x:Name="entryMessgeTo"
- Placeholder="Phone number"
- Keyboard="Numeric"
- TextColor="Blue"
- Grid.Row="0" Grid.Column="0"></Entry>
- <Entry x:Name="entryMessageText"
- Placeholder="Message body"
- TextColor="Blue"
- Grid.Row="1" Grid.Column="0"></Entry>
- <Button Text="SMS"
- TextColor="White"
- BackgroundColor="Blue"
- HorizontalOptions="FillAndExpand"
- Clicked="ButtonSMSClicked"
- Grid.Row="2" Grid.Column="0"></Button>
- </Grid>
- <Label Text="Open Mail"
- FontAttributes="Bold"
- FontSize="Medium"
- HorizontalOptions="Center" />
- <Grid Padding="10,5,10,30">
- <Grid.RowDefinitions>
- <RowDefinition Height="*" />
- <RowDefinition Height="*" />
- <RowDefinition Height="*" />
- <RowDefinition Height="*" />
- </Grid.RowDefinitions>
- <Grid.ColumnDefinitions>
- <ColumnDefinition Width="*" />
- </Grid.ColumnDefinitions>
- <Entry x:Name="entryEmail"
- Placeholder="To Email"
- Keyboard="Email"
- TextColor="Blue"
- Grid.Row="0" Grid.Column="0"></Entry>
- <Entry x:Name="entryEmailSubject"
- Placeholder="Subject"
- TextColor="Blue"
- Grid.Row="1" Grid.Column="0"></Entry>
- <Editor x:Name="editorEmailBody"
- HeightRequest="50"
- Text="Email body text it is..."
- TextColor="Blue"
- Grid.Row="2" Grid.Column="0"></Editor>
- <Button Text="Mail"
- TextColor="White"
- BackgroundColor="Blue"
- HorizontalOptions="FillAndExpand"
- Clicked="ButtonMailClicked"
- Grid.Row="3" Grid.Column="0"></Button>
- </Grid>
- </StackLayout>
- </ScrollView>
- Open xaml.cs and paste the below code in it.
- public partial class MainPage : ContentPage
- {
- public MainPage()
- {
- InitializeComponent();
- }
- private void ButtonCallClicked(object sender, EventArgs e)
- {
- string phoneNumber = entryPhoneNumber.Text;
- if (string.IsNullOrEmpty(phoneNumber))
- {
- return;
- }
- // Following line used to display given phone number in dialer
- Device.OpenUri(new Uri(String.Format("tel:{0}", phoneNumber)));
- }
- private void ButtonSMSClicked(object sender, EventArgs e)
- {
- string smsPhoneNumber = entryMessgeTo.Text;
- string smsText = entryMessageText.Text;
- if (string.IsNullOrEmpty(smsPhoneNumber))
- {
- return;
- }
- // Following line used to open Messages app and populate below given details
- if (Device.RuntimePlatform == Device.iOS)
- {
- Device.OpenUri(new Uri(String.Format("sms:{0}&body={1}", smsPhoneNumber, smsText)));
- }
- else if (Device.RuntimePlatform == Device.Android)
- {
- Device.OpenUri(new Uri(String.Format("sms:{0}?body={1}", smsPhoneNumber, smsText)));
- }
- }
- private void ButtonMailClicked(object sender, EventArgs e)
- {
- string toEmail = entryEmail.Text;
- string emailSubject = entryEmailSubject.Text;
- string emailBody = editorEmailBody.Text;
- if (string.IsNullOrEmpty(toEmail))
- {
- return;
- }
- Device.OpenUri(new Uri(String.Format("mailto:{0}?subject={1}&body={2}", toEmail, emailSubject, emailBody)));
- }
- }
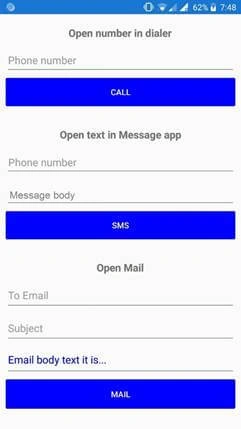
- Now, set either Android or iOS project as StartUp project and run the application. The output will be like below.
Call
SMS
Email
To view full source code, please click here.
Thanks for reading the article!!
Pratik ShirsePosted May 31, 2018, 8:54 AM
It's really knowledgeable article for beginners
Munish APosted May 30, 2018, 10:31 AM
Nice article keep sharing............