

Introduction
If it is true that we speak of other areas, and true that with Visual Studio, we can safely create interfaces and applications that interact with a machine tool and/or an automation system, we'll start with what are the tools needed to create a system which will interact with a Siemens PLC. We will continue creating a project with WPF technology. In the next article, we will create the project with TIAPORTAL V13 and will perform the sample application text.
Necessary tools
Below, we see what instruments and software we need to make what we described previously. Let's start with Microsoft.
- Microsoft Visual Studio 2015
- S7.NET library for communication with the Siemens PLC, available on NuGet.
Now, we come to the part of Siemens.
- Totally integrated Automation (TIA Portal V13), is nothing more or less than the development IDE of Siemens with which we should create all the PLC program. On the latter, you should talk a lot, that is, as should be used, what are the principles for good logic PLC, and how to learn the languages dedicated for development. We will give some advice necessary to the creation of the project, but the invitation for good learning to access the official website where there will be all the information available, necessary for learning.
- To best perform the sample project, the idea is to have as in my case a PLC, will make use of the CPU 1211C, the family of Siemens S7-1200 products.
- A power supply that provides a 24V DC voltage and outputs current of at least 2 Amperes.
- RJ45 network patch cable (uncrossed)
Link for Siemens products
I leave briefly the necessary link for Siemens products. From this link, you can download the trial version of TIAPORTAL V13, and for those who lack access to a PLC, can download the emulators of the CPU S7-1200 family. Install them so that you can run the emulation CPU without necessarily having a physical PLC at home. At the end to the page, you will find the files to download and install. Else, those who do not use a physical PLC should install NetToPlcSim. This to emulate a network connection between the PLC and the interface that we will create later.
Creating the project with Visual Studio
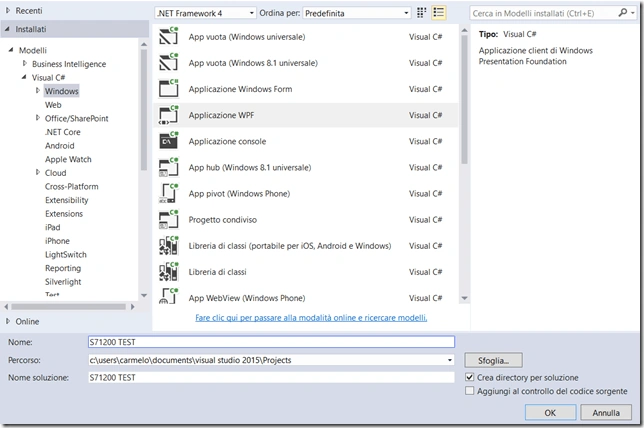
Got to this point, we just should create the sample project from Visual Studio. Once downloaded and installed Visual Studio, you are moving and we create a WPF project entitled S71200 TEST, as in the image.
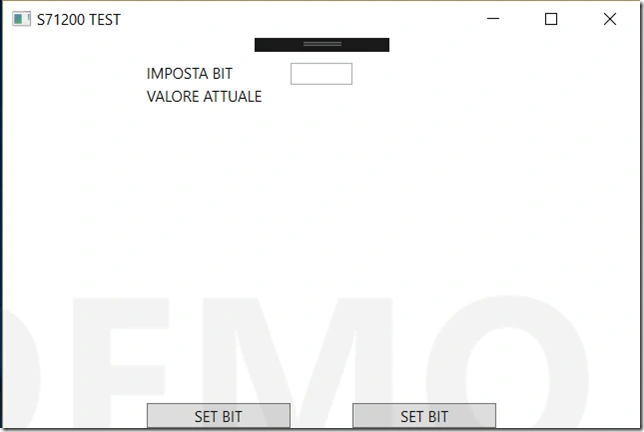
- <Window x:Class="S71200_TEST.MainWindow"
- xmlns="http://schemas.microsoft.com/winfx/2006/xaml/presentation"
- xmlns:x="http://schemas.microsoft.com/winfx/2006/xaml"
- xmlns:d="http://schemas.microsoft.com/expression/blend/2008"
- xmlns:mc="http://schemas.openxmlformats.org/markup-compatibility/2006"
- xmlns:local="clr-namespace:S71200_TEST"
- mc:Ignorable="d"
- Title="S71200 TEST" Height="350" Width="525">
- <Grid>
- <Grid.RowDefinitions>
- <RowDefinition Height="20"/>
- <RowDefinition Height="Auto"/>
- <RowDefinition Height="Auto"/>
- <RowDefinition Height="*"/>
- <RowDefinition Height="Auto"/>
- </Grid.RowDefinitions>
- <Grid.ColumnDefinitions>
- <ColumnDefinition Width="*"/>
- <ColumnDefinition Width="*"/>
- <ColumnDefinition Width="50"/>
- <ColumnDefinition Width="Auto"/>
- <ColumnDefinition Width="*"/>
- <ColumnDefinition Width="*"/>
- </Grid.ColumnDefinitions>
- <TextBlock Grid.Row="1" Grid.Column="1" x:Name="tbkTipoVariabile" Text="IMPOSTA BIT"/>
- <TextBox Grid.Row="1" Grid.Column="2" x:Name="tbxImpostaVariabile"/>
- <TextBlock Grid.Row="2" Grid.Column="1" x:Name="tbkValoreVariabile" Text="VALORE ATTUALE"/>
- <TextBlock Grid.Row="2" Grid.Column="2" x:Name="tbkValore"/>
- <Button Grid.Row="4" Grid.Column="1" x:Name="btnSetBit" Content="SET BIT" Click="btnSetBit_Click"/>
- <Button Grid.Row="4" Grid.Column="4" x:Name="btnRESetBit" Content="SET BIT" Click="btnRESetBit_Click"/>
- </Grid>
- </Window>

As mentioned, this is a simple example. As we move forward, it will enrich with all the functionality of the S7.NET library, to have at the end a functional project that we can then extend further in the future according to our needs.
Now, let's add, as told by NuGet, the reference to the library S7.NET. In exploring solutions, we are going to select References, right-click and select -
- Manage NuGet packages.

- / * NameSpace third party * / using S7.Net;
- Plc _S71200 = new Plc (CpuType.S71200, "192.168.0.25", 0, 1);
- CpuType, the family to which the PLC belongs. In our case, it is a series CPU S7-1200.
- We will see how to set the IP address of the CPU by using TIAPORTAL V13 Siemens software in the next article.
- The last parameter of the PLC station is located. Leave it to 1 for S7-1200.
Now that we have created the object of S7NET type, you must open the Ethernet connection to the PLC. The Open () method must be implemented here, as follows.
- _S71200.Open ();
These are the minimum code instructions to be able to communicate with the plc S7-1200 and to any other and that supported by the S7.NET library. Let us write code to set/reset the bit. We have defined two buttons in the interface, the first set to true and the other false reset to all, a TextBox where we will write the value to be set, a TextBlock that will display the bit status. Here is the complete C # code.
- using System.Windows;
- /*NameSpace di terze parti*/
- using S7.Net;
- namespace S71200_TEST
- {
- /// <summary>
- /// Logica di interazione per MainWindow.xaml
- /// </summary>
- public partial class MainWindow : Window
- {
- Plc _S71200 = new Plc(CpuType.S71200, "192.168.0.25", 0, 1);
- public MainWindow()
- {
- InitializeComponent();
- /*Apro la comunicazione con il plc*/
- _S71200.Open();
- }
- private void btnSetBit_Click(object sender, RoutedEventArgs e)
- {
- /*Se il plc è connesso*/
- if (_S71200.IsConnected)
- {
- /*Vado a leggere il valore del bit DBX0.0 sul blocco dati DB1*/
- bool uscita = (bool)_S71200.Read("DB1.DBX0.0");
- /*Se il valore del bit e false*/
- if (uscita.Equals(false))
- {
- /*Imposto a true il bit DBX0.0*/
- _S71200.Write("DB1.DBX0.0", true);
- /*Visualizzo lo stato attuale sull'interfaccia*/
- tbkValore.Text = uscita.ToString();
- }
- }
- }
- private void btnRESetBit_Click(object sender, RoutedEventArgs e)
- {
- /*Se il plc è connesso*/
- if (_S71200.IsConnected)
- {
- /*Vado a leggere il valore del bit DBX0.0 sul blocco dati DB1*/
- bool data1 = (bool)_S71200.Read("DB1.DBX0.0");
- /*Se il valore del bit e true*/
- if (data1.Equals(true))
- {
- /*Imposto a false il bit DBX0.0*/
- _S71200.Write("DB1.DBX0.0", false);
- /*Visualizzo lo stato attuale sull'interfaccia*/
- tbkValore.Text = data1.ToString();
- }
- }
- }
- }
- }
Nayana VVPosted Jun 9, 2020, 1:19 AM
Hi, Is there any way to handle the error when the Ethernet cable connecting PLC and the system in which this code run gets disconnected? and wait for the application to reconnect
Bubble BubPosted Oct 2, 2019, 3:14 AM
May I know how I read negative value from Siemens simatic s7-1500 to c# winforms? Currently the plc is set the value -90 but what i get in winforms is 65540. The way I read from PLC was (ushort)plc.Read(“DB1.DBW100”). Any idea what's wrong I make?
sandhyaPosted Sep 21, 2018, 5:01 AM
Im using B&R PLC and Visual studio 2017 (C# program) in my application. Im able to receive the variables from B&R automation studio program to visual studio program but Im not able to send a variables back to automation studio. Please help me to solve this problem...
AlejandroPosted Nov 27, 2017, 12:00 PM
Very useful article! is there a next part of the article?
Manav PandyaPosted Dec 30, 2016, 4:43 AM
Thanks for sharing , likely to know kind of stuff