

Introduction
In various scenarios, we need to migrate data from on-premises SharePoint to SharePoint Online. ShareGate is a popular third-party migration tool designed to simplify and streamline this process. This article explains how to use ShareGate to efficiently migrate data from on-premises SharePoint 2019 to SharePoint Online, outlining the prerequisites, steps, and best practices.
Overview of ShareGate Migration Tool
ShareGate is a user-friendly migration and management tool with an intuitive user interface. It has the following features.
- Bulk migration of sites, lists, libraries, and content.
- Migration of metadata, permissions, workflows, and versions.
- Pre-migration analysis to identify potential issues.
- Reporting and monitoring during migration.
- Support for incremental migrations to minimize downtime.
Pre-requisites
Below pre-requisites are required before implementation.
- Preparation and Planning
- Identify the sites, lists, libraries, and content that require migration.
- Data cleanup: Remove obsolete or redundant content to minimize migration volume.
- Map Permissions and Users: Ensure user accounts in SharePoint Online match those of SharePoint on-premise.
- Install and Configure ShareGate
- Pre-Migration Analysis
- Use ShareGate’s Migration Assessment tool to analyze the source environment.
- This tool reports issues such as unsupported customizations, broken permissions, or incompatible workflows.
- Select Content to Migrate: Choose the sites, lists, libraries, or individual files you want to migrate.
- Configure Migration Options
- Preserve metadata (author, created date, modified date).
- Migrate permissions and user groups.
- Copy the version history if needed.
- Schedule the migration for off-peak hours to minimize disruption. Performing migration during business hours may slow down your site.
Implementation
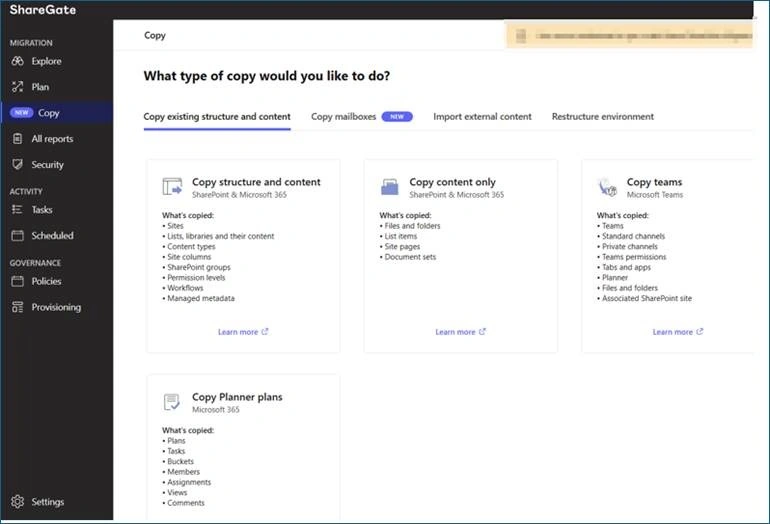
Step 1. Select "Copy" from the left-side menu, which presents multiple options, as shown in the image below. You can copy the structure and content, copy only the content, copy Teams, and also copy planner plans.
Step 2. Select the Source site from the next screen and the Authentication method. This source site should be on SharePoint on-premises 2019.
- Authentication: ShareGate provides mainly three types of Authentication in the drop-down, i.e.
- A current Windows user refers to the user with whom you are currently logged in on the server or machine where ShareGate is installed.
- Other user means you can provide the username and password of another user who should have access to the SharePoint site.
- Browser means you can enter the credentials in a browser window.

Step 3. Once authenticated successfully, you will be directed to the Source selection screen, where you can select the source List or Library that needs to be migrated from the source SharePoint on-premise site.

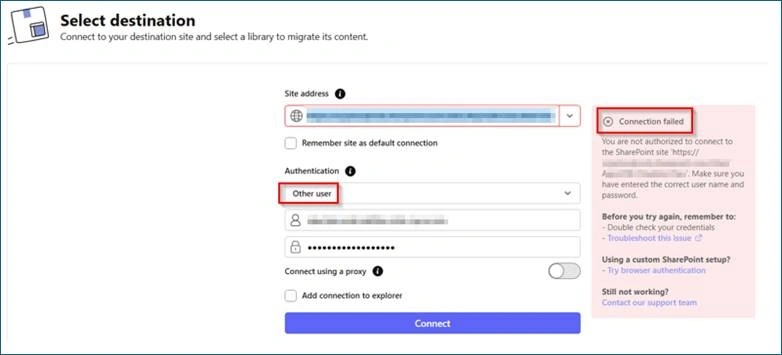
Step 4. Connect to the Destination SharePoint Online site by providing the Site URL and required credentials for Authentication.

Note. If you encounter permission issues with other User Authentication types (as shown below), try using browser-type authentication instead.
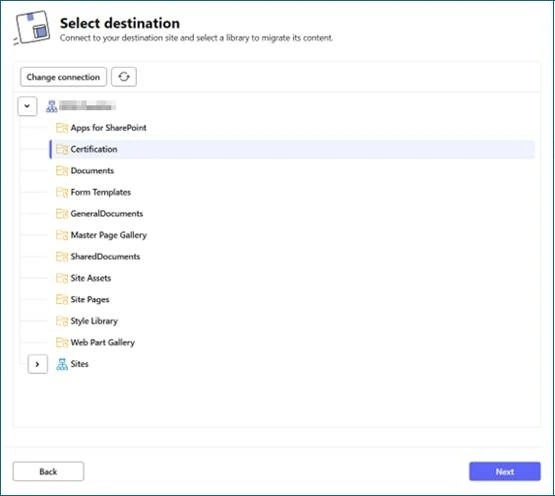
Step 5. If you are authenticated successfully, you will be redirected to a screen where you can select the destination SharePoint List or Library. In this data migration example (in my scenario), the data schema was already created, and I was tasked with migrating only the data/content. However, through ShareGate, you can also make the structure.
Step 6. Once both the source and destination are connected and the data source and destination are selected, you can start the Copy Content functionality as shown below. You can either select one item or record at a time to migrate, or you can choose all items together from the source.
Step 7. You should configure Mappings before starting the migration.

Once the data is migrated successfully or if any errors occur, ShareGate will display the corresponding messages on the next screen, and the data migration will be completed.
Best Practices
Successful data migration requires more than just following steps; however, strategy and foresight also play a key role.
- Plan and Communicate
- Develop a detailed migration plan that includes timelines, resource allocation, and risk mitigation strategies.
- Communicate and inform stakeholders and end-users regularly about the migration progress and expected changes.
- Perform Pilot Migrations: Test with a small set of sites or content before migrating to a full scale.
- Maintain Permissions and Metadata
- Ensure that user and group mappings are accurate to avoid access issues after migration.
- Preserve metadata and version history where possible to maintain data integrity.
- Leverage Incremental Migrations
- Clean Up Before Migration: Remove outdated or irrelevant data to reduce migration time and improve post-migration performance.
- Documentation: Add your Lessons Learned for future references.
Conclusion
Migrating data or content from SharePoint on-premises to SharePoint Online using ShareGate is a practical and efficient approach. In this article, I explain how to migrate data using the ShareGate tool.
References
Join the conversation! Your thoughts help the community grow.