

INTRODUCTION
In any MVC based application , a Model component typically is one of the most important components as it implements the core business logic and the data access functionality. They resemble real-life entities and business processes. The model component needs to be totally independent of the View component as in this manner the same core application code can be reused with different types of view such as web based interface, standalone interface, or with mobile device interface and so on.
Model components also provide interfaces to database or back-end systems. The Model components should be independent of the type of client accessing the business objects.
View component on the other hand provides an interface to your application. The View component represents a display of the model in a user interface. There can be different views of the same model.
MODEL COMPONENTS
The model component has three types of classes or sub-layers
- External Interface
- Business Logic
- Data Access
External Interface
Classes at this layer will be responsible for providing interface to the external code. It is through these interfaces that the external code will interact with the Model. The data values arriving from View components need to be converted to objects , which are suitable to the business logic. These are part of External Interface and are known as value Objects. For example , in the given source code below, the ProductSearch application the class Product will be a Value Object.
- public class Product {
- private String name;
- private float price;
- public Book(String name, float price) {
- this.name = name;
- this.price = price;
- }
- public void setName(String name) {}
- public String getName() {}
- public void setPrice(float price) {}
- public float getPrice() {}
- }
This code defines a Product class with two attributes, name and price. It implements a getter and setter method for each of the attributes.
Business Logic
The classes that implement business logic facilitates communication between External Interface classes and the Data Access classes. They implement the actual business requirement . For example in ProductSearch application, the functionality such as SearchProductbyName() or SearchProductbyPrice() will be implemented as Business Logic.
Data Access
The classes will generally implement functions related to data such as loading , storing, accessing or modifying the data in a format required by the data store. For example in ProductSearch application, data access classes will actually build the query for getting the required product from the database.
VIEW COMPONENT
The advantage of separating Model and View layer is that no business logic is embedded in this component, it allows the applications’ interface to change without affecting any kind of Model component code.
Technology used for implementing Struts view component can be HTML/JSP or XML or Swing and so on.
ActionForm
Struts ActionForm class is an abstract class. A subclass of this class is created to capture the application specific form data as well as to display the required data on the presentation page. Such a sub class is also known as FormBean as it is a basic Java bean with getter and setter method for every property allowing setting and retrieving the data. These classes do not contain the code for business logic and data access. The reset() and validate() methods are the only methods present in these classes. The validate() method is invoked only if the Form Bean has been configured for validation in the configuration file.
In Struts based applications a Form Bean has a well-defined life cycle. Form Bean act as a pipe for transferring data between the Model and View layer of Struts Application. Figure 1 below depicts the life cycle of typical struts Form Bean.
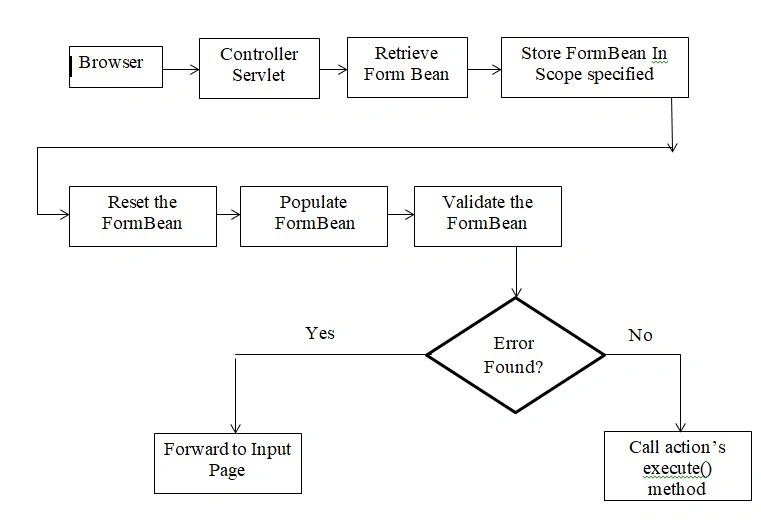
Fig 1: Form Bean Life Cycle
- As a request is received from a browser by the controller servlet, it is mapped to an Action class, which has been programmed to process that request.
- Associated with the Action class is a Form Bean. Struts searches for this Form Bean in request scope or in session scope. If an instance of such a Form Bean is not found then it is created and placed in the specified scope.
- Next, the Form Bean invokes the reset() method. This method performs the required processing before the Form Bean is populated with the Form data.
- Then, Struts populates the Form Bean using data from the input request
- Next, the Form Bean’s validate () method is invoked . The validate() method performs validations on the form data.
- If validate() method reports any error then the message is forwarded to the input page else execute() method on corresponding action object is executed.
STRUTS TAG LIBRARY
This library is a collection of tags that provide a way to interact with the web application objects in a JSP.
Advantages of Bean tags
- They are useful in defining new beans in any desired scope from a variety of possible sources.
- They are useful in rendering a particular bean or bean property to the output response.
- They support convenient mechanisms to create new beans. These beans are created based on the values of request cookies, headers and parameters are also furnished.
Attribute of Bean Tags
The common attributes that can be applied to all the Bean tags are,
- id which defines a bean.
- name which refers to an existing bean.
- property which defines a property from a bean.
- scope which defines the scope to search for the bean. If scope is not specified then the bean is searched for in the order page, request , session and application scope.
Struts Logic Tag Library
This library provides a set of tags for implementing simple conditional logic in a JSP. The advantages of Logic tags are:
- It provides presentation logic tags that eliminates the necessity for scriptlets.
- Useful for managing conditional generation of output text , also managing flow of application and looping over object collections for repetitive generation of output text.
Struts HTML Tag Library
The struts HTML tag library provides custom tags that are useful for generating HTML controls.
Cancel Tag
The tag generates an HTML <input type=”submit”> tag, that when executed triggers a cancel feature. This tag is always embedded within the <form> tag. This tag will not invoke the Form Bean’s validate() method if the incoming request consists of a request parameter named CANCEL.
Some of the attributes of this tag are,
- property : attribute which specifies the name associated with this control.
- value : attribute specifies the name with which the control will be populated.
- Onclick attribute specifies the javascript event handler when the button is clicked.
Code below the use of this tag
- <html : form action=”/login”>
- <html:cancel property=”cancelButton” value=”CANCEL”/>
- </html:form>
This code uses cancel tag to create a button component title “CANCEL” and is identified as “cancelButton”
The checkbox Tag
It generates an HTML <input type=”checkbox”> tag. It is always embedded within the <form>tag. The form field associated with this tag should be of Boolean or Boolean type. The reset() method should have statement to reset the field to false.
Some of the attribute of this tag are,
- property attribute which specifies the name associated with this control.
- value : attribute which specifies the constant value that will be populated in control.
- Ondblclick : attribute which specifies the JavaScript event handler when the control receives a mouse double click.
- <html:form action=”/login”>
- Register to avail greater benefits
- <html:checkbox property=”register”/><br>
- <html:submit>
- </html:form>
The code uses a checkbox tag that will search for the FormBean named “/login” which is defined in the action attribute of the form tag. It then calls the getter method of this bean’s property named as ‘register” which is specified with the property attribute of checkbox tag. The checkbox control is then populated with the data available from the Form Bean property values.
The errors Tag
The tag displays the error messages that are stored as an ActionError object defined in the org.apache.struts.action package. It can also format and display the error message along with header , footer, prefix and suffix. Header is the output String that will be displayed before the list of error messages. Footer is the output String that will be displayed after the list of error messages. Prefix is the output String displayed before each error message and suffix is output String displayed after each error message.
Some of the attributes of this tag are:
- property: attribute which specifies the field for which the error messages are to be displayed.
- locale : attribute which specifies an instance of Locale used for searching error keys.
- <html:errors property=”employeeID”/>
The code uses errors tag to display errors that are limited to the property named “employedID”. If the property attribute is not defined then it will show all the errors declared in the ActionError object.
The file tag
The tag generates an HTML <input type=”file”> tag. This tag must be always embedded within <form> tag and the action attribute must be defined for the <form> tag. The <form> tag must specify the HTTP method as POST and its encoding type set to “multipart/form-data”.
The following code demonstrate the use of this tag
- <html:form method=”post” action=”/sendFile”>
- Send File Here :<html:file property=”sendFile”><br>
- <html:submit>
- </html:form>
This code uses the html tag within the form tag with method set to “post” and action attribute set to “sendFile”. The property attribute of the file tag specifies the field for which the HTML tag’s name attribute is set.
The frame Tag
This tag generates an HTML <frame> tag. The URL for frame can be specified by four ways such as using action attribute, using forward attribute, using href attribute or using page attribute . The action attribute is used to specify the name of an Action from config file whose URL will be used. The forward attribute is used to specify the name of a global ActionForward that contains the URL which will be used. The href attribute is used to specify an absolute URL where as page attribute is used to specify an application-specific URL.
The following code demonstrate the use of this tag.
- <html:frame href=http://www.ashishb.com/>
- Or
- <html:frame page=”/login.jsp” />
The first line of code uses href attribute to specify the absolute URL as http://www.ashishb.com/ whereas , the second line of code uses page attribute to specify the URL that is specific to application in concern.
The hidden Tag
It generates an HTML <input type=”hidden” > tag . This tag is always embedded within the form tag. Some attributes of this tag are below:
- property : attribute which specifies the value of name attribute.
- value: attribute specifies the data with which the control will be populated .
- write: attribute is of type Boolean which when true indicates that the value populated in this control will be written out of the page scope to make it visible.
The following code demonstrate the use of this tag,
- <html:form action=”/findProduct”>
- <html:hidden property=”lastProductId”/>
- <html:submit>
- </html:form>
The above code uses hidden tag within form tag. The action attribute with form tag indicates the Form Bean named “findProduct” whose getter method will be called for the “lastProductId” as specified with property attribute of hidden tag. Then , this field’s value will populate the HTML control with the contents with the contents of lastProductId.
The html Tag
This tag generates an <html> tag that has the user’s locale defined with the language attribute . Some of the attribute of this tag are:
- locale: which is of type Boolean which when true indicates the user’s Locale object available from language attribute in the HTTP request will be used in the current session.
- xhtml: which is of type boolean which when true indicates that the tags will give output in XHTML instead of HTML.
The following code demonstrate the use of this tag
- <html:html locale=”true” xhtml=”true” />
This code uses html tag with its attribute locale and xhtml set to true.
The javascript Tag
This tag generates a JavaScript code that is used by the validation framework to validate the client-side data.
Some attributes for this tag are,
- formName : specifies the logical name of the Form Bean that will be used for validating data.
- src: specifies the URL to a static JavaScript code to be included.
- staticJavascript : is a Boolean in nature and is set to false whenever static Javascript will not be generated.
- dynamicjavaScript : is a Boolean in nature and is set to false when dynamic JavaScript code will not be generated.
The following code demonstrate the use of this tag
- <html:javascript formName=”login” staticJavaScript=”false” src=”staticLogin.jsp”/>
This code uses the javascript tag specifying that the Form Bean name “login” will be used for validation. The javascript code is separated into two pieces, static and dynamic.
The static javascript attribute is set to false indicating that only dynamic piece of Javascript will be used given by src attribute.
The link Tag
The tag generates an HTML anchor tag . The URL for link can be specified by four ways such as using action attribute , using forward attribute , using href attribute or using page attribute. The action attribute is used to specify the name of an Action form config file whose URL will be used. The forward attribute is used to specify the name of a forward whose URL will be used. The href attribute is used to specify an absolute URL whereas page attribute is used to specify an application specific URL.
The following code demonstrate the use of this tag,
- <html:link href=”http://www.ashishb.com/ “ paramId=”query” paramName=”queryObject”/>
The code uses link tag with href attribute set to “http://www.ashishb.com/”. The paramId and paramName attribute are used to query the string to be appended to the absolute URL.
The option Tag
The tag generates an HTML <option> tag. This must always be embedded within the select tag. The control will be selected if its value matches with the property of Form Bean specified with the select tag.
Some of the attribute of this tag are,
- value : which specifies the constant data with which the control will be populated.
- disabled : which is Boolean in type and is set to true when the control is to be disabled for operation.
The following code demonstrate the use of this tag,
- <html:select property =”status”>
- <html:option value=”married”> Married</html:option>
- <html:option value=”unmarried”> Unmarried</html:option>
- </html:select>
The code uses option tag within the select tag. The property attribute specifies that the value of field “status” of Form Bean is to be used for matching with the values of option. Only the option control for which the property value is matched will be marked selected at the time of generation.
The rewrite Tag
This tag generates a URL. As opposed to link tag it does not create anchor tag for the URL. It can be used for creating constant strings. The URL can be specified by four ways such as using action attribute, or forward attribute or href attribute or page attribute.
The following code demonstrate the use of this tag
- <html:rewrite page=”/login.jsp” name=”args”/>
This code uses page attribute to generate a URL that is specific to application. The name attribute specifies the instances of Map whose entries will be added as query string parameters to this URL.
The text Tag
The tag generates an HTML <input type=”text”> tag . It must always be embedded within the form tag. Some of the attributes of this are:
- property : specifies the value that will be set to the name attribute of control.
- maxlength : specifies the maximum number of characters that this control will accept.
The following code demonstrate the use of this tag.
- <html:form action=”/searchProduct”>
- Search Product: <html:text property=”product Id” maxlength=”4” /><br>
- <html:submit>
- </html:form>
This code uses text element to create a textbox where user can enter the ProductId. The property attribute indicates that the property field named “productID” of Form Bean specified with form tag will be used for searching. The maxlength attribute indicates that the length of “productId” can not exceed 4 characters.
Summary
A Model component implements the core business logic and the data access functionality. Separation of Model and View Components allows the application’s interface to change without affecting any of the Model component code. Struts ActionForm class is an abstract class which is subclassed to capture the application specific form data as well as to display the required data on the presentation page. Struts tags libraries help in creating interactive form-based application using server pages.
Join the conversation! Your thoughts help the community grow.