

Introduction
In this article we will show an animation of a moving ball in a Windows Phone application through the ApplicationBar code buttons start and stop. In this animation we will add a storyboard_Completed event that will move the ellipse and also check for collisions against the layoutroots dimensions. When a collision happens the direction will be reversed. The way that the start and stop buttons work are, when the user clicks the start button the IsBouncing property of the control is true and the ball begins to move in the phone screen and simply when the stop button is clicked the Isbouncing property is set to false and the ball will be stop. To move the ball in the phone's screen we will create a method startMove() in code behind; the speed and direction of the ball will be set randomly.
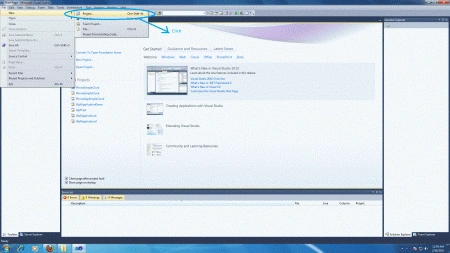
Step 1 : Open Visual Studio.- Select new -> project
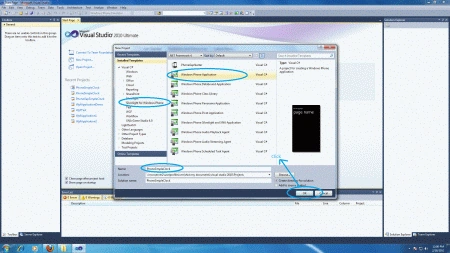
- Select your preferred language
- Select Silverlight for Windows Phone application
- Name the project
- Now name of project is "MovingBallApplication"
Step 2: Now make some modification on MainPage.xaml page.
- Modify the ContentGrid, change it to a canvas and add an ellipse
- Uncomment the sample app bar code and change it to the following, to add a click event and button images
- Add a UserControl.Resources for Storyboard control
Step 3 : The whole code of the MainPage.xaml page is:
Code
<phone:PhoneApplicationPage
x:Class="MovingBallApplication.MainPage"
xmlns="http://schemas.microsoft.com/winfx/2006/xaml/presentation"
xmlns:x="http://schemas.microsoft.com/winfx/2006/xaml"
xmlns:phone="clr-namespace:Microsoft.Phone.Controls;assembly=Microsoft.Phone"
xmlns:shell="clr-namespace:Microsoft.Phone.Shell;assembly=Microsoft.Phone"
xmlns:d="http://schemas.microsoft.com/expression/blend/2008"
xmlns:mc="http://schemas.openxmlformats.org/markup-compatibility/2006"
FontFamily="{StaticResource PhoneFontFamilyNormal}"
FontSize="{StaticResource PhoneFontSizeNormal}"
Foreground="{StaticResource PhoneForegroundBrush}"
SupportedOrientations="Portrait" Orientation="Portrait"
mc:Ignorable="d" d:DesignWidth="480" d:DesignHeight="696"
shell:SystemTray.IsVisible="True">
<UserControl.Resources>
<!-- Game loop -->
<Storyboard x:Name="ellipseStoryboard" Completed="ellipseStoryboard_Completed">
</Storyboard>
</UserControl.Resources>
<!--LayoutRoot contains the root grid where all other page content is placed-->
<Grid x:Name="LayoutRoot" Background="Transparent">
<Grid.RowDefinitions>
<RowDefinition Height="Auto"/>
<RowDefinition Height="*"/>
</Grid.RowDefinitions>
<!--TitlePanel contains the name of the application and page title-->
<StackPanel x:Name="TitlePanel" Grid.Row="0" Margin="24,24,0,12">
<TextBlock x:Name="ApplicationTitle" Text="Animation" Style="{StaticResource PhoneTextNormalStyle}"/>
<TextBlock x:Name="PageTitle" Text="Moving Ball" Margin="-3,-8,0,0" Style="{StaticResource PhoneTextTitle1Style}"/>
</StackPanel>
<!--ContentPanel - place additional content here-->
<Canvas x:Name="ContentCanvas" Grid.Row="1">
<Ellipse Canvas.Left="350" Canvas.Top="150" Width="100" Height="100" Name="ellipseObject" Canvas.ZIndex="1" >
<Ellipse.Fill>
<LinearGradientBrush StartPoint='0.1,0.06' EndPoint='0.5,0.6'>
<GradientStop Color='#FFFFFFFF' Offset='0'/>
<GradientStop Color="#FFBF1BB2" Offset='1'/>
</LinearGradientBrush>
</Ellipse.Fill>
</Ellipse>
<Canvas.Background>
<LinearGradientBrush EndPoint="1,0.5" StartPoint="0,0.5">
<GradientStop Color="Black" Offset="0" />
<GradientStop Color="White" Offset="1" />
</LinearGradientBrush>
</Canvas.Background>
</Canvas>
</Grid>
<phone:PhoneApplicationPage.ApplicationBar>
<shell:ApplicationBar IsVisible="True" IsMenuEnabled="True">
<shell:ApplicationBarIconButton x:Name="appbar_button1" IconUri="/Images/start-button.png" Text="Start a new bounce" Click="appbar_button1_Click" ></shell:ApplicationBarIconButton>
<shell:ApplicationBarIconButton x:Name="appbar_button2" IconUri="/Images/inward_black_stop.png" Text="Stop bounce" Click="appbar_button2_Click" ></shell:ApplicationBarIconButton>
</shell:ApplicationBar>
</phone:PhoneApplicationPage.ApplicationBar>
</phone:PhoneApplicationPage>
- The application looks like this at design time:
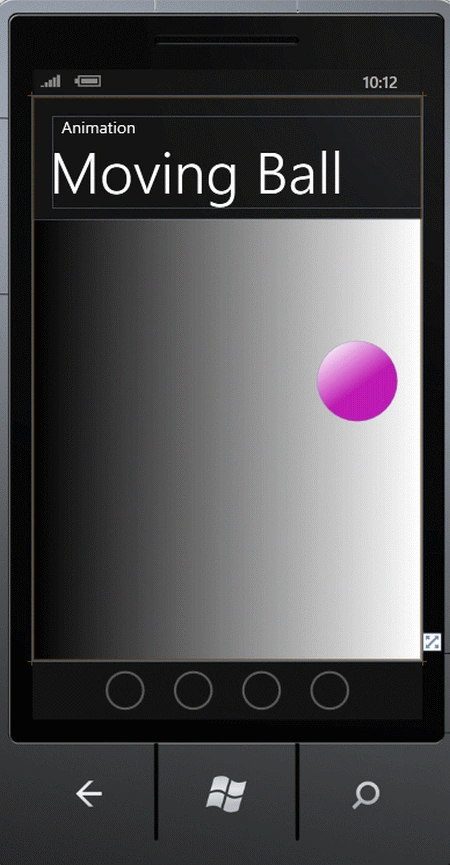
Step 4 : Now we will do the code behind file MainPage.xaml.
-
create a method to start the motion of ball "startMoving()"
-
put the code of click event of buttons "start" and "stop"
Step 5 : The final source code of the MainPage.xaml.cs file is:
Code
using System;
using System.Collections.Generic;
using System.Linq;
using System.Net;
using System.Windows;
using System.Windows.Controls;
using System.Windows.Documents;
using System.Windows.Input;
using System.Windows.Media;
using System.Windows.Media.Animation;
using System.Windows.Shapes;
using Microsoft.Phone.Controls;
using Microsoft.Phone.Shell;
namespace MovingBallApplication
{
public partial class MainPage : PhoneApplicationPage
{
#region Instance members and Constructors
private int xVelocity = 5;
private int yVelocity = 5;
private bool isBouncing = false;
// Constructor
public MainPage()
{
InitializeComponent();
}
private void startMoving()
{
//Make speed, direction random
Random r = new Random();
xVelocity = r.Next(3, 10);
yVelocity = r.Next(3, 10);
int coin = r.Next(100);
if (coin > 50)
{
xVelocity *= -1;
}
coin = r.Next(100);
if (coin > 50)
{
yVelocity *= -1;
}
ellipseStoryboard.Begin();
isBouncing = true;
}
private void appbar_button1_Click(object sender, EventArgs e)
{
startMoving();
}
private void appbar_button2_Click(object sender, EventArgs e)
{
ellipseStoryboard.Stop();
isBouncing = false;
}
}
}
Step 6 : Press F5 to run the application.
Output
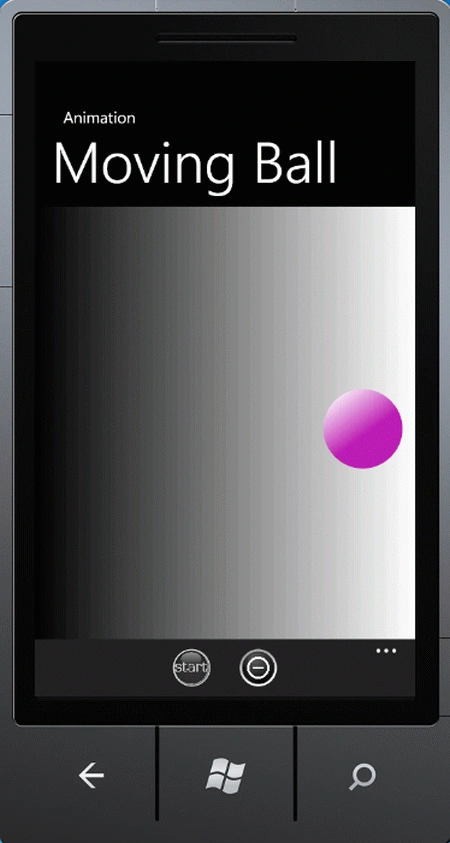
- Click the start button to moving the ball on phone screen
- Stop the motion of the ball by clicking the stop button
Resources
Animations in Silverlight for Windows Phone 7
Simple Animation in Windows Phone 7
Creating a Bouncing Ball in Windows 8 Metro Style Applications
Magic Eight Ball on the Windows Phone 7
SheikAbdullah LatheepPosted May 22, 2012, 8:18 AM
This code is not working for me.. pls share the original source code