


Introduction
In this article, we will learn how to create Multi-Item Selection Picker Control in Xamarin.Forms. To achieve this, I have created a common control that will open the selection on clicking the control like the picker control. Without making any further delay, we will see the steps one by one to implement the multi-item selection control.
Multi-Item Selection Picker
Basically, I am creating a new custom control inherited with Entry control, which will focus on the picker. The Multi-Item Selection Picker listing is nothing but a content page with list view control that has the check box template. Also, I have used await able content page which will return the data when the page closes.
Now we will move to the coding part of this article.
Coding Part Steps
Here, I will explain the steps to create a Multi-Item Selection Picker in Xamarin.Forms.
- Creating new Xamarin.Forms Projects.
- Creating a custom control view in Xamarin.Forms.NetStandard Project
- Creating the Custom Checkbox listing page.
- Implementation of Multi-Item Selection Picker & Its Demo.
Creating new Xamarin.Forms Projects
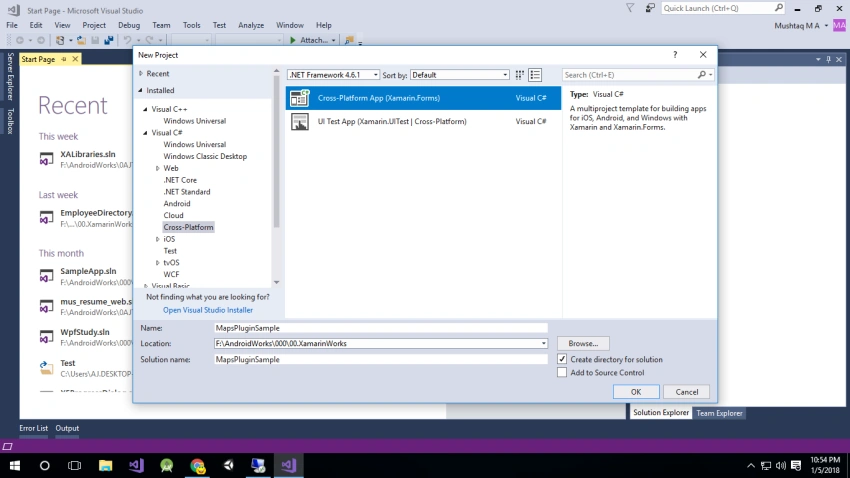
Create New Project by Selecting New - Project - Select Xamarin Cross-Platform App and Click OK.
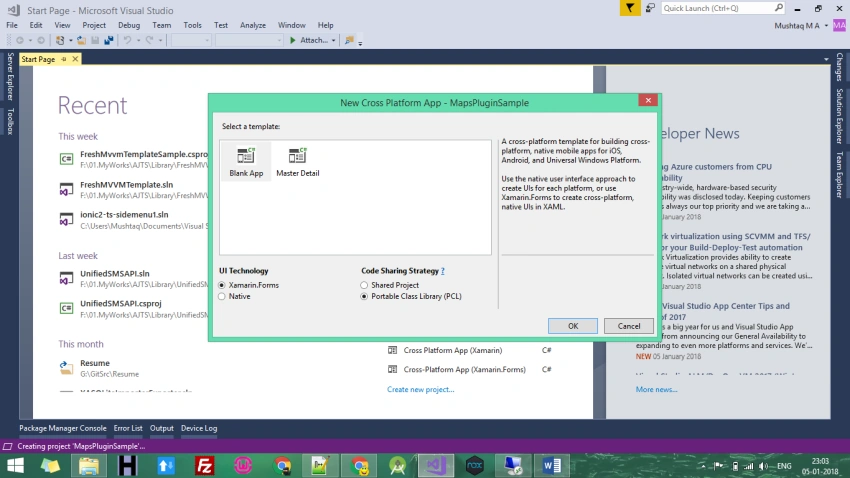
Then Select Android and iOS Platforms as shown below with Code Sharing Strategy as PCL or .Net Standard and Click OK.
Creating a custom control view in Xamarin.Forms.NetStandard Project,
- Create a class named “MultiSelectionPicker” and inherit with “Entry” to have the basic properties like Placeholder, Focused & Unfocused event.
- Then we will create the required bindable properties. First, we will see, what are all the properties & events required for dropdown.
public class MultiSelectionPicker: Entry { //... }- ItemsSource – To assign the list of data to be populated in the picker.
- SelectedIndices – To identify the index of selected values from the ItemsSource.
- Title – To set the title for the control page
- Create a bindable property for the ItemsSource as shown below,
public static readonly BindableProperty ItemsSourceProperty = BindableProperty.Create("ItemsSource", typeof(List<string>), typeof(MultiSelectionPicker), null, BindingMode.TwoWay); public List<string> ItemsSource { get { return (List<string>)GetValue(ItemsSourceProperty); } set { SetValue(ItemsSourceProperty, value); } } - Create a bindable property for the Selected Indices as shown below,
public static readonly BindableProperty SelectedIndicesProperty = BindableProperty.Create("SelectedItems", typeof(List<int>), typeof(MultiSelectionPicker), null, BindingMode.TwoWay, propertyChanged: SelectedIndexChanged); public List<int> SelectedIndices { get { return (List<int>)GetValue(SelectedIndicesProperty); } set { SetValue(SelectedIndicesProperty, value); } } - Create a bindable property for the Title as shown below,
public static readonly BindableProperty TitleProperty = BindableProperty.Create("Title", typeof(string), typeof(MultiSelectionPicker), null);
public string Title
{
    get { return (string)GetValue(TitleProperty); }
    set { SetValue(TitleProperty, value); }
}
Creating the Custom Checkbox listing page.
In this step, we will see how to design the picker and available page to return results when the screen is closed by the user.
Create await able content page by using the following code block which is the base page for the checkbox listing page.
public class BasePage<T> : ContentPage
{
    public event Action<T> PageDisappearing;
    protected T _navigationResut;

    public BasePage()
    {

    }

    protected override void OnDisappearing()
    {
        PageDisappearing?.Invoke(_navigationResut);
        if (PageDisappearing != null)
        {
            foreach (var @delegate in PageDisappearing.GetInvocationList())
            {
                PageDisappearing -= @delegate as Action<T>;
            }
        }
        base.OnDisappearing();
    }
}
Here, T is nothing but the template which will be any data type like string, bool and so.
Create a XAML file named as CheckboxPage.xaml. Set step 1 created page as a base page.
Then paste the following code XAML and xaml.cs file where the data type is a string. Refer to the below codes for the screen design and property assignments.
<?xml version="1.0" encoding="utf-8" ?>
<pages:BasePage xmlns="http://xamarin.com/schemas/2014/forms"
                xmlns:x="http://schemas.microsoft.com/winfx/2009/xaml"
                xmlns:pages="clr-namespace:Xamarin.Forms"
                x:Class="Xamarin.Forms.CheckboxPage"
                x:TypeArguments="x:String">
    <ContentPage.Content>
        <StackLayout Padding="5">
            <ListView x:Name="listView"
                      ItemTapped="listView_ItemTapped"
                      SeparatorVisibility="None"
                      VerticalScrollBarVisibility="Never"
                      HorizontalScrollBarVisibility="Never">
                <ListView.ItemTemplate>
                    <DataTemplate>
                        <ViewCell>
                            <StackLayout Orientation="Horizontal" HorizontalOptions="FillAndExpand">
                                <Label Text="{Binding Text}" VerticalOptions="Center" HorizontalOptions="StartAndExpand"/>
                                <CheckBox IsChecked="{Binding IsChecked}" HorizontalOptions="EndAndExpand" Color="Black"/>
                            </StackLayout>
                        </ViewCell>
                    </DataTemplate>
                </ListView.ItemTemplate>
            </ListView>
            <StackLayout HorizontalOptions="End"
                         Orientation="Horizontal">
                <Button Text="Cancel" Clicked="Cancel_Clicked" HorizontalOptions="Center" VerticalOptions="End" BackgroundColor="Transparent"/>
                <Button Text="Done" Clicked="Done_Clicked" HorizontalOptions="Center" VerticalOptions="End" BackgroundColor="Transparent"/>
            </StackLayout>
        </StackLayout>
    </ContentPage.Content>
</pages:BasePage>
The above code contains the cancel and done button for canceling and updating the picker selection.
public partial class CheckboxPage : BasePage<string>
{
    private List<CheckedItem> ItemsSource;
    public CheckboxPage(List<string> itemsSource, List<int> selectedIndices)
    {
        InitializeComponent();
        List<CheckedItem> list = new List<CheckedItem>();
        for (int i = 0; i < itemsSource.Count; i++)
        {
            list.Add(new CheckedItem()
            {
                Text = itemsSource[i],
                IsChecked = false,
                Position = i
            });
        }
        ItemsSource = list;
        foreach (int i in selectedIndices)
        {
            list[i].IsChecked = true;
        }
        listView.ItemsSource = list;
    }

    private void listView_ItemTapped(object sender, ItemTappedEventArgs e)
    {
        ((ListView)sender).SelectedItem = null;
    }

    private void Done_Clicked(object sender, EventArgs e)
    {
        List<CheckedItem> list = (List<CheckedItem>)listView.ItemsSource;
        _navigationResut = string.Join(",", list.Where(x => x.IsChecked).Select(x => x.Position).ToArray());
        Navigation.PopModalAsync();
    }

    private void Cancel_Clicked(object sender, EventArgs e)
    {
        //List<CheckedItem> list = ItemsSource;
        _navigationResut = "";// string.Join(",", list.Where(x => x.IsChecked).Select(x => x.Position).ToArray());
        Navigation.PopModalAsync();
    }
}

public class CheckedItem
{
    public int Position { get; set; }
    public bool IsChecked { get; set; }
    public string Text { get; set; }
}
After that, go to the custom control “Multiselectionpicker.cs” and create the following function which will open the page a modal page with TaskCompletionSource.
public async Task<T> NavigateToModal<T>(BasePage<T> page)
{
    var source = new TaskCompletionSource<T>();
    page.PageDisappearing += (result) =>
    {
        var res = (T)Convert.ChangeType(result, typeof(T));
        source.SetResult(res);
    };
    await Application.Current.MainPage.Navigation.PushModalAsync(new NavigationPage(page));
    return await source.Task;
}
Create a focused event in the multiselectpicker and call the above-mentioned function.
Focused += async (e, s) =>
{
    if (s.IsFocused)
    {
        Unfocus();
        string item = await NavigateToModal<string>(new CheckboxPage(ItemsSource, SelectedIndices));
        if (item == "")
            return;
    }
};
In the focused event, get the selection indexes and assign them to the entry with a comma separator.
Focused += async (e, s) =>
{
    if (!IsControlLoaded && Device.RuntimePlatform == Device.UWP)
    {
        IsControlLoaded = true;
        Unfocus();
        return;
    }
    if (s.IsFocused)
    {
        Unfocus();
        string item = await NavigateToModal<string>(new CheckboxPage(ItemsSource, SelectedIndices));
        if (item == "")
            return;
        SelectedIndices = item.Split(',').Select(x => Convert.ToInt32(x)).ToList();
        List<string> selectedItems = new List<string>();
        foreach (int i in SelectedIndices)
        {
            selectedItems.Add(ItemsSource[i]);
        }
        Text = string.Join(", ", selectedItems);
    }
};
Full Code of MultiSelectPicker.cs
namespace Xamarin.Forms
{
    public class MultiSelectionPicker : Entry
    {
        public static readonly BindableProperty TitleProperty = BindableProperty.Create("Title", typeof(string), typeof(MultiSelectionPicker), null);
        public string Title
        {
            get { return (string)GetValue(TitleProperty); }
            set { SetValue(TitleProperty, value); }
        }
        public static readonly BindableProperty ItemsSourceProperty = BindableProperty.Create("ItemsSource", typeof(List<string>), typeof(MultiSelectionPicker), null, BindingMode.TwoWay);
        public List<string> ItemsSource
        {
            get { return (List<string>)GetValue(ItemsSourceProperty); }
            set { SetValue(ItemsSourceProperty, value); }
        }
        public static readonly BindableProperty SelectedIndicesProperty = BindableProperty.Create("SelectedItems", typeof(List<int>), typeof(MultiSelectionPicker), null, BindingMode.TwoWay,
            propertyChanged: SelectedIndexChanged);

        public List<int> SelectedIndices
        {
            get { return (List<int>)GetValue(SelectedIndicesProperty); }
            set { SetValue(SelectedIndicesProperty, value); }
        }

        private static void SelectedIndexChanged(BindableObject bindable, object oldValue, object newValue)
        {
            var ctrl = (MultiSelectionPicker)bindable;
            if (ctrl == null)
                return;
            List<string> selectedItems = new List<string>();
            foreach (int i in ctrl.SelectedIndices)
            {
                selectedItems.Add(ctrl.ItemsSource[i]);
            }
            ctrl.Text = string.Join(", ", selectedItems);
        }

        bool IsControlLoaded = false;

        public MultiSelectionPicker()
        {
            Focused += async (e, s) =>
            {
                if (!IsControlLoaded && Device.RuntimePlatform == Device.UWP)
                {
                    IsControlLoaded = true;
                    Unfocus();
                    return;
                }
                if (s.IsFocused)
                {
                    Unfocus();
                    string item = await NavigateToModal<string>(new CheckboxPage(ItemsSource, SelectedIndices));
                    if (item == "")
                        return;
                    SelectedIndices = item.Split(',').Select(x => Convert.ToInt32(x)).ToList();
                    List<string> selectedItems = new List<string>();
                    foreach (int i in SelectedIndices)
                    {
                        selectedItems.Add(ItemsSource[i]);
                    }
                    Text = string.Join(", ", selectedItems);
                }
            };
        }

        public async Task<T> NavigateToModal<T>(BasePage<T> page)
        {
            var source = new TaskCompletionSource<T>();
            page.PageDisappearing += (result) =>
            {
                var res = (T)Convert.ChangeType(result, typeof(T));
                source.SetResult(res);
            };
            await Application.Current.MainPage.Navigation.PushModalAsync(new NavigationPage(page));
            return await source.Task;
        }
    }

    public class BasePage<T> : ContentPage
    {
        public event Action<T> PageDisappearing;
        protected T _navigationResut;

        public BasePage()
        {

        }

        protected override void OnDisappearing()
        {
            PageDisappearing?.Invoke(_navigationResut);
            if (PageDisappearing != null)
            {
                foreach (var @delegate in PageDisappearing.GetInvocationList())
                {
                    PageDisappearing -= @delegate as Action<T>;
                }
            }
            base.OnDisappearing();
        }
    }
}
Implementation of Multi-Item Selection Picker & Its Demo.
In this step, we will see how to use the view in Xamarin.Forms.
Open your designer file and in my case MainPage.xaml and add the control as shown below,
<control:MultiSelectionPicker x:Name="picker" BackgroundColor="White"/>
Set ItemsSource and SelectedIndices as shown below,
picker.ItemsSource = new List<string>() { "Item 1", "Item 2", "Item 3", "Item 4", "Item 5", "Item 6" };
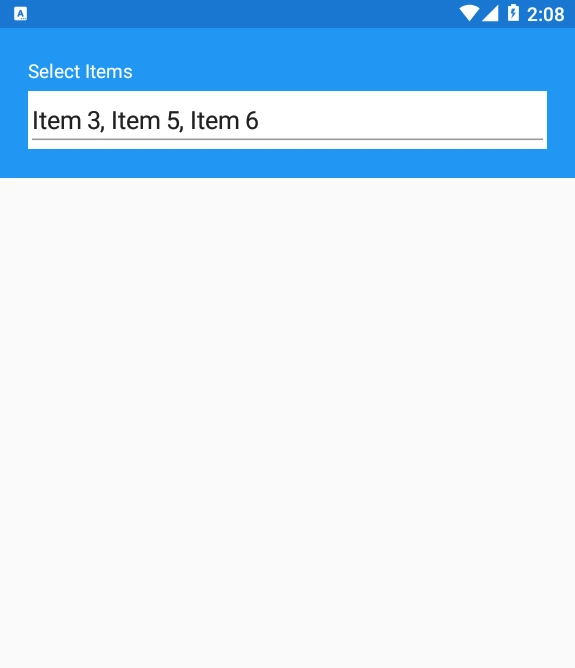
picker.SelectedIndices = new List<int>() { 2,4,5 };
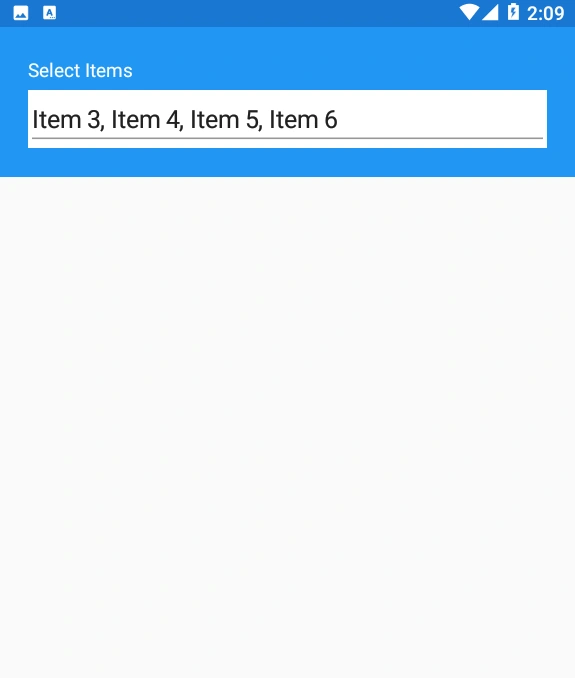
Demo
Download Code
You can download the full source code from GitHub. If you like this article, do like, share and star the repo in GitHub.
Rakeshkumar DesaiPosted Jul 12, 2021, 1:25 PM
This what many people looking for..thanks for posting this
Venkatasubbarao PolisettyPosted Jul 6, 2021, 2:08 PM
Useful information regarding multiple item selection picker in Xamarin Forms