

Introduction
Hello everyone, previously I've posted an article about Data Binding. Today, I'll talk about one the most important and slightly advanced topics. It's all about Model-View-ViewModel (MVVM). The Model View ViewModel (MVVM) is an architectural pattern used in software engineering as a specialization of the Presentation Model design pattern. It's a famous architectural model for the WPF and Windows or Windows Phone application developers. It's really helpful to organize your code separately. When you're working on a big project that handles a lots of data, then MVVM gives you the flexibility to write clean and efficient code. A Model basically initializes properties, attributes and whatever you say and a “ViewModel” contains all the data of your application. Finally the View represents the actual representation of data in your screen. Basically Data Binding works between the “ViewModel” and the “View“ layer. The “View” requests a command and a “ViewModel” accepts it and responds to the “View”. I'm not delving into the entire theoretical knowledge. I have just tried to provide you the basic idea of what “MVVM” is.
Now, let's get to the best practices in this super awesome architectural model.
Creating a New Project
First of all, open up a new project and name it “MVVMEx” or whatever you want. Now, simply delete your “Mainpage.xaml”. Don't freak out, it's a way to do the modification. Now, add the three folders “Models”, “ViewModels” and “Views” one by one, like this.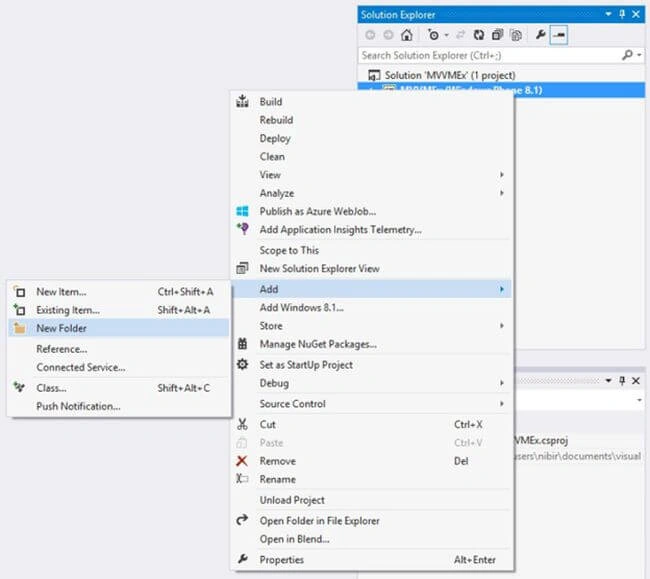
Figure 1
It should look exactly like the following in Figure 2.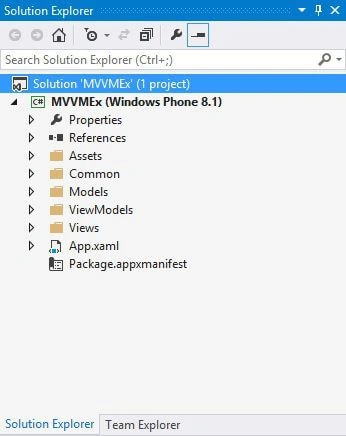
Figure 2
Adding a New Page
Now, it is a kind of remake of our Data Binding example from my last article. In the “Views” folder right-click and add a new “Basic Page”, give it the name “AutoView”.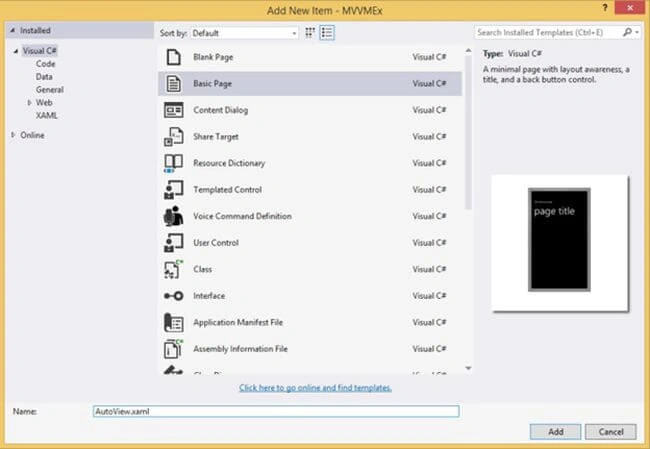
Figure 3
Changing the Starting Page
Now one more thing we need to do is to change our starting page. For that, you need to go to “app.xaml.cs” and change the following line of code:
- if (!rootFrame.Navigate(typeof(AutoView), e.Arguments))
- {
- throw new Exception("Failed to create initial page");
- }
Because, we've deleted our “MainPage.xaml” and added a new page “AutoView.xaml”.
Adding Classes
Now, similarly right-click on the “Model” folder and add a new class named “Auto.cs”. Again right-click on the “ViewModels” folder and add another class named “AutoViewModel.cs”. After all you setup, your Solution Explorer will look like in Figure 4.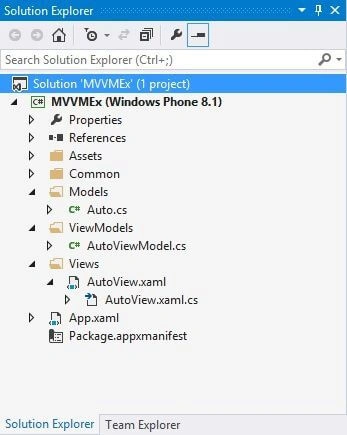
Figure 4
Now, we'll do similarly as in our previous Data Binding example, now we'll modify our “AutoView.xaml” as follows.
Modifying “AutoView.xaml” Page
Setting up app title and information.
- <!-- Title Panel -->
- <StackPanel Grid.Row="0" Margin="19,0,0,0">
- <TextBlock Text="Learn With BD Devs" Style="{ThemeResource TitleTextBlockStyle}" Margin="0,12,0,0"/>
- <TextBlock Text="MVVM" Margin="0,-6.5,0,26.5" Style="{ThemeResource HeaderTextBlockStyle}" CharacterSpacing="{ThemeResource PivotHeaderItemCharacterSpacing}"/>
- </StackPanel>
Listing 1
Modifying main grid.
- <!--TODO: Content should be placed within the following grid-->
- <Grid Grid.Row="1" x:Name="ContentRoot" Margin="19,9.5,19,0">
- <TextBlock Height="50"
- HorizontalAlignment="Left"
- Margin="10,10,0,0"
- Name="manufacturerBlock"
- Text="{Binding manufacturer,Mode=OneWay}"
- VerticalAlignment="Top"
- Width="342" FontSize="24"/>
- <TextBlock Height="50"
- HorizontalAlignment="Left"
- Margin="10,65,0,0"
- Name="modelBlock"
- Text="{Binding model,Mode=OneWay}"
- VerticalAlignment="Top"
- Width="342" FontSize="24"/>
- <TextBlock Height="50"
- HorizontalAlignment="Left"
- Margin="10,120,0,0"
- Name="colorBlock"
- Text="{Binding color,Mode=OneWay}"
- VerticalAlignment="Top"
- Width="342" FontSize="24"/>
- <TextBlock Height="50"
- HorizontalAlignment="Left"
- Margin="10,175,0,0"
- x:Name="yearBlock"
- Text="{Binding year, Mode=OneWay}"
- VerticalAlignment="Top"
- Width="342" FontSize="24"/>
- </Grid>
Listing 2
Implementation of “BaseModel.cs” Class
Now, we'll move to our “Models” folder and initialize the auto's properties, but before that, we need to add another class named “BaseModel.cs” in our “Common” folder.
- public class BaseModel : INotifyPropertyChanged
- {
- public event PropertyChangedEventHandler PropertyChanged;
- protected bool SetProperty<T>(ref T storage, T value, [CallerMemberName] string propertyName = null)
- {
- if (object.Equals(storage, value)) return false;
- storage = value;
- this.OnPropertyChaned(propertyName);
- return true;
- }
- private void OnPropertyChaned(string propertyName)
- {
- var eventHandler = this.PropertyChanged;
- if (eventHandler != null)
- eventHandler(this, new PropertyChangedEventArgs(propertyName));
- }
- }
Listing 3
It's our “INotifyPropertyChanged” interface. As we've said in best practices, you make your code as clean as you can.
Implementation of “Auto.cs” Class
Now, move back to our “Auto.cs” class. The initialized properties are given below.
- public class Auto : BaseModel
- {
- private string _manufacturer;
- private string _model;
- private string _color;
- private int _year;
- public string manufacturer
- {
- get { return _manufacturer; }
- set { this.SetProperty(ref this._manufacturer, value); }
- }
- public string model
- {
- get { return _model; }
- set { this.SetProperty(ref this._model, value); }
- }
- public string color
- {
- get { return _color; }
- set { this.SetProperty(ref this._color, value); }
- }
- public int year
- {
- get { return _year; }
- set { this.SetProperty(ref this._year, value); }
- }
- }
Listing 4
Here, we've inherited all the public properties of the “BaseModel.cs” class and fired the value of the data in the setter. Just simple logic of Object Oriented Programming (OOP).
Setting Up Data in “AutoViewModel.cs” Class
Now, we'll set the data of our “Auto” properties in the “AutoViewModel.cs” class.
- public class AutoViewModel : Auto
- {
- Auto _auto = new Auto
- {
- manufacturer = "Oldsmobile",
- model = "Cutlas Supreme",
- color = "Silver",
- year = 1988
- };
- public AutoViewModel()
- {
- this.manufacturer = _auto.manufacturer;
- this.model = _auto.model;
- this.color = _auto.color;
- this.year = _auto.year;
- }
- }
Listing 5
Here, we've used inheritance and inherited the “Auto.cs” class as before, so that we can access all the public properties of the “Auto.cs” class.
We created a “_auto” object of the “Auto.cs” class and initializeg all the values here and in the constructor “AutoViewModel” we make references to these properties.
Setting Up DataContext in “AutoView.xaml.cs” Class
Our work is nearly done. Now, to visualize the data of our “AutoViewModel.cs” class, we need to instantiate our “AutoView.xaml.cs” class. To do so, change the following lines of code.
- private AutoViewModel defaultViewModel = new AutoViewModel();
- public AutoView()
- {
- this.InitializeComponent();
- ...
- this.DataContext = defaultViewModel;
- }
- public AutoViewModel DefaultViewModel
- {
- get { return this.defaultViewModel; }
- }
Listing 6
Here, we've create a “defaultViewModel” object of the “AutoViewModel.cs” class and made it the “DataContext” of our “AutoView.xaml.cs” class in the constructor. It actually retrieves all the data from the “AutoViewModel” constructor and shows it in the “ContentRoot” grid of “AutoView.xaml”.
Running the Application
Now, it's time to build our project. After you run the application, it should look exactly like the following.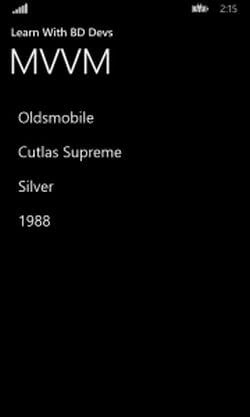
Summary
So, that's it. I hope you understand the concept of “MVVM” and how to implement it in your project. It's really helpful when you work in a big project and you need to handle a lot of data. I'll be here with a new topic soon. Until then good bye. Have a nice day.
Happy coding!
Read the original article at http://t.co/AIUq4cWrmG
Join the conversation! Your thoughts help the community grow.