

Introduction
In the world of distributed caching, securing your cache nodes is paramount to protect your data and infrastructure from potential threats. NCache, a powerful distributed caching solution, provides robust security features for managing cache nodes effectively. This article will walk you through the process of configuring different levels of security in NCache to ensure the safety and integrity of your cached data.
Note: All these features are available only with NCache Enterprise Edition.
Install and Set Up NCache
Before you can configure node security, ensure that you have NCache installed and set up on your servers. You can download and install NCache from the official NCache website (https://www.alachisoft.com/download-ncache.html) if you haven't already.
Configuring SSL/TLS Encryption in Windows
What is SSL/TLS Encryption?
SSL/TLS encryption plays a crucial role in ensuring robust security for applications or websites that handle sensitive operations, such as online financial transactions, login password entry and so on. In these scenarios, SSL/TLS facilitates secure communication exclusively between the involved parties by safeguarding the confidentiality and integrity of shared information.
For communication between the server and the client through SSL/TLS handshake, a certificate is essential. This certificate, acting as an entity, contains the necessary information to encrypt data exchanged between both parties. It incorporates a shared public key that, upon successful matching during the connection establishment, enables secure communication between the server and the client. The below image will give you a complete idea about the data communication between client and server with SSL/TLS encryption.

Communication between Server and Client with SSL/TLS Encryption
NCache with SSL/TLS Encryption
- NCache requires data to travel for out-of-process communication in various ways based on your setup, such as between servers and clients, different servers, caches, and bridges, so securing the data in transit is important. NCache offers the capability to implement TLS/SSL encryption, specifically using TLS 1.2, across the network. This ensures that data exchanged between the server and authorized clients is securely protected.
- Users have the option to enable SSL certificates, whether they are issued by a trusted authority or self-signed, for establishing client connections with the NCache server. This ensures that data transmission is inherently encrypted. Additionally, NCache offers the flexibility of optionally supplying the certificate on the client machine. The most welcomed thing is no code change is involved in enabling the TLS/SSL Encryption.
To prepare for issuing an SSL certificate in NCache, it's important to take the following prerequisites into account:
Ensure that the certificate includes a private key. You can find guidance on creating such certificates in this blog post titled "Generating Self-Signed Certificates on Windows."
Note: Self-signed certificate should be used only for testing or proof of concept. Highly not recommended for the production use
Make sure that the private key is set as exportable, allowing it to be exported to all nodes, including the client machine.
Import the certificate to the machine, click here for the details
Prerequisites before enabling SSL security
- Stop the cache and client processes.
- Confirm that the certificate is installed in the Trusted Root Certificate Authorities store within the Microsoft Management Console. If it's located in the personal folder, move it to the Certificates folder within Trusted Root Certificate Authorities.
Get the Thumbprint and Certificate Name from MMC
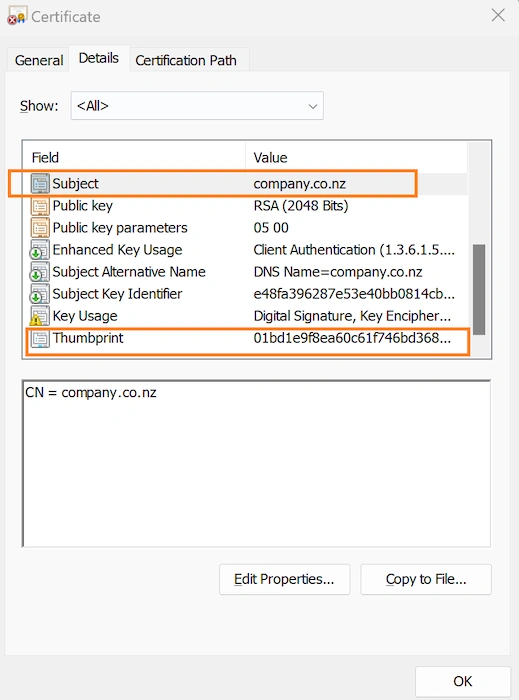
Enabling TLS/SSL Certificate - Windows
You can activate the certificate for NCache by accessing the Registry Editor or you can use below PowerShell script
Enable-NCacheTLS -Node "10.0.0.220" -CertificateName "company.co.nz" -CertificateThumbprint "01bd1e9f8ea60c…………" -ClientServerCommunication -BridgeCommunication -UseMutualTLSForClientToServer true
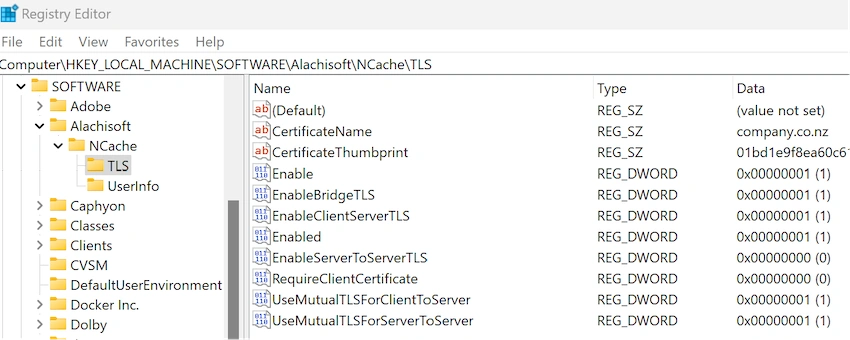
Enable TLS on Client-to-Server Communication
- ClientServerCommunication - This parameter in the powershell script set to true to enable the TLS encryption between server nodes and client communication.
- UseMutualTLSForClientToServer - If the UseMutualTLSForClientToServer option is activated, client nodes attempting to connect to the server must provide a valid TLS certificate for authentication. Additionally, the authority that issued the client's certificate must be part of the server's trusted root certificates.
Enable TLS on Bridge Cache
- BridgeCommunication - This will enable the TLS Between NCache bridge and geographically separated cache.
Note:
- To extend the security between the bridge nodes we should enable the ServerToServerCommunication flag.
- If BridgeCommunication is true, we should make sure ClientServerCommunication is enabled.
- NCache recommends using the same certificate on both bridge nodes.
Enable TLS on Server-to-Server Communication
- ServerToServerCommunication- This will enable the TLS encryption between server nodes within a cluster.
- UseMutualTLSForServerToServer - Enabling this feature imposes a mandate for a valid TLS certificate on servers during communication. When active, each server node connecting to the initial server is required to present a valid TLS certificate for authentication. Furthermore, all servers must possess the Certificate Authorities of each other in their Trusted Roots
TLS on Client Machines
<tls-info>
    <certificate-name>certificate-name</certificate-name>
    <certificate-thumbprint>your-thumbprint</certificate-thumbprint>
    <enable>false</enable>
    <enable-client-server-tls>false</enable-client-server-tls>
    <use-mutual-tls-for-client-to-server>false</use-mutual-tls-for-client-to-server>
</tls-info>
<enable-client-server-tls> and <use-mutual-tls-for-client-to-server> will work only if <enable> is set to true.
To confirm that the client connectivity over TLS is functioning correctly, you can execute the Test-Stress cmdlet using the Windows PowerShell Tool. Below is an example of running Test-Stress on the cache with the name "demoCache."
Test-Stress -CacheName demoCache
Stress test from NCache web manager

Configure TLS Encryption - Linux
- Log in to your system using the designated NCache user.
- Verify whether the NCache Service is active and running under the NCache user on Linux. Note that, by default, this user does not possess a home directory, which is essential. To establish the required home directory, execute the following commands.
sudo mkdir /home/ncache
sudo chown ncache /home/ncache
- Once you have set up your home directory, proceed to install the certificates on your Linux machine. Utilize the provided PowerShell commands to generate a store object named Root and subsequently install the SSL/TLS certificate RootCA.pfx into that store.
$store=[System.Security.Cryptography.X509Certificates.X509Store]::new([System.Security.Cryptography.X509Certificates.StoreName]::Root,[System.Security.Cryptography.X509Certificates.StoreLocation]::CurrentUser,[System.Security.Cryptography.X509Certificates.OpenFlags]::ReadWrite) $store.Add([System.Security.Cryptography.X509Certificates.X509Certificate2]::new("RootCA.pfx","password",[System.Security.Cryptography.X509Certificates.X509KeyStorageFlags]::PersistKeySet)) - The configuration settings for certificates are stored in the tls.ncconf file, located at %NCHOME/config. Below is an example of a sample configuration
<tls-info>
    <certificate-name>certificate-name</certificate-name>
    <certificate-thumbprint>your-thumbprint</certificate-thumbprint>
    <enabled>False</enabled>
    <require-client-certificate>False</require-client-certificate>
</tls-info>
All these parameter setups are discussed above on TLS Encryption configuration with windows.
After completing the configuration restart the cache and client process and the NCache service
Note: Make sure that NCache service is running under the same user which was used to import the certificate.
3. Security Cache Server Nodes
NCache's Secured Cache Server Node is a fundamental component of its caching architecture, engineered with a primary focus on enhancing data security.
NCache, a distributed in-memory cache, offers security features to safeguard cache and node operations, enhancing the overall security of your working environment. While security is an optional aspect, it becomes imperative, especially when there is open user access to your cache.
The two primary processes involved in the security are
- Authentication and
- Authorization
The Secured Cache Server Node incorporates robust access control and authentication mechanisms. Only authorized users, applications, or services are granted access to the cache server node. This ensures that data can only be accessed by trusted entities, significantly reducing the risk of unauthorized access and potential data breaches.

NCache Server Side security architecture
Authentication
Authentication verifies whether the client attempting to connect to the cache is a legitimate user within your domain. NCache achieves this by utilizing LDAP Service Providers to authenticate all incoming client connection requests.
In terms of Cache Level Security, you are required to furnish an LDAP provider against which all client connections undergo authentication. It is essential to ensure that for each node, you provide the identical LDAP provider, assuming a homogeneous working environment. This practice is implemented to maintain uniformity among administrators across all nodes.
Authorization
Upon successful authentication, it is established that a particular user is a valid user within that domain. However, the determination of whether that user possesses the privileges to execute operations on the cache cluster or a server node is addressed through authorization. Authorization is the process of specifying the actions or scope that the authenticated user is permitted to perform on your cache or node. If a user is registered against a cache or node, they are granted the authority to execute all API or managerial operations on the respective cache or node.
There are multiple ways you can setup the Node level security for a NCache. Let’s see how to setup using,
- NCache web manager and
- PowerShell
1. Using NCache Web Manager
Before getting into node level security, you should configure NCache Manager Setting

Click on server settings and configure the manager security as shown in above figure.
Node level security allows you to specify administrators who can perform managerial operations like Create cache, start cache etc.
Under select user section select the user
From the setting screen, select Node Level Security,
Step 1. Verify the server node IP. Enter the server node IP / Name and click on verify button.
Step 2. Once the server node verified, select the user from the select user section where the select user can perform the managerial operations like create cache, start, stop cache and so on.
Note: Check the box enable security
Step 3. Finally, click on Apply to save the changes. It also update the changes in security.nconfig file under <administrators> tag.
2. Using PowerShell
Using Add-NodeSecurity command, we can configure Node level security for the cache.
Add-NodeSecurity -EnableSecurity -AdminUserID youradminuserId -AdminPassword mypassword -PrimaryLdap yourprimarydomain -PrimaryLdapPort 389 -NodeName yourNodeAddress
The above command will enable securirty on your node address, and assign the user as administrator where the primary LDAP controller is yourprimarydomain
Note: You must make sure at least one user in the node’s admin list before you enable the security for the first time using this command.
Admin credential must be either a local admin or node admin credentials.
If you want to add more users, use the following command after step 1. The following command adds the user david_jones to the secured users list of the node 20.200.20.38 with yourprimarydomain as the primary domain controller.
Add-NodeSecurity -AddUser -AdminUserID Kriish_Mahendran -AdminPassword mypassword -NewUser David_Warner -NewUserPassword userpassword -NewUserDN "CN=David Warner, OU=admin, DC=yourdomain, DC=org" -PrimaryLdap yourprimarydomain -PrimaryLdapPort 389 -NodeName 20.200.20.38

4. Data Encryption
NCache guarantees that data remains securely encrypted while residing in storage on cache servers. This security measure ensures that even if an unauthorized entity gains physical access to the cache server's storage, the data remains incomprehensible and well-protected. The management of encryption keys is executed with strict security protocols to block any unauthorized attempts at decryption.
Encryption and decryption of NCache data take place within the NCache client application process. Consequently, all data transmitted over the network between your application and the cache cluster is already encrypted. Additionally, solely encrypted data is stored in the cache store. An encryption key, provided by you, is utilized by NCache and securely stored in an encrypted manner within NCache security configuration files on each cache server. Upon a successful connection, the encryption key is automatically transmitted to clients for in-memory use.
Enabling encryption through the NCache web manager requires no programming effort on your part. Once encryption is activated, the NCache client seamlessly initiates the encryption of your objects before transmitting them to the cache cluster. Likewise, it automatically decrypts objects retrieved from the cache before delivering them to your application.
Encryption can be enabled in the following steps:
- To initiate the NCache Manager, access it by navigating to either http://localhost:8251 or <server-ip>:8251.
- On the left-hand navigation bar, select either Clustered Caches or Local Caches, depending on the cache to which you intend to add Encryption. Then, click on View Details next to the cache name.

The supported flavors of AES (Advanced Encryption Standard) and 3DES ( Triple-DES ) Encryption are listed below
- AES-128
- AES-192
- AES-256
- AES-FIPS 128
- AES-FIPS 192
- AES-FIPS 256
- 3DES-128
- 3DES-192
Input the encryption key into the Key text box. This key should consist of 32 characters and is designed for use with a 256-bit encryption algorithm.
Select the "Save Changes" option to implement this configuration for the cache.
Encryption can also be enabled at the time of cache creation.
The encrypted objects will automatically be decrypted by the NCache client before sending them to the application.
Summary
- TLS Encryption: NCahce has implemented Transport Layer Security (TLS) encryption to secure data transmission between clients and cache servers. TLS ensures that data exchanged between applications and the cache is encrypted, preventing unauthorized access and eavesdropping. This encryption protocol guarantees the confidentiality and integrity of data, making it extremely difficult for malicious actors to intercept or tamper with information in transit.
- Data Encryption: Beyond securing data in transit, NCahce places a strong emphasis on protecting data at rest. It employs data encryption mechanisms to safeguard cached data when it is stored on disk. This ensures that even if physical access to the cache servers is compromised, the stored data remains encrypted and inaccessible to unauthorized parties. The encryption keys are managed securely, adding an extra layer of protection.
- Secured Cache Server Node: NCahce goes a step further by implementing a Secured Cache Server Node architecture. This feature enforces stringent access controls and authentication mechanisms for cache server nodes. Only authorized personnel and applications are granted access to the cache, reducing the risk of data breaches due to unauthorized server access. The server nodes themselves are fortified with security measures to resist attacks and maintain the integrity of cached data.
These security features collectively create a robust shield around NCahce, making it a dependable choice for organizations handling sensitive data.
Join the conversation! Your thoughts help the community grow.