

Introduction
In my previous article, I briefly explained the Azure Kubernetes Service. Now it’s the time to create an Azure Kubernetes Service Cluster. Azure Kubernetes Service (AKS) is a managed Kubernetes service that lets you quickly deploy and manage clusters, Azure provides multiple ways that you can create an AKS Cluster. I will explain to you each way but, in our article, we are using the Azure portal for creating Azure Kubernetes Service cluster. Our article is divided into two parts, the first one is to create an Azure Kubernetes Service Cluster, and the second one is an overview of the Azure Kubernetes Service Cluster in the Azure Portal.
Different Ways of Creating Azure Kubernetes Service Cluster
By using the Azure portal
The Azure portal gives you a graphical interface of deploying your cluster through a wizard. This is a great way to deploy your first cluster. For multiple deployments or automated deployments, one of the following methods is recommended.
By using the Azure CLI
The Azure command-line interface (CLI) is a cross-platform CLI for managing Azure resources. Azure CLI, an interactive shell environment that you can use through your browser. In Azure CLI there is the option of Bash or PowerShell to work with Azure services. Azure CLI allows you to script your cluster deployment, which can be integrated into other scripts.
Using Azure PowerShell
Azure PowerShell is a set of PowerShell commands for managing Azure resources directly from PowerShell. It can also be used to create a Kubernetes cluster.
By using ARM templates
Azure Resource Manager (ARM) templates are an Azure native infrastructure-as-code (IaC) language. They allow you to declaratively deploy your cluster. This allows you to create a template that can be reused by multiple teams.
By using Terraform for Azure
Terraform is an open-source IaC tool developed by HashiCorp. The tool is very popular in the open-source community to deploy cloud resources, including AKS. Like ARM templates. Terraform also uses declarative templates for your cluster.
Create an Azure Kubernetes Service Cluster
As I mentioned above, we will use the Azure Portal for creating the Azure Kubernetes Service Cluster, The Azure portal is a web-based management console. It allows you to build, manage, and monitor all your Azure deployments worldwide through a single console. Now let’s start to create an AKS Cluster, for creating an AKS cluster you must have an Azure subscription account if you don’t have you can create it by following the URL.
Step 1
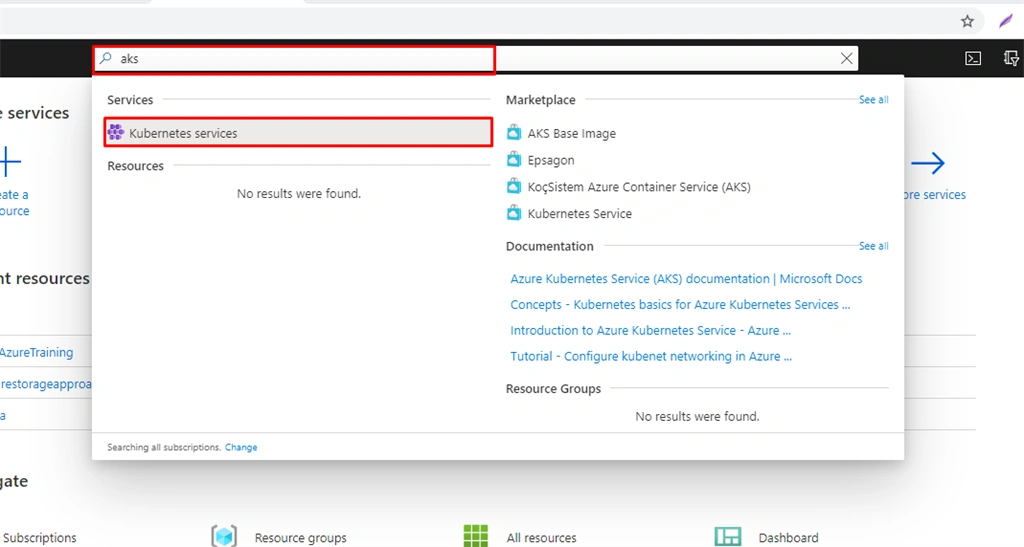
Enter the aks keyword in the search bar at the top of the Azure portal. Click on Kubernetes services under the Services category.
Step 2
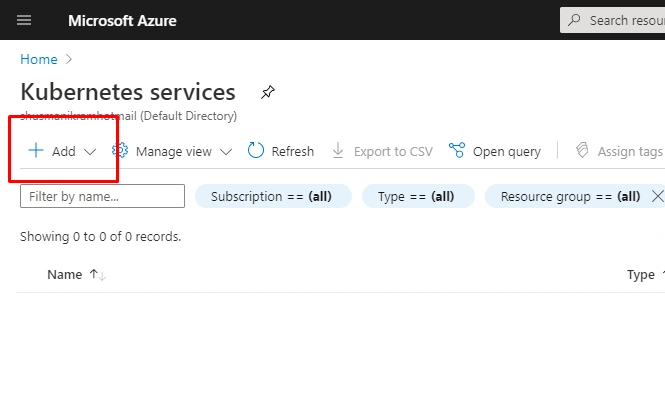
It will take you the Azure Kubernetes Service blade click on the Add button to create a new AKS Cluster.
Step 3
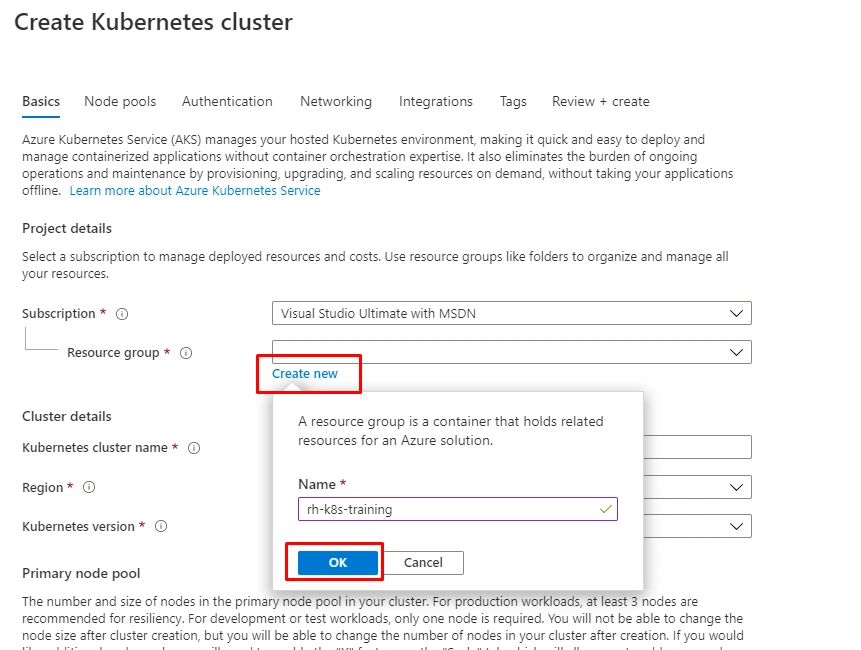
The add button will take you through the creation wizard blade to create your first AKS cluster. The first step here is to create a new resource group. Hit the Create New button, give your resource a name, and hit OK. In my case, I give the resource group the name rh-K8s-training. It will show the Green tick if the name is valid.
Step 4
Once you click the Ok button you will provide cluster details.
- Kubernetes cluster name
- rh-K8s-training
- rh-K8s-training
- Region
- The region we will use is (Middle East) UAE North, but you could use any other region of choice close to your location.
- The region we will use is (Middle East) UAE North, but you could use any other region of choice close to your location.
- Kubernetes cluster version
- We will use the default Kubernetes version 1.16.3 (default), but you can use the latest one or later update the version.
- We will use the default Kubernetes version 1.16.3 (default), but you can use the latest one or later update the version.
- Node size
- We will need to change the node size and node count. we will use a virtual machine (VM) with two core without premium storage and deploy a two-node cluster. If you are not using the free trial, you could choose a more powerful VM size as I did, Now hit the Change Size button below the machine name. It will show the Select a VM Size window blade select a VM DS1_v2 or DS2_v2. In my case, I select the DS2_V2 but you have to choose DS1_v2 if you are using the azure free trial and click the select button.
- We will need to change the node size and node count. we will use a virtual machine (VM) with two core without premium storage and deploy a two-node cluster. If you are not using the free trial, you could choose a more powerful VM size as I did, Now hit the Change Size button below the machine name. It will show the Select a VM Size window blade select a VM DS1_v2 or DS2_v2. In my case, I select the DS2_V2 but you have to choose DS1_v2 if you are using the azure free trial and click the select button.
- Node Count
- Change the slider for Node count to 2
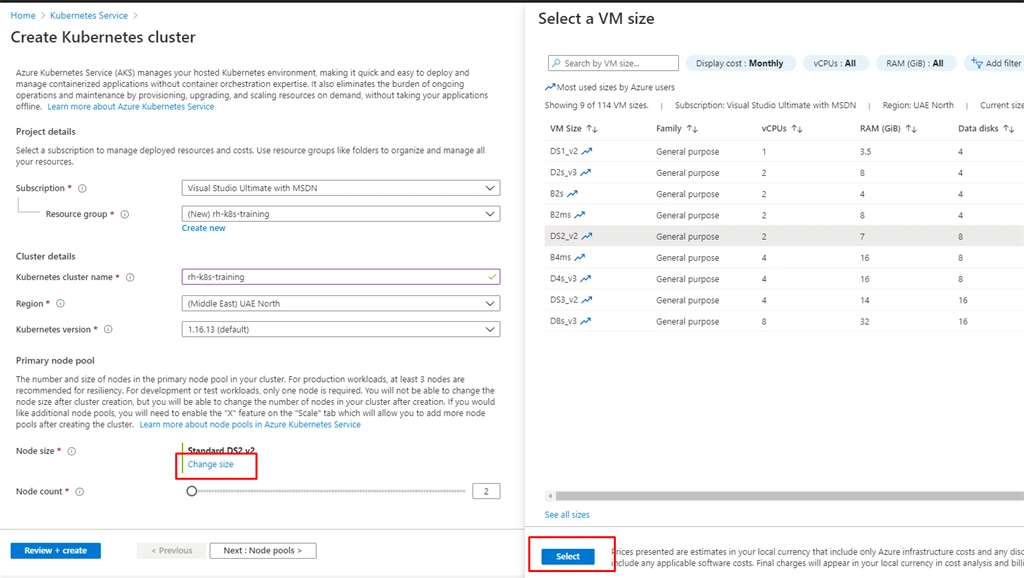
After adding the cluster details click the Review + create button now to do a final review and create your cluster.
Step 5
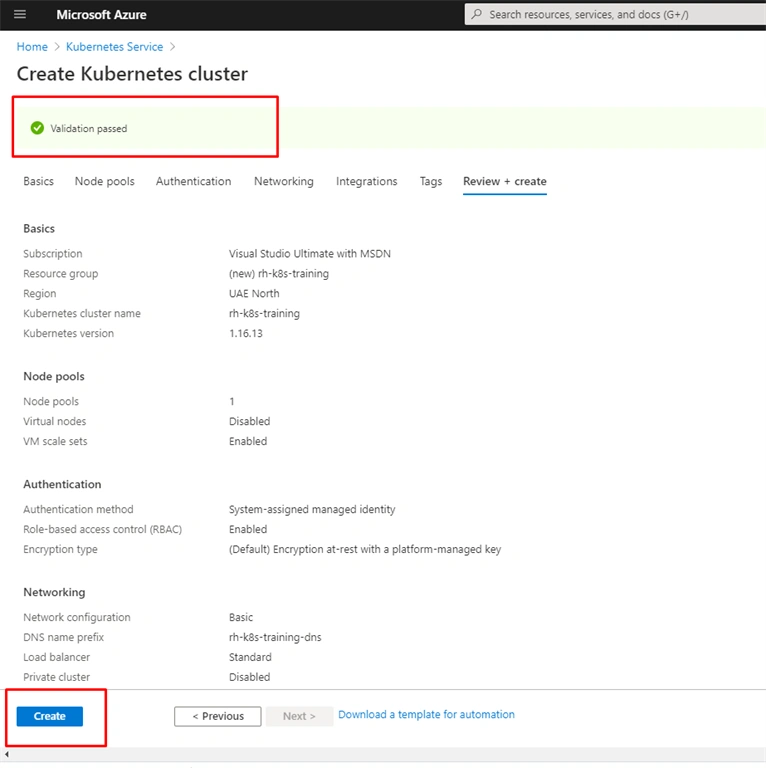
Once you click the Review + create button, Azure will validate the configuration that was applied to your first cluster. If the validation passed it will show on the top with a green tick and then click on Create:
Step 6
Deploying your cluster it will take 10 to 15 mins Once the deployment is complete, you can check the deployment details as shown:
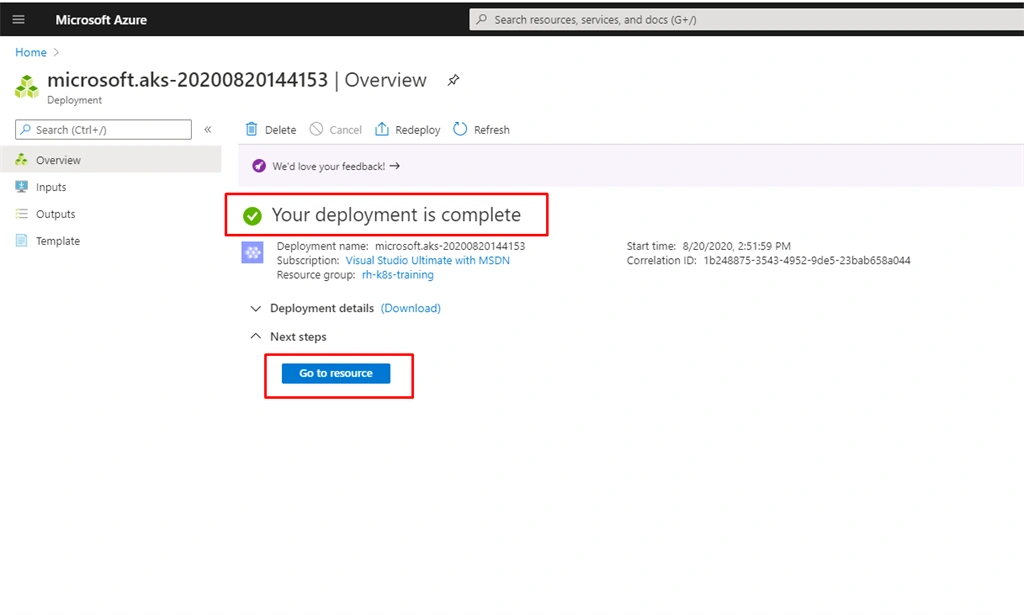
Congratulations your deployment is complete!
Overview of Azure Kubernetes Service Cluster in the Azure Portal
After successful deployment, let’s move to the second part of our article to overview the AKS Cluster in the Azure Portal. Hit the Go to resource button on step 6, It will take you to the AKS blade in the portal. you should now see the overview of your cluster in the Azure portal. The portal shows a quick overview of your cluster. It provides the name, the location, and the API server address. The left-hand navigation menu provides different options to control and manage your cluster.
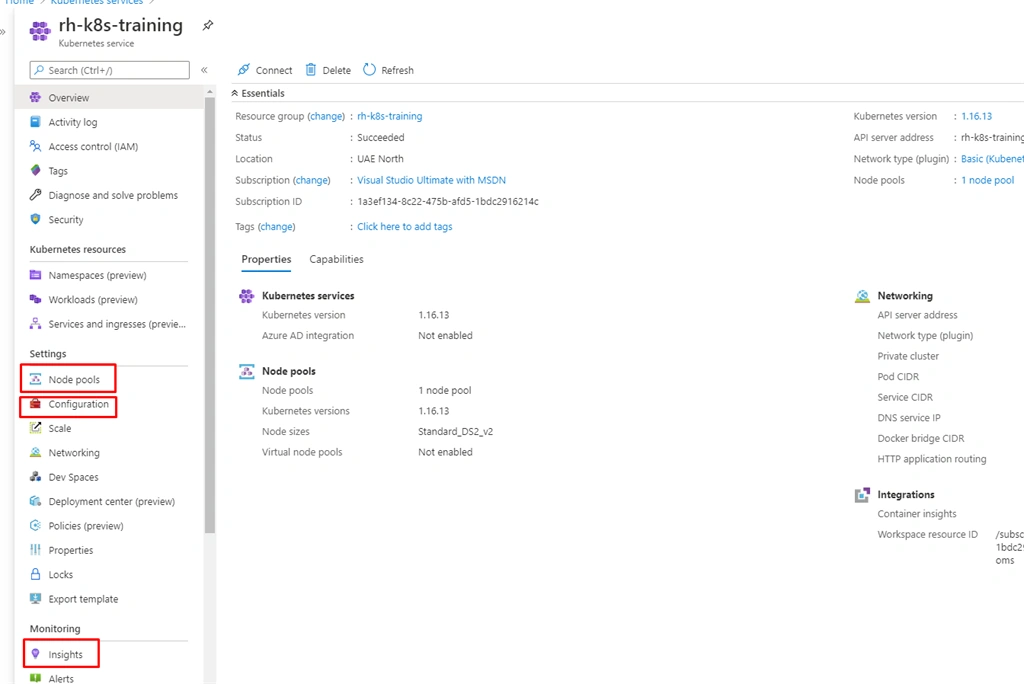
Let's walk through a couple of interesting options the portal offers.
Node Pools
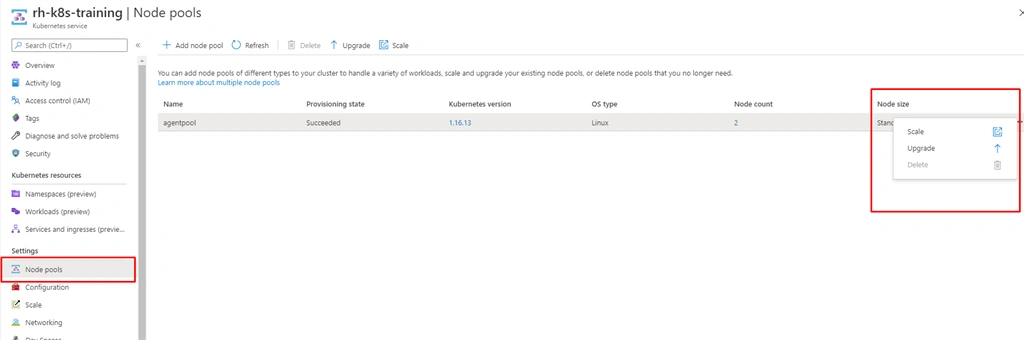
The first interesting option is the Node pools option. In the node pools view, you scale your existing node pool (meaning the nodes or servers in your cluster) either up or down by adding or removing nodes; you can add a new node pool, potentially with a different server size, and you can also upgrade your node pools individually. In the mentioned image, you can see the Add node pool option at the top left, and the options to Scale or Upgrade in the menu on the right.
Configurations
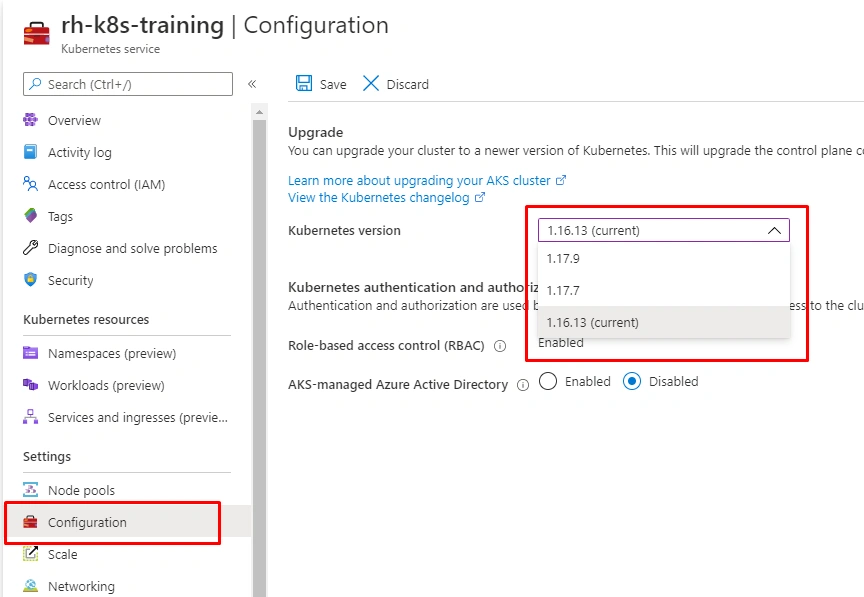
The second interesting blade is the Upgrade blade. Here, you can instruct AKS to upgrade the management plane to a newer version. As I mentioned above in Step 6 you can choose the default one or later you can upgrade your AKS Cluster, from configuration blade you can upgrade it Typically, in a Kubernetes upgrade, you first upgrade the master plane, and then the individual node pools separately,
Insights
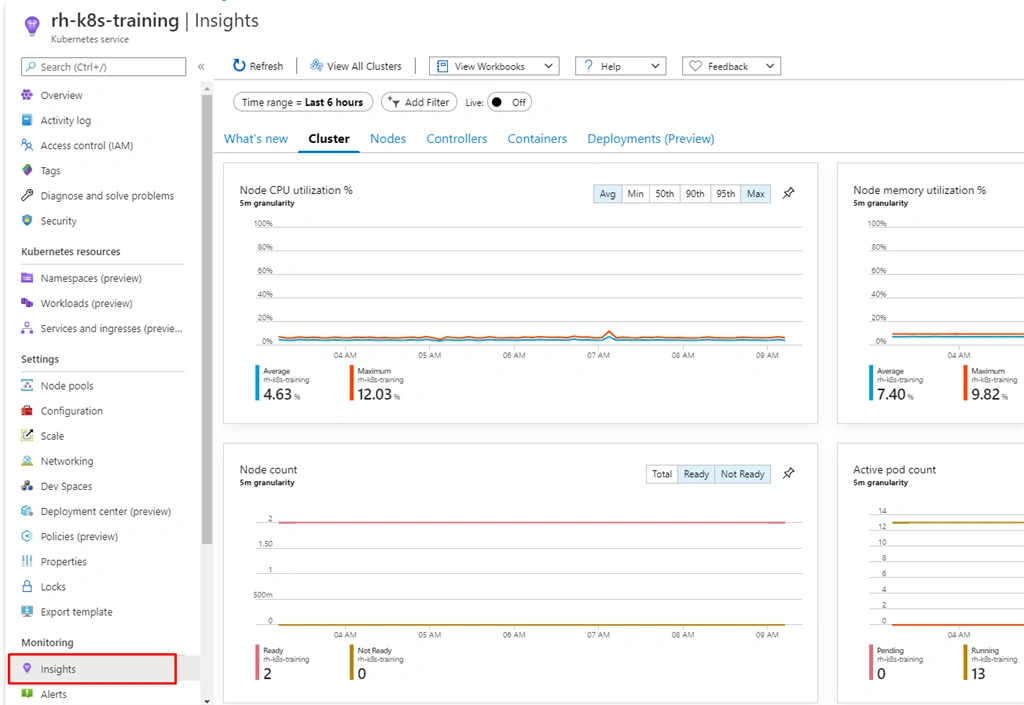
The Insights option provides you with monitoring of your cluster infrastructure and the workloads running on your cluster. Since our cluster is brand new, there isn't a lot of data to investigate.
Join the conversation! Your thoughts help the community grow.