

Introduction
This article explains the Data Annotation property for doing validation. Here we create a simple form for displaying the validation using Data Annotation. We know that validation is very important for any form.
Use the following procedure to create a simple form.
Step 1
Create a Web API Application as in the following:
- Start Visual Studio 2013.
- From the Start Window select "New Project".
- Select "Installed" -> "Templates" -> "Visual C#" -> "Web" -> "Visual Studio 2012" and select "ASP.NET MVC4 Web Application".
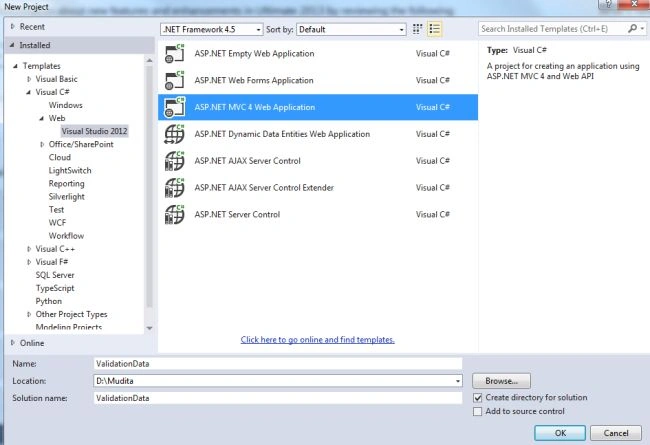
- Click on the "OK" button.
- From the MVC4 project window select "Web API".
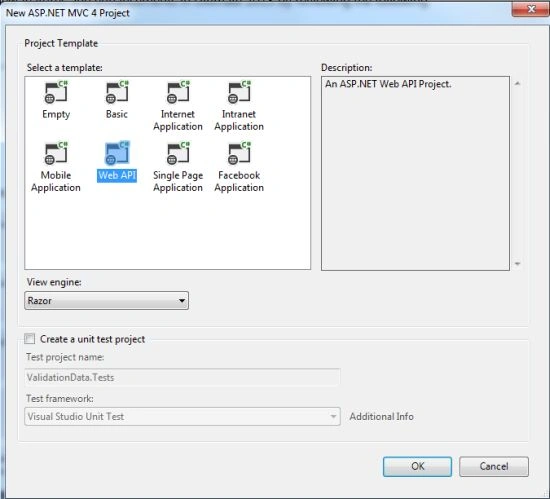
- Click on the "Create Project" button.
Step 2
Add a Model Class as in the following:
- In the "Solution Explorer".
- Right-click on the Model Folder.
- Select "Add" -> "Class".
- Select "Installed" -> "Visual C#" and select "Class".
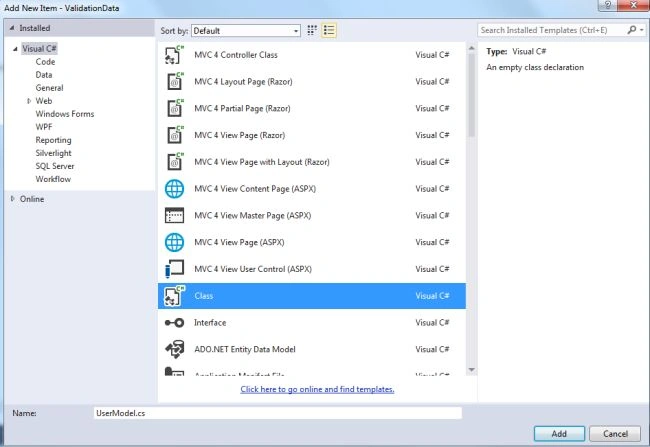
- Click on the "Add" button.
Add the following code:
- using System;
- using System.Collections.Generic;
- using System.ComponentModel.DataAnnotations;
- using System.Linq;
- using System.Web;
- namespace ValidationData.Models
- {
- public class UserModel
- {
- [Required(ErrorMessage = "Enter User Name")]
- public string FirstName { get; set; }
- [Required(ErrorMessage = "Enter User Last Name")]
- public string LastName { get; set; }
- [Required(ErrorMessage = "Enter USer Address")]
- public string Address { get; set; }
- [Required(ErrorMessage = "Enter User Age")]
- [Range(18, 50, ErrorMessage = "Age Sholud more the 18 and Less Than 50")]
- public int Age { get; set; }
- }
- }
Step 3
Add a Controller:
- In the "Solution Explorer".
- Right-click on the Controller folder, select "Add" -> "Controller".
- From the Template select "MVC Controller".
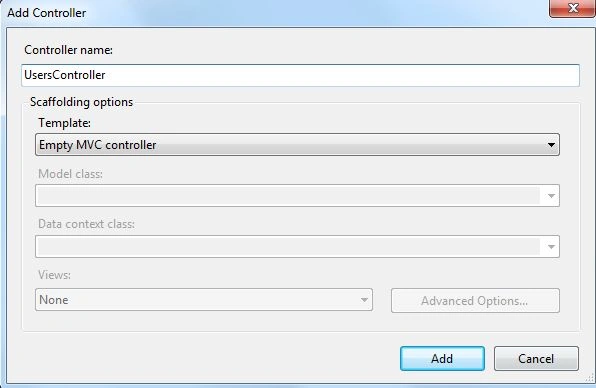
- Click on the "Add" button.
Add the following Code:
- using System;
- using System.Collections.Generic;
- using System.Linq;
- using System.Web;
- using System.Web.Mvc;
- using ValidationData.Models;
- namespace ValidationData.Controllers
- {
- public class UsersController : Controller
- {
- //
- // GET: /Users/
- public ActionResult Index()
- {
- return View();
- }
- [HttpPost]
- public ActionResult Detail(UserModel u)
- {
- if(!ModelState.IsValid)
- {
- return View("Index");
- }
- else
- {
- return Content("Valid User" + "FirstName" + u.FirstName + "LastName" + u.LastName + "Address" + u.Address + "Age" + u.Age);
- }
- }
- }
- }
Step 4
Add a View:
- In the "EmployeeController".
- Right-click on the "Index" action Method.
- Select "Add View."

- After the Add View dialog box has been opened select "Strongly Typed View" and select "Model class".
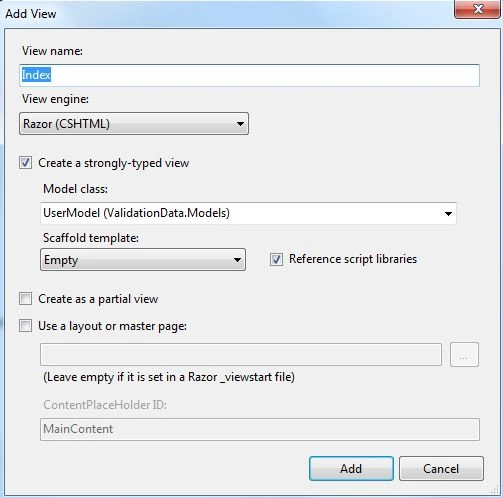
- Click on the "Add" button.
Add the following code:
- @model ValidationData.Models.UserModel
- @{
- Layout = null;
- }
- <!DOCTYPE html>
- <html>
- <head>
- <meta name="viewport" content="width=device-width" />
- <title>Index</title>
- </head>
- <body>
- <div>
- @using (Html.BeginForm("Detail","Users",FormMethod.Post))
- {
- @Html.ValidationSummary(true)
- <p>
- @Html.LabelFor(m=>m.FirstName)
- @Html.TextBoxFor(m=>m.FirstName)
- @Html.ValidationMessageFor(m=>m.FirstName)
- </p>
- <p>
- @Html.LabelFor(m=>m.LastName)
- @Html.TextBoxFor(m=>m.LastName)
- @Html.ValidationMessageFor(m=>m.LastName)
- </p>
- <p>
- @Html.LabelFor(m=>m.Address)
- @Html.TextBoxFor(m=>m.Address)
- @Html.ValidationMessageFor(m=>m.Address)
- </p>
- <p>
- @Html.LabelFor(m=>m.Age)
- @Html.TextBoxFor(m=>m.Age)
- @Html.ValidationMessageFor(m=>m.Age)
- </p>
- <input type="submit" value="Submit"/>
- }
- </div>
- </body>
- </html>
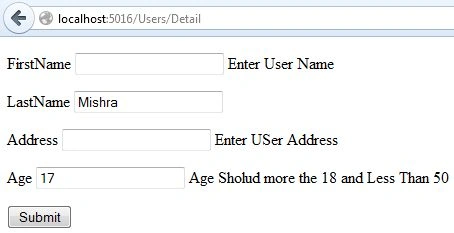
Execute the application and change the URL to "http://localhost:5016/Users/Index".

Leave the TextBoxes of FirstName and Address empty and enter an age less than 18. Then it displays the following validation message.
Join the conversation! Your thoughts help the community grow.