

Introduction
In this article, we will learn how to create a top navigation and display on the pages using SPFx webpart.
This article uses PnP library to fetch the navigation items from a SharePoint list to display them dynamically.
Overview
There might be a business requirement to show the top navigation items underneath a company brand, like the one displayed on the C# corner site.

With the introduction of Modern pages, most organizations have restricted editing the default Master pages, set by the tenant administrators for various reasons, say, to maintain the company brand, ensure the same look and feel across all the other site collections etc.
After placing our webpart, the top navigation will be displayed as:

Create WebPart
This article assumes that you know how to create a simple React SPFx web part. If you are first-timer, you can follow this article to create a React-based web part.
Let's jump in to the technical work. Start creating a webpart with the following options,
-
solution name - aadi-spfx-react-wp
-
webpart name - TopNavigation
-
Install PnP library dependencies
-
run the command in a terminal window: npm install react-bootstrap bootstrap --save
Understanding the rendering of a webpart on a page
When a webpart is added to the page, it is rendered with in the webpart’s zone that was defined in the <WebPartName>WebPart.ts file, in the render() method.
But in our case, we want to render the webpart as Top Navigation, typically some html lines of code, and underneath the default SharePoint header.
So, the tricky part is to render the webpart by appending to an available OOTB div instead in a webpart’s zone.
The OOTB div IDs are different for classic and modern pages, please have a look by inspecting the element or by pressing F12.
When a webpart is created, the <webpartname>WebPart.ts file has the following code, we need to modify this,
- public render(): void {
- const element: React.ReactElement<ITopNavigationProps> = React.createElement(
- TopNavigation,
- {
- description: this.properties.description
- }
- );
- ReactDom.render(element, this.domElement);
- }
Modify the <webpartname>WebPart.ts file,
- public render(): void {
- const element: React.ReactElement<ITopNavigationProps> = React.createElement(
- TopNavigation,
- {
- description: this.properties.description,
- context: this.context
- }
- );
- const tempDiv = document.createElement("div");
- ReactDom.render(element, tempDiv);
- const divTopNavPlaceHolder: HTMLElement =
- (document.getElementById("suiteBarDelta") != null)
- ? document.getElementById("suiteBarDelta")
- : document.getElementById("SuiteNavPlaceHolder");
- if (objectDefinedNotNull(divTopNavPlaceHolder)) {
- divTopNavPlaceHolder.appendChild(tempDiv);
- }
- }
We will be first getting the OOTB div on a page, and then append the webpart html.
For classic page, the div suiteBarDelta is available and for Modern pages, SuiteNavPlaceHolder is available.
Get the top navigation items from a SharePoint list
I have optionally created a SharePoint list to fetch the items dynamically, the default view of SharePoint list is as,
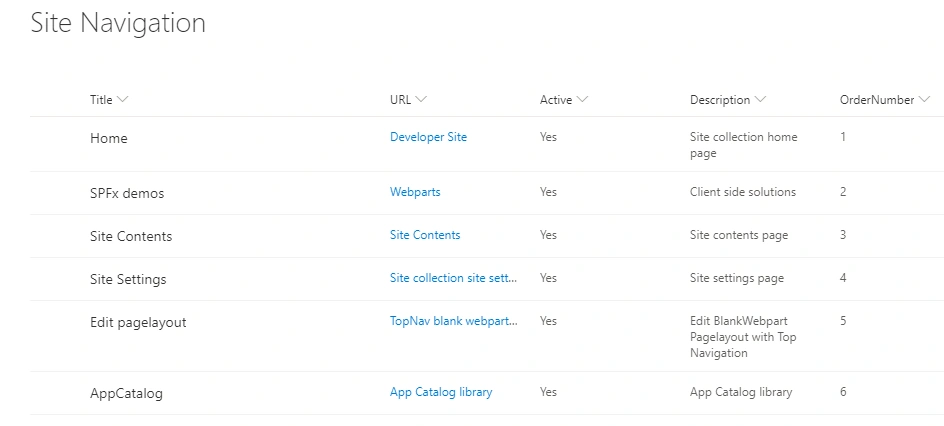
I will be uploading the list template with contents with this article, feel free to download and upload to your site.
Go to the component folder, <webpartname>.ts file, and add the componentDidMount() method to fetch the items from a SharePoint list:
- interface ISPListItemNav {
- Title: string;
- URL: string;
- Description: string;
- ParentMenu: string;
- }
- interface ITopNavigationState {
- TopNavItems: ISPListItemNav[];
- }
- export default class TopNavigation extends React.Component<ITopNavigationProps, ITopNavigationState, {}> {
- public constructor(props: ITopNavigationProps) {
- super(props);
- this.state = {
- TopNavItems: []
- };
- }
- public render(): React.ReactElement<ITopNavigationProps> {
- return (
- <Navbar bg="dark" variant="dark" expand="lg">
- <Navbar.Brand href={this.props.context.pageContext.site.absoluteUrl}>{this.props.context.pageContext.web.title}</Navbar.Brand>
- <Navbar.Toggle aria-controls="basic-navbar-nav" />
- <Navbar.Collapse id="basic-navbar-nav">
- <Nav className="mr-auto">
- {this.state.TopNavItems.map(navItem => {
- return (
- <Nav.Link href={navItem.URL}>{navItem.Title}</Nav.Link>
- );
- })}
- <NavDropdown title="Dropdown" id="basic-nav-dropdown">
- <NavDropdown.Item href="#action/3.1">Action</NavDropdown.Item>
- <NavDropdown.Item href="#action/3.2">Another action</NavDropdown.Item>
- <NavDropdown.Item href="#action/3.3">Something</NavDropdown.Item>
- <NavDropdown.Divider />
- <NavDropdown.Item href="#action/3.4">Separated link</NavDropdown.Item>
- </NavDropdown>
- </Nav>
- </Navbar.Collapse>
- </Navbar>
- );
- }
- public async componentDidMount() {
- const navItems = await this.getNavigationItems();
- this.setState({
- TopNavItems: navItems
- });
- }
- private getNavigationItems(): Promise<any> {
- return new Promise<any>((res, rej) => {
- sp.web.lists.getByTitle('Site Navigation').items
- .select('Title,URL,RoutingEnabled,RoutingRuleDescription,parentmenu,OrderNumber')
- .filter(`(parentmenu ne null or parentmenu ne '') and RoutingEnabled eq 1`)
- .orderBy('OrderNumber', true)
- .get()
- .then(spitems => {
- const navItems: ISPListItemNav[] = [];
- spitems.map(item => {
- navItems.push({
- Description: item.RoutingRuleDescription,
- Title: item.Title,
- URL: item.URL.Url,
- ParentMenu: item.parentmenu
- });
- });
- res(navItems);
- })
- .catch(e => rej(e));
- });
- }
- }
After placing the code changes, using gulp commands, bundle and Package the solution. Upload and deploy the package to your site collection.
Add the webpart to one of the page and see the contents are rendered to one of the DIV tag, as top navigation items.
Conclusion
We learnt how to fetch the items from a SharePoint list using PnP library and append the webpart to an exisitng div tagon the page.
Hope it helps someone, happy SharePointing!!
Adeniyi OdualaPosted Jan 6, 2023, 1:01 AM
Can you please share the source code
Abhijeet ChavanPosted Jan 7, 2021, 12:17 PM
How to use ParentMenu ? I am not able to make child node
Rashmi GoyalPosted Jul 29, 2020, 8:56 AM
Hi...Good documentation!!Just curious to ask Cant same thing will be acheived by Application Custumizer in extension for Modern Pages??