

Introduction
In PMS Tutorial1, the method of connecting to a local database in C# is introduced, here the code of PMS Tutorial1 will be updated. So before beginning you should refer to PMS Tutorial1 to understand PMS Tutorial2. In this tutorial we will learn the basics of inserting, updating and deleting records from a table in a local database.
2.1 Update the Drugs table schema by adding more fields and more records
Update the schema of the drugs table to add more fields. Right-click on the Drugs Table then select "Edit Table Schema".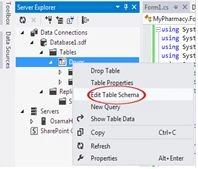
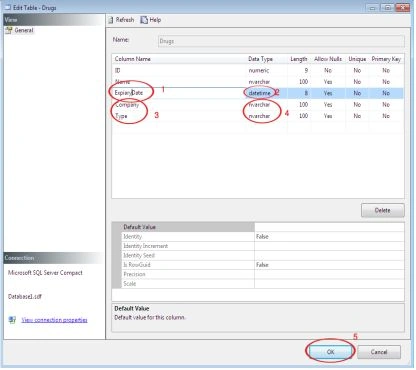
From the Edit Table window, do the following:
- Add a field called “Expiry Date” that represents the expiry date of the drug.
- Change the Data Type of the Expiry Date to be a Datetime
- Add two more fields
- Change their corresponding Data Type as preferred
- Click OK to close the form and accept the changes.
Now, explore the contents of the Drugs table and add the missing data. For example, the expiry date field is empty since it is recently added to the table. To make the database alteration operations more interesting add more records as shown in the following figure.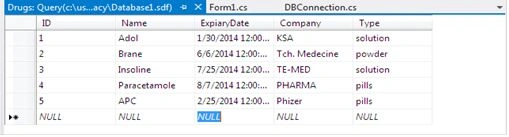
2.2 Drugs Form Design
Open Form1 in design view. Make sure you selected Form1 by clicking into an empty area of the form or simply by clicking its title bar, from the properties window change Text to be Drugs. Then choose GroupBox from Toolbox's container tab as shown in the figure.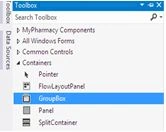
The group box is a container that holds any type of control as needed in the application. From the group box properties change its Name to gbDrugs, and change Text to “Drug Detail”. From the toolbox add a Label, Text Box and DateTimePicker as shown in the figure.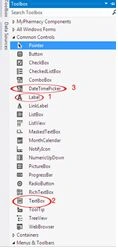
Select the Label and the TextBox together then copy once and paste 3 times. Rearrange all the resulting controls as shown in the following figure.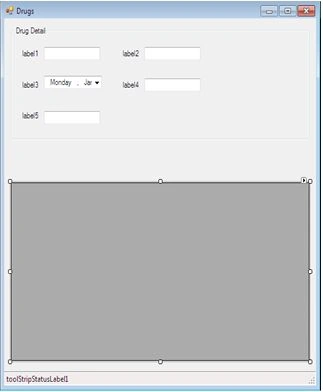
Change the properties of each control, if the properties window doesn't appear, right-click on the control and select properties from the context window, the properties should be changed as follows:
- Change the label1 Name to "lblID", and Text to “Drug ID”
- Change TextBox1 (more specifically the TextBox beside "lblID"), change its Name to be "txtDrugID"
- Change the label2 Name to "lblName" and Text to “Name”.
- Change TextBox2 (more specifically the TextBox beside "lblName"), change its Name to be "txtDrqugName".
- Change the label3 Name to be "lblExpiryDate" and Text to “Expiry Date”.
- Change the DateTimePickers Name to be "dtpExpiryDate"
- Change the label4 Name to be "lblCompany" and text to “Company”.
- Change Label5 Name to be "lblType" and text to “Drug Type”.
The final arrangements of the controls should be as shown in the following figure: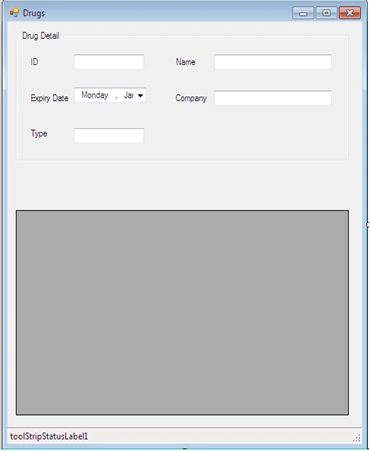
Add 3 more controls. This time add 3 Buttons, from the toolbox select a Button and drag it to the form, then copy once and paste it 2 times. The three button properties should be changed as follows:
- Button1 Name should be changed to “btnInsert”, and its Text to "Insert"
- Button2 Name should be changed to “btnUpdate”, and its Text to "Update"
- Button3 Name should be changed to “btnDelete”, and its Text to "Delete"
The final arrangements of the controls on the form should be as shown in the following figure: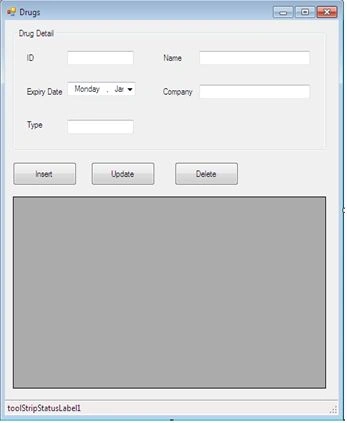
2.3 Display the Selected Record from the DataGridView
The objective is to display any record when selected in the DataGridView. So if the user clicks on any record in the DataGridView the corresponding data will be displayed on the controls in the Drug Detail container. The selection by default is done cell by cell. For accurate selection, the selection scheme of the DataGridView must be changed to Full Row Selection, this is done by selecting FullRowSelect from SelectionMode property of the dgvDrugs as shown in the following figure.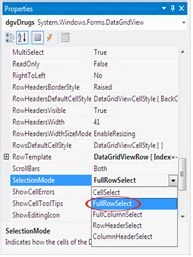
The event of clicking the DataGridView must be added to the list of its events. This is done by the following procedure:
- Click on any place inside the dgvDrugs
- Click the events button
- Double-click on the blank area beside the CellClick event.
The code editor must be opened. 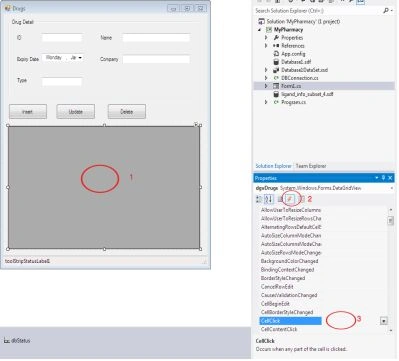
Add the following code for the CellClick procedure:
private void dgvDrugs_CellClick(object sender, DataGridViewCellEventArgs e)
{
txtID.Text = dgvDrugs.Rows[e.RowIndex].Cells["ID"].Value.ToString();
txtName.Text = dgvDrugs.CurrentRow.Cells["Name"].Value.ToString();
if(dgvDrugs.CurrentRow.Cells["ExpiryDate"].Value.ToString().Length > 0)
dtpExpiryDate.Value = Convert.ToDateTime(dgvDrugs.CurrentRow.Cells["ExpiryDate"].Value.ToString());
txtCompany.Text = dgvDrugs.CurrentRow.Cells["Company"].Value.ToString();
txtType.Text = dgvDrugs.CurrentRow.Cells["Type"].Value.ToString();
}
In the preceding procedure, e.RowIndex holds the current position of the selected row; this also can be changed by CurrentRow that holds a pointer to the current row. To call a specific column, Cells [Column Name] is used.
The if statement tests the database field (ExpiryDate), if the user leaves it blank or it is retrieved from the database with a blank value then the date will not be displayed on the dtpExpiryDate. Notice the use of Convert.ToDateTime to convert a string to date time.
Run the program now to ensure everything is working well. When a cell is clicked, the corresponding record is displayed in the Drug Detail groupbox.
2.4 Update the DBConnection Class to Hold Insert, Update and Delete Functions
The DBConnection class is updated by including three functions. The first function is drugInsert() that takes the drug info and inserts it into the database. The second function is drugUpdate that takes the new info of the record and updates it. The third function is drugDelete that takes the drug ID and deletes its record from the database. The following code represents the functions inside the DBConnection Class.
2.4.1 Insert Record
The insertion in C# is done by creating a new ADO.Net object called SqlCeCommand. It holds the SQL command that will be applied onto the database. The SqlCeCommand is initialized by the SQL statement, the current connection, and the command type (Text or Stored Procedure). The following function is added to the DBConnection class:
public int drugInsert(int ID,string Name,DateTime expDate,string company,string type)
{
try
{
string strCommand = "INSERT INTO Drugs(ID,Name,ExpiryDate,Company,Type) VALUES(@ID,@Name,@ExpiryDate,@Company,@Type)";
SqlCeCommand cmdInsert = new SqlCeCommand();
cmdInsert.Connection = conn;
cmdInsert.CommandType = CommandType.Text;
cmdInsert.CommandText = strCommand;
cmdInsert.Parameters.AddWithValue("@ID", ID);
cmdInsert.Parameters.AddWithValue("@Name", Name);
cmdInsert.Parameters.AddWithValue("@ExpiryDate",expDate );
cmdInsert.Parameters.AddWithValue("@Company", company);
cmdInsert.Parameters.AddWithValue("@Type", type);
return cmdInsert.ExecuteNonQuery();
}
catch (SqlCeException e)
{
MessageBox.Show(e.Source + "\n" + e.Message + "\n" + e.StackTrace);
return -1;
}
}
The next step is to connect this command with the form. This can be done by opening Form1 and double-clicking on the "Insert" button. The code editor will be opened for the following code to be written, that is the Click procedure of the button
private void btnInsert_Click(object sender, EventArgs e)
{
if (txtID.Text.Length > 0 && txtName.Text.Length > 0)
{
int k = DBConn.drugInsert(Int32.Parse(txtID.Text), txtName.Text, dtpExpiryDate.Value.Date, txtCompany.Text, txtType.Text);
if (k > 0)
{
dgvDrugs.DataSource = DBConn.getAllDrugs();
}
else
{
MessageBox.Show("No record inserted");
}
}
else
{
MessageBox.Show("Please fill in ID and Name of the drug");
}
}
The function checks the text in the ID TextBox and Name TextBox and ensures that the user hasn't left them empty. The drugInsert method returns -1 if an error occurs together with a message reporting the error, it returns 1 if a single record inserted. So the k value is always 1 for successful insertion of a single record.
Int32.Parse converts text or a string to an integer value. After adding the record successfully it must be displayed on the grid, getAllDrugs retrieves the entire table data including the record that is just inserted.
Run the program and click the "Insert" button. You should immediately see the following message: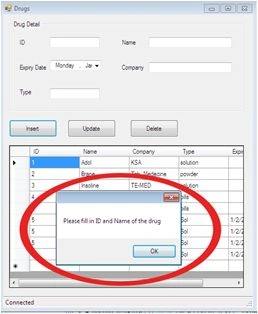
Close the message by clicking OK and fill in the ID and Name, select the date and fill in the other fields, then click insert, the new record will be inserted and shown directly on the gird.
After successfully inserting the new record, the controls must be cleared for entering a new record. Clearing the control is done by adding the following function to Form1.cs:
public void clearControls()
{
txtCompany.Text = string.Empty;
txtName.Text = string.Empty;
txtID.Text = string.Empty;
txtType.Text = string.Empty;
}
private void btnInsert_Click(object sender, EventArgs e)
{
if (txtID.Text.Length > 0 && txtName.Text.Length > 0)
{
int k = DBConn.drugInsert(Int32.Parse(txtID.Text), txtName.Text, dtpExpiryDate.Value.Date, txtCompany.Text, txtType.Text);
if (k > 0)
{
dgvDrugs.DataSource = DBConn.getAllDrugs();
clearControls();
}
else
{
MessageBox.Show("No records inserted");
}
}
else
{
MessageBox.Show("Please fill in ID and Name of the drug");
}
}
The update of a record is done by using the same ADO.Net object “SqlCeCommand”. The command is initialized by the command text, the current connection and command type. The same procedure will be used as shown in the Insert function. Open the DBConnect class and add the following code:
public int drugUpdate(string ID, string Name, DateTime expDate, string company, string type)
{
try
{
string strCommand = "Update Drugs Set Name=@Name, ExpiryDate=@ExpiryDate, Company=@Company, Type=@Type WHERE ID=" + ID;
SqlCeCommand cmdUpdate = new SqlCeCommand();
cmdUpdate.Connection = conn;
cmdUpdate.CommandType = CommandType.Text;
cmdUpdate.CommandText = strCommand;
cmdUpdate.Parameters.AddWithValue("@ID", ID);
cmdUpdate.Parameters.AddWithValue("@Name", Name);
cmdUpdate.Parameters.AddWithValue("@ExpiryDate", expDate);
cmdUpdate.Parameters.AddWithValue("@Company", company);
cmdUpdate.Parameters.AddWithValue("@Type", type);
return cmdUpdate.ExecuteNonQuery();
}
catch (SqlCeException e)
{
MessageBox.Show(e.Source + "\n" + e.Message + "\n" + e.StackTrace);
return -1;
}
}
The preceding command is used in Form1 to update the current selected item from the dgrDrugs. Open Form1 in design mode then double-click on the “Update” button, the code editor will be opened for entering the following code:
private void btnUpdate_Click(object sender, EventArgs e)
{
string strID = dgvDrugs.CurrentRow.Cells["ID"].Value.ToString();
if (strID.Length > 0)
{
int k = DBConn.drugUpdate(txtID.Text, txtName.Text, dtpExpiryDate.Value.Date, txtCompany.Text, txtType.Text);
if (k > 0)
{
dgvDrugs.DataSource = DBConn.getAllDrugs();
}
else
{
MessageBox.Show("No records updated");
}
}
else
MessageBox.Show("No record Selected");
}
Run the program and make sure everything is working well. When the user clicks one of the rows in the girdview, the corresponding data is displayed on the controls in the Drug Detail group box. Try to change the contents of the controls and click the "Update" button. The data will be updated and displayed directly into the GridView.
2.4.3 Delete Record
The record is deleted using only its ID. The car data can be deleted by passing the CarID to the delete procedure, the procedure searches for that specific record and deletes it, if there is more than one record with the same ID the procedure will delete them all. Add the drugDelete function to the DBConnection class as follows:
public int drugDelete(string ID)
{
try
{
string strCommand = "DELETE FROM Drugs WHERE ID=" + ID;
SqlCeCommand cmdDelete = new SqlCeCommand();
cmdDelete.Connection = conn;
cmdDelete.CommandType = CommandType.Text;
cmdDelete.CommandText = strCommand;
return cmdDelete.ExecuteNonQuery();
}
catch (SqlCeException e)
{
MessageBox.Show(e.Source + "\n" + e.Message + "\n" + e.StackTrace);
return -1;
}
}
private void btnDelete_Click(object sender, EventArgs e)
{
string strID = dgvDrugs.CurrentRow.Cells["ID"].Value.ToString();
if (strID.Length > 0)
{
if (MessageBox.Show("Ar you sure that you want to delete", "Delete record", MessageBoxButtons.YesNo, MessageBoxIcon.Warning) ==
DialogResult.Yes)
{
int k = DBConn.drugDelete(strID);
if (k > 0)
{
dgvDrugs.DataSource = DBConn.getAllDrugs();
clearControls();
}
}
}
}
- First, the code must check to ensure that the user clicked a record in the grid view
- Second, a message is displayed to the user asking the user if he/she really wants to delete the record, then execute the delete only if the user clicks “Yes”
- The final check is to make sure that at least one record is deleted
After deleting, the controls will be cleared for adding a new record or deleting another record.
Exercise
Download the code for this project and then update it by adding a new form; call it "Employee". Add a table called "Employee" to the database and then use the new form to display its contents. Add the functionality of Inserting, Updating and Deleting records to the new form.
David WPosted Sep 18, 2014, 10:30 AM
Yet another finely written and very education tutorial sir. Many thanks.
Mark MqPosted Sep 1, 2014, 2:07 PM
i have some problem while calling .ExecuteNonQuery(); please help
Osama HosamPosted Mar 24, 2014, 7:42 AM
I've uploaded the code again. inform me back if you have any problem
Maxson BossPosted Mar 22, 2014, 1:16 PM
Hi Osama, Thank you for the article. I've been looking for something like this to implement in a project I'm working on. I tried downloading your example but they are corrupt. Could you please re-upload them? Thank you,