

Today, in this article, we will learn how to populate hierarchical data in TreeView in WPF using MVVM architecture.
Let’s take an example of populating employees’ details per position per department in hierarchical pattern.
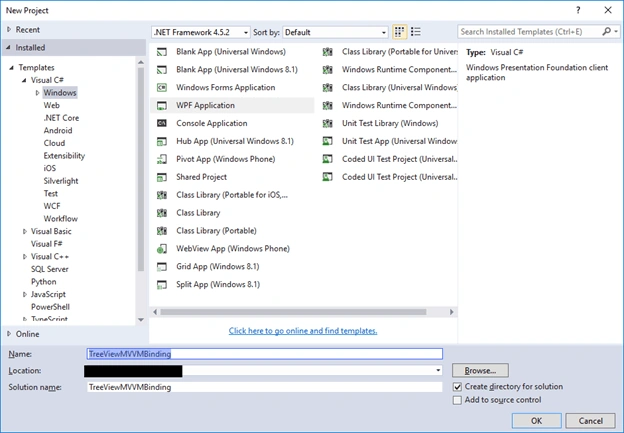
Step1 Create new project
- Create new WPF application and name it as “TreeViewMVVMBinding”.
Step2 InotifyPropertyChanged Class
- Add new class and name it as “ViewModelBase”. This is a base class to notify the client that a property value has changed.
- Add code to handle “PropertyChangedEventHandler”.
- Finally, class should be like below.
- public class ViewModelBase : INotifyPropertyChanged
- {
- public event PropertyChangedEventHandler PropertyChanged;
- public void OnPropertyChanged(string propname)
- {
- if (PropertyChanged != null)
- {
- PropertyChanged(this, new PropertyChangedEventArgs(propname));
- }
- }
- }
Step3 Employee Class
- Add new class and name it as “Employee”. This is a model class to define structure for employee.
- Define properties for employee related details.
- Inherit ViewBase class and implement Property changed notification while setting value of each property.
- Finally, class should be like below.
- Public class Employee : ViewModelBase
- {
- private string _strEmployeeName = string.Empty;
- public string EmployeeName
- {
- get
- {
- return _strEmployeeName;
- }
- set
- {
- _strEmployeeName = value;
- OnPropertyChanged("EmployeeName");
- }
- }
- public Employee(string employeename)
- {
- EmployeeName = employeename;
- }
- }
Step4 Position Class
- Add new class and name it “Position”. This is a model class to define position of an employee in the company.
- Define properties for position related details.
- Inherit ViewBase class and implement Property changed notification while setting value of each property.
- Finally, class should be like below.
- public class Position : ViewModelBase
- {
- private List<Employee> employees;
- public Position(string positionname)
- {
- PositionName = positionname;
- employees = new List<Employee>()
- {
- new Employee("Employee1"),
- new Employee("Employee2"),
- new Employee("Employee3")
- };
- }
- public List<Employee> Employees
- {
- get
- {
- return employees;
- }
- set
- {
- employees = value;
- OnPropertyChanged("Employees");
- }
- }
- public string PositionName
- {
- get;
- set;
- }
- }
Step5 Department Class
- Add new class and name it “Department”. This is a model class to define structure for Department.
- Define properties for Department related details.
- Inherit ViewBase class and implement Property changed notification while setting the value of each property.
- Finally, class should be like below.
- public class Department : ViewModelBase
- {
- private List<Position> positions;
- public Department(string depname)
- {
- DepartmentName = depname;
- positions = new List<Position>()
- {
- new Position("TL"),
- new Position("PM")
- };
- }
- public List<Position> Positions
- {
- get
- {
- return positions;
- }
- set
- {
- positions = value;
- OnPropertyChanged("Positions");
- }
- }
- public string DepartmentName
- {
- get;
- set;
- }
- }
We are done with our base implementation for required details with required classes. Now, we will bind a set of these implementations into a TreeView to populate data in hierarchical format.
Step6 ViewModel for a window to bind datacontext
- Add new class and name it as “MainWindowViewModel”. This will be a ViewModule for our View “MainWindow”.
- Finally, class should be like below.
- public class MainWindowViewModel : ViewModelBase
- {
- private List<Department> departments;
- public MainWindowViewModel()
- {
- Departments = new List<Department>()
- {
- new Department("DotNet"),
- new Department("PHP")
- };
- }
- public List<Department> Departments
- {
- get
- {
- return departments;
- }
- set
- {
- departments = value;
- OnPropertyChanged("Departments");
- }
- }
- }
Step7 Prepare View
- Add Namespace of current application in MainWindow Xaml file.
- xmlns:VM="clr-namespace:TreeViewMVVMBinding"
- Bind MainWindowViewModel as DataContext to MainWindow View.
- <Window.DataContext>
- <VM:MainWindowViewModel/>
- </Window.DataContext>
- Add TreeView control into the MainWindow and name it as “MainTreeView”.
- <TreeView x:Name="MainTreeView" HorizontalAlignment="Stretch" Margin="10" VerticalAlignment="Stretch"/>
- Bind HierarchicalDataTemplate as per the data structure.
- <TreeView x:Name="MainTreeView" HorizontalAlignment="Stretch" Margin="10" VerticalAlignment="Stretch" ItemsSource="{Binding Departments}">
- <TreeView.ItemTemplate>
- <HierarchicalDataTemplate ItemsSource="{Binding Positions}" DataType="{x:Type VM:Department}">
- <Label Content="{Binding DepartmentName}"/>
- <HierarchicalDataTemplate.ItemTemplate>
- <HierarchicalDataTemplate ItemsSource="{Binding Employees}" DataType="{x:Type VM:Position}">
- <Label Content="{Binding PositionName}"/>
- <HierarchicalDataTemplate.ItemTemplate>
- <DataTemplate DataType="{x:Type VM:Employee}">
- <Label Content="{Binding EmployeeName}"/>
- </DataTemplate>
- </HierarchicalDataTemplate.ItemTemplate>
- </HierarchicalDataTemplate>
- </HierarchicalDataTemplate.ItemTemplate>
- </HierarchicalDataTemplate>
- </TreeView.ItemTemplate>
- </TreeView>
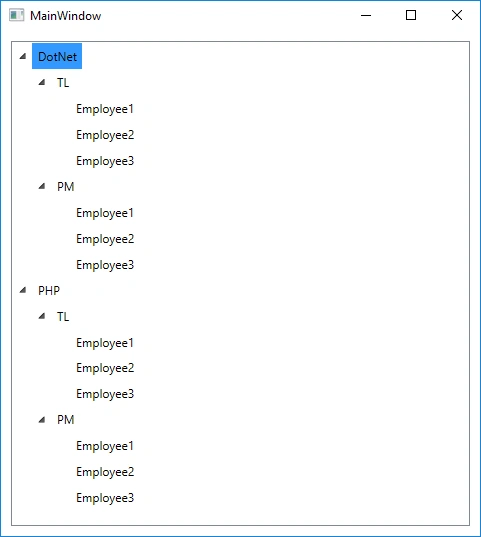
Finally, complete the XAML code for MainWindow. The window will be as mentioned below.
- <Window x:Class="TreeViewMVVMBinding.MainWindow"
- xmlns="http://schemas.microsoft.com/winfx/2006/xaml/presentation"
- xmlns:x="http://schemas.microsoft.com/winfx/2006/xaml"
- xmlns:d="http://schemas.microsoft.com/expression/blend/2008"
- xmlns:mc="http://schemas.openxmlformats.org/markup-compatibility/2006"
- xmlns:local="clr-namespace:TreeViewMVVMBinding"
- xmlns:VM="clr-namespace:TreeViewMVVMBinding"
- mc:Ignorable="d"
- Title="MainWindow" Height="350" Width="525">
- <Window.DataContext>
- <VM:MainWindowViewModel/>
- </Window.DataContext>
- <Grid>
- <TreeView x:Name="MainTreeView" HorizontalAlignment="Stretch" Margin="10" VerticalAlignment="Stretch" ItemsSource="{Binding Departments}">
- <TreeView.ItemTemplate>
- <HierarchicalDataTemplate ItemsSource="{Binding Positions}" DataType="{x:Type VM:Department}">
- <Label Content="{Binding DepartmentName}"/>
- <HierarchicalDataTemplate.ItemTemplate>
- <HierarchicalDataTemplate ItemsSource="{Binding Employees}" DataType="{x:Type VM:Position}">
- <Label Content="{Binding PositionName}"/>
- <HierarchicalDataTemplate.ItemTemplate>
- <DataTemplate DataType="{x:Type VM:Employee}">
- <Label Content="{Binding EmployeeName}"/>
- </DataTemplate>
- </HierarchicalDataTemplate.ItemTemplate>
- </HierarchicalDataTemplate>
- </HierarchicalDataTemplate.ItemTemplate>
- </HierarchicalDataTemplate>
- </TreeView.ItemTemplate>
- </TreeView>
- </Grid>
- </Window>
We are done with the implementation. Run the application and check the output. It should be like the following.
Thank you. Please let me know if you have any query or concern regarding the above implementation. I hope I have explained enough for you to understand the concept.
Vid ČrešnikPosted Jan 26, 2020, 3:08 PM
Hey, great article! I have a question though. I would like to present the data structure in this kind of matter - https://stackoverflow.com/questions/59867526/multiple-templates-treeview-with-caliburn-micro-wpf?noredirect=1#comment105866160_59867526 - do you know how to set it up?
Ankur JaiswalPosted Nov 27, 2019, 4:05 AM
Great Article
Sheethal YadattiPosted Oct 3, 2019, 1:17 AM
If we have a collection of employees and want to loop it how do I attain it using this kind of structure ?
Sumit KumawatPosted Sep 20, 2017, 1:14 AM
Hi Maulik, Nice Article. did you followed MVVM pattern for this project? can you plz share your code as im not getting some errors while linking viewmodel in Xaml.thanks
Maulik KansaraPosted Jun 22, 2017, 12:16 AM
Thank you schnewin. I am aware about this implementation. But here my purpose is to bind treeview in MVVM pattern in general format so everyone can understand. THats why, I have followed light binding.
schnewinPosted Jun 21, 2017, 3:50 PM
Hi Maulik, too avoid the PropertyNames as your OnPropertyChanged parameter, you can use the CallerMemberNameAttribute. See https://docs.microsoft.com/en-us/dotnet/api/system.runtime.compilerservices.callermembernameattribute?view=netframework-4.7. I personally prefer to use an ObservableCollection instead of List, because an ObservableCollection gets automatically refresh if an item is updated/added/deleted and you don't need to call OnPropertyChanged().