

Nearly every application has a need to notify the user about an event or to ask for confirmation before proceeding onto the next operation. Prior to MVVM, we would have used the MessageBox class in the code-behind. But for MVVM applications, that's not the appropriate way since it breaks the separation of concerns from the view or viewmodel. There are many ways to show popups in a MVVM application. In Prism, we just happen to use triggers.
Triggers
Triggers are used to initiate actions when a specific event is raised. So, it means we need to setup a view to detect the interaction request of an event and then present an appropriate visual display for that request.
How to raise events
Now for raising events, we need an event trigger. But not just any event trigger. We don't want to use the built-in event trigger, instead Prism provides its own InteractionRequestTrigger. This trigger binds to the source object or the InteractionRequest object that exists in your viewmodel. It automatically wires up and connects to the appropriate raised event on that request.
What next?
Once that request event is raised, the InteractionRequest should then invoke an action and this action calls the PopUpWindowAction and displays a popup window to the user. When it is shown its data context is set to the context parameter of the InteractionRequest.
You can even specify your own custom window content by setting the window content property on the popup window action object. The Tile of the popup window is bound to the Tile property of the context object.
InteractionRequest
The following are some interfaces one needs to be familiar with:
- INotification
- IConfirmation
- Custom
INotification has two contracts on its two properties as Tile and Content. The Tile property that I just talked about is the property it reads from. Next is the Content property, which will be our message. So, if you are not providing your own window content, this message is what's going to show in the default popup window, that is shown using this request. I like to mention that the INotification request is only used when you are trying to notify the user about something.
Next we have is IConfirmation request, that extends INotification. It adds a new confirmed property that basically signifies, if the request was confirmed or not. We use an IConfirmation request for scenarios where we want to use a messagebox for a Yes/No type answer.
And of course you can always create your custom request. So, if you want to pass custom objects or custom information or INotification and IConfirmation doesn't solve your problem, you can create your own.
Implementing Popups
Implementing popups are not at all difficult when the following procedure is followed:
- Declare an InteractionObject<T> object in the viewmodel
- Need a DelegateCommand to raise the request
- Add a trigger to the view
- Inside the trigger, add an InteractionRequestTrigger
- Add a PopupWindowAction
- Bind a command to the button
In this article, we will learn only about INotification. Let's create a simple view with a button and a label. On the click of this button, we will see how to show notifications using MVVM and my label will display the status of the notification.
- <Grid>
- <StackPanel>
- <Button Content="PopUp" Width="90" Height="30" Command="{Binding NotificationCommand}"/>
- <Label Margin="20" Content="{Binding Status}"/>
- </StackPanel>
- </Grid>
- string _status;
- public String Status
- {
- get { return _status; }
- set
- {
- SetProperty<string>(ref _status, value);
- }
- }
- public InteractionRequest<INotification> NotificationRequest { get; set; }
- public ICommand NotificationCommand { get; set; }
- public MainWindowViewModel()
- {
- NotificationRequest = new InteractionRequest<INotification>();
- NotificationCommand = new DelegateCommand(() => {
- NotificationRequest.Raise(new Notification
- { Title = "Notification", Content = "Notification message displayed" },
- i => Status = "Done");
- });
- }
Now, the rest of the work is in the view. In order to support notifications, a couple of namespaces need to be added to the view for Interactivity and Prism. Next we need to add some interaction triggers as in the following:
- <interact:Interaction.Triggers>
- <prism:InteractionRequestTrigger SourceObject="">
- // TODO: Define action here
- </prism:InteractionRequestTrigger>
- </interact:Interaction.Triggers>
Once SourceObject is set, we need to define an action. For us, it will be PopupWindowAction. The next thing is invoking the request, that will fire our trigger and will in turn show our popup window. In order to do that, we need to set a command property on our button. Once all the preceding things are done, our code will look like:
- <Window x:Class="PrismInteractivityDemo.MainWindow"
- xmlns="http://schemas.microsoft.com/winfx/2006/xaml/presentation "
- xmlns:x="http://schemas.microsoft.com/winfx/2006/xaml "
- xmlns:interact="http://schemas.microsoft.com/expression/2010/interactivity "
- xmlns:prism="http://www.codeplex.com/prism "
- Title="MainWindow" Height="150" Width="225">
- <interact:Interaction.Triggers>
- <prism:InteractionRequestTrigger SourceObject="{Binding NotificationRequest}">
- <prism:PopupWindowAction IsModal="True" CenterOverAssociatedObject="True"/>
- </prism:InteractionRequestTrigger>
- </interact:Interaction.Triggers>
- <Grid>
- <StackPanel>
- <Button Content="PopUp" Width="90" Height="30" Command="{Binding NotificationCommand}"/>
- <Label Margin="20" Content="{Binding Status}"/>
- </StackPanel>
- </Grid>
- </Window>

Click on the PopUp button, you will receive a notification message as:
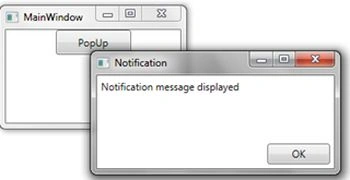
As soon as the user clicks on the OK button, the label on the MainWindow will be updated as:
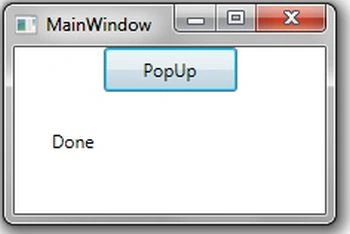
The user has been notified. So, our callback has successfully updated our status property. I hope you enjoyed learning!
Join the conversation! Your thoughts help the community grow.