

Background
In many MVC projects you might have noticed while inserting data into the database using Html.BeginForm a whole post back occurs which consumes the server resources unnecessarily . So to avoid it , we will learn how to post the data of strongly typed view Html.BeginForm using jQuery Ajax post method in MVC which will insert the data asynchronously into the database without whole page post back.
In my previous article we have learned how to post data using Ajax.BeginForm without whole page postback but it has many limitation which few are listed below .
In many MVC projects you might have noticed while inserting data into the database using Html.BeginForm a whole post back occurs which consumes the server resources unnecessarily . So to avoid it , we will learn how to post the data of strongly typed view Html.BeginForm using jQuery Ajax post method in MVC which will insert the data asynchronously into the database without whole page post back.
In my previous article we have learned how to post data using Ajax.BeginForm without whole page postback but it has many limitation which few are listed below .
- Its works only for partial view .
- It will not be work with separate layout page.
- It requires extra jQuery library.
So in this article we will learn how to post whole data of strongly typed Html.BeginForm view into database without whole postback using jQuery json with the help of Ajax request instead of Ajax.BeginForm
So, let's demonstrate it by using a simple MVC application.
Step 1: Create an MVC Application.
Step 1: Create an MVC Application.
Now let us start with a step by step approach from the creation of a simple MVC application as in the following:
- "Start", then "All Programs" and select "Microsoft Visual Studio 2015".
- "File", then "New" and click "Project", then select "ASP.NET Web Application Template", then provide the Project a name as you wish and click OK. After clicking, the following window will appear:
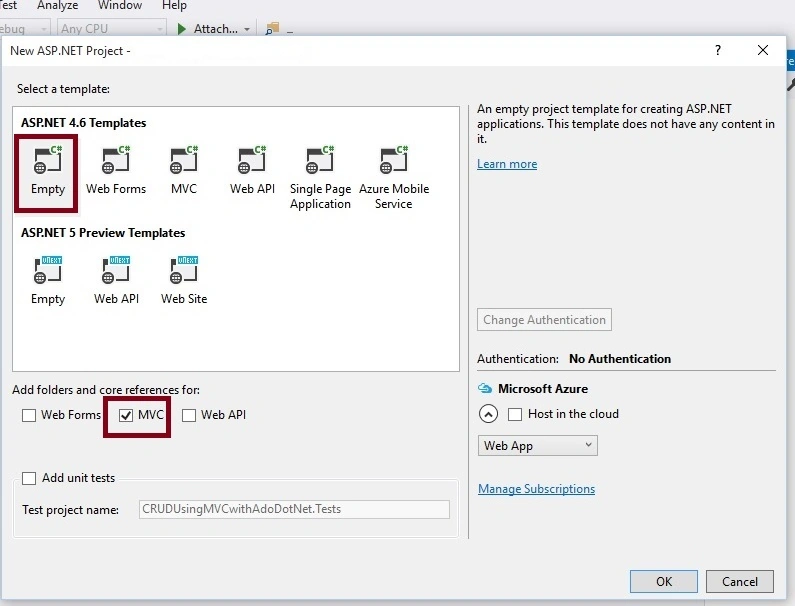
- As shown in the preceding screenshot, click on Empty template and check MVC option, then click OK. This will create an empty MVC web application.
Now next step is to add the reference of Dapper ORM into our created MVC Project. Here are the steps:
- Right click on Solution ,find Manage NuGet Package manager and click on it.
- After as shown into the image and type in search box "dapper".
- Select Dapper as shown into the image .
- Choose version of dapper library and click on install button.
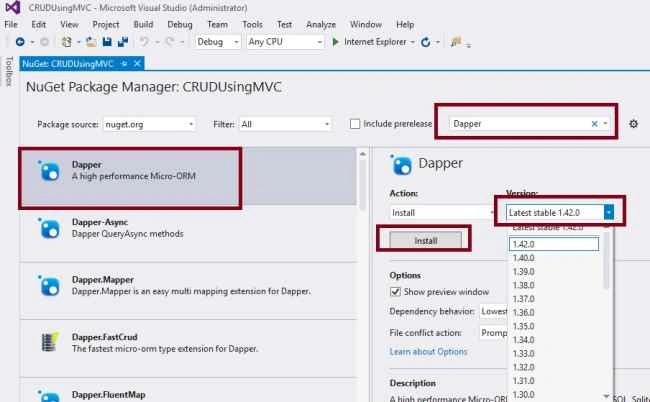
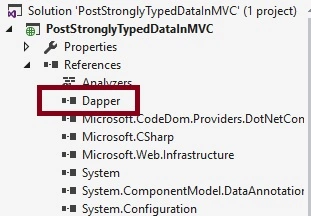
After installing the Dapper library, it will be added into the References of our solution explorer of MVC application such as:
If wants to learn how to install correct Dapper library , watch my video tutorial using following link,
If wants to learn how to install correct Dapper library , watch my video tutorial using following link,
I hope you have followed the same steps and installed dapper library.
Step 3: Create Model Class.
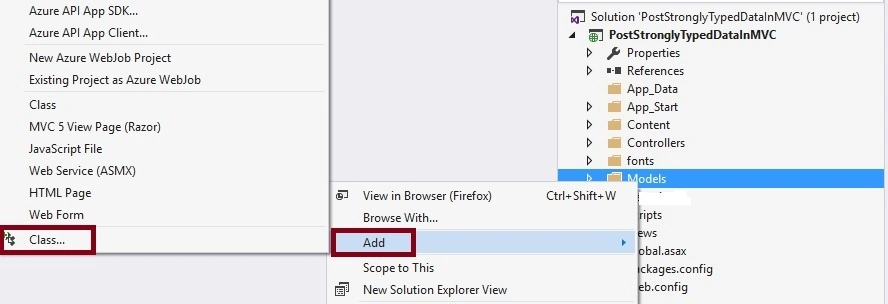
Now let's create the model class named EmpModel.cs by right clicking on model folder as in the following screenshot:
Step 3: Create Model Class.
Now let's create the model class named EmpModel.cs by right clicking on model folder as in the following screenshot:
- using System.ComponentModel.DataAnnotations;
- namespace PostStronglyTypedDataInMVC.Models
- {
- public class EmpModel
- {
- [Required]
- public string Name { get; set; }
- [Required]
- public string City { get; set; }
- [Required]
- public string Address { get; set; }
- }
- }
Note:
It is not mandatory that Model class should be in Model folder, it is just for better readability you can create this class anywhere in the solution explorer. This can be done by creating different folder name or without folder name or in a separate class library.
Step 4 : Create Controller.
It is not mandatory that Model class should be in Model folder, it is just for better readability you can create this class anywhere in the solution explorer. This can be done by creating different folder name or without folder name or in a separate class library.
Step 4 : Create Controller.
Now let us add the MVC 5 controller as in the following screenshot:
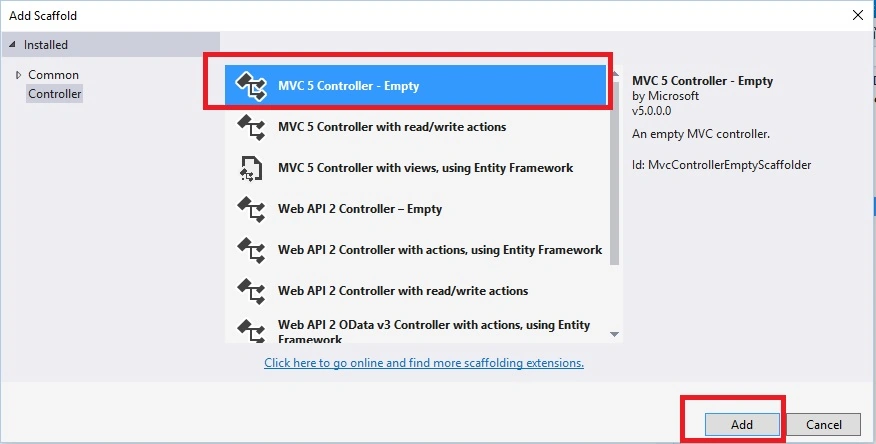
After clicking on Add button it will show the window. specify the Controller name as Home with suffix Controller:
Note: The controller name must be having suffix as 'Controller' after specifying the name of controller.
Step 5 : Create Table and Stored procedure.
Now before creating the views let us create the table named Employee in the database according to our model fields to store the details:

Create stored procedure to insert records
- Create procedure [dbo].[AddEmp]
- (
- @Name varchar (50),
- @City varchar (50),
- @Address varchar (50)
- )
- as
- begin
- Insert into Employee values(@Name,@City,@Address)
- End
Now run the above script in sql editor it will generates the stored procedure to insert details into database .
Step 6: Create Repository class.
Now create Repository folder and Add EmpRepository.cs class for database related operations, Now create method in EmpRepository.cs to insert the data into database using stored procedure with the help of dapper as in the following code snippet:
- using Dapper;
- using System.Data;
- using System.Configuration;
- using System.Data.SqlClient;
- using PostStronglyTypedDataInMVC.Models;
- namespace PostStronglyTypedDataInMVC.Repository
- {
- public class EmpRepository
- {
- SqlConnection con;
- //To Handle connection related activities
- private void connection()
- {
- string constr = ConfigurationManager.ConnectionStrings["SqlConn"].ToString();
- con = new SqlConnection(constr);
- }
- //Add employee details
- public void AddEmpDetails(EmpModel emp)
- {
- DynamicParameters ObjParm = new DynamicParameters();
- ObjParm.Add("@Name", emp.Name);
- ObjParm.Add("@City", emp.City);
- ObjParm.Add("@Address", emp.Address);
- connection();
- con.Open();
- con.Execute("AddEmp", ObjParm,commandType:CommandType.StoredProcedure);
- con.Close();
- }
- }
- }
- In the above code we are manually opening and closing connection, however you can directly pass the connection string to the dapper without opening it. Dapper will automatically handle it.
Now open the HomeController.cs and create the following action methods:
- using PostStronglyTypedDataInMVC.Models;
- using System.Web.Mvc;
- using PostStronglyTypedDataInMVC.Repository;
- namespace PostStronglyTypedDataInMVC.Controllers
- {
- public class HomeController : Controller
- {
- // GET: Home
- public ActionResult Employee()
- {
- return View();
- }
- [HttpPost]
- public JsonResult Employee(EmpModel obj)
- {
- EmpRepository ObjRepo = new EmpRepository();
- ObjRepo.AddEmpDetails(obj);
- return Json("Success",JsonRequestBehavior.AllowGet);
- }
- }
- }
Step 8 : Creating strongly typed view named Employee using EmpModel class .
Right click on View folder of created application and choose add view , select EmpModel class and create scaffolding template as,
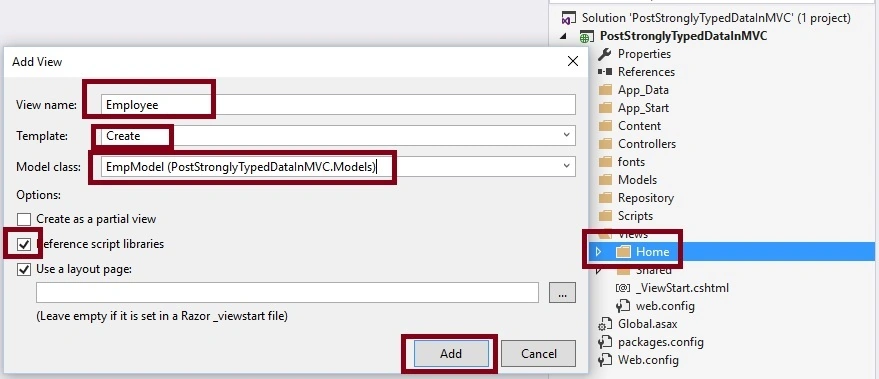
Right click on View folder of created MVC application project and add empty view named Employee.cshtml.
Right click on View folder of created application and choose add view , select EmpModel class and create scaffolding template as,
Right click on View folder of created MVC application project and add empty view named Employee.cshtml.
Step 9: Create jQuery Post method
Now open the Employee.cshtml view and create the following jQuery Post method to call controller.
- <script type="text/javascript">
- $(document).ready(function () {
- $("#EmpForm").submit(function (e) {
- e.preventDefault();
- if ($(this).valid()) {
- $.ajax({
- type: "POST",
- url: $(this).attr('action'),
- data: $(this).serialize(),
- success: function (res)
- {
- alert("Records added Successfully.");
- }
- });
- }
- });
- })
- </script>
- To work with jQuery we need to reference jQuery library .You can use the following CDN jQuery library from any provider such as Microsoft,Google or jQuery .
- https://ajax.googleapis.com/ajax/libs/jquery/1.11.3/jquery.min.js
To use above jQuery library you need an active internet connection, if you don't have then you can use the following offline jQuery library as well:
- <script src="~/Scripts/jquery-1.10.2.min.js"></script>
- @model PostStronglyTypedDataInMVC.Models.EmpModel
- @{
- ViewBag.Title = "www.compilemode.com";
- }
- <script src="~/Scripts/jquery-2.2.3.min.js"></script>
- <script src="~/Scripts/jquery.validate.min.js"></script>
- <script src="~/Scripts/jquery.validate.unobtrusive.min.js"></script>
- <script type="text/javascript">
- $(document).ready(function () {
- $("#EmpForm").submit(function (e) {
- e.preventDefault();
- if ($(this).valid()) {
- $.ajax({
- type: "POST",
- url: $(this).attr('action'),
- data: $(this).serialize(),
- success: function (res)
- {
- alert("Records added Successfully.");
- }
- });
- }
- });
- })
- </script>
- @using (Html.BeginForm("Employee","Home",FormMethod.Post,new {id="EmpForm" }))
- {
- @Html.AntiForgeryToken()
- <div class="form-horizontal">
- <hr />
- @Html.ValidationSummary(true, "", new { @class = "text-danger" })
- <div class="form-group">
- @Html.LabelFor(model => model.Name, htmlAttributes: new { @class = "control-label col-md-2" })
- <div class="col-md-10">
- @Html.EditorFor(model => model.Name, new { htmlAttributes = new { @class = "form-control" } })
- @Html.ValidationMessageFor(model => model.Name, "", new { @class = "text-danger" })
- </div>
- </div>
- <div class="form-group">
- @Html.LabelFor(model => model.City, htmlAttributes: new { @class = "control-label col-md-2" })
- <div class="col-md-10">
- @Html.EditorFor(model => model.City, new { htmlAttributes = new { @class = "form-control" } })
- @Html.ValidationMessageFor(model => model.City, "", new { @class = "text-danger" })
- </div>
- </div>
- <div class="form-group">
- @Html.LabelFor(model => model.Address, htmlAttributes: new { @class = "control-label col-md-2" })
- <div class="col-md-10">
- @Html.EditorFor(model => model.Address, new { htmlAttributes = new { @class = "form-control" } })
- @Html.ValidationMessageFor(model => model.Address, "", new { @class = "text-danger" })
- </div>
- </div>
- <div class="form-group">
- <div class="col-md-offset-2 col-md-10">
- <input type="submit" value="Save" class="btn btn-primary" />
- </div>
- </div>
- <hr />
- </div>
- }
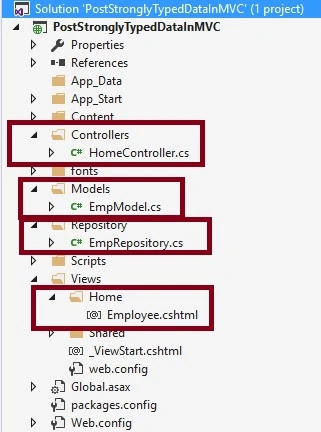
Now we have done all coding to upload files.
Step 10 : Now run the application.
After running the application initial screen will be look like as follows,
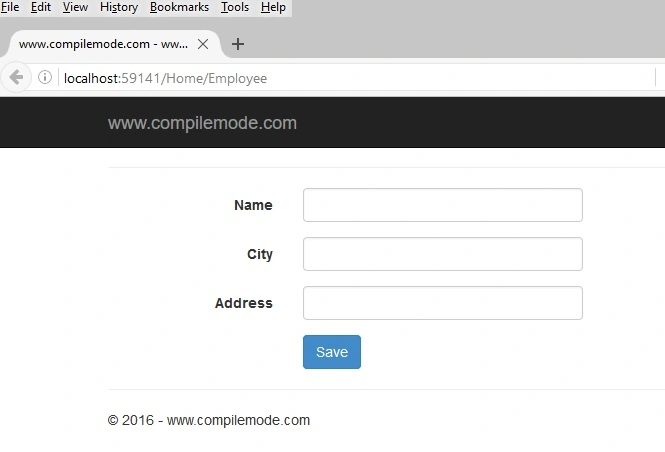
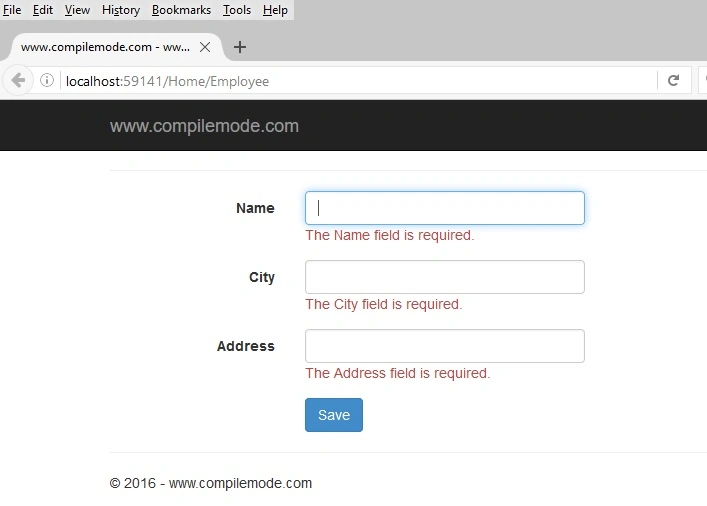
Now click on Add save button without entering the details then the following error message shows which we have defined in model class as,
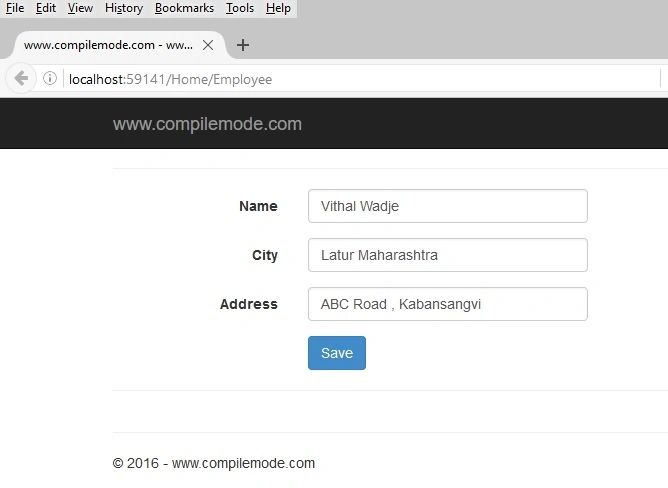
Now enter the proper details as,
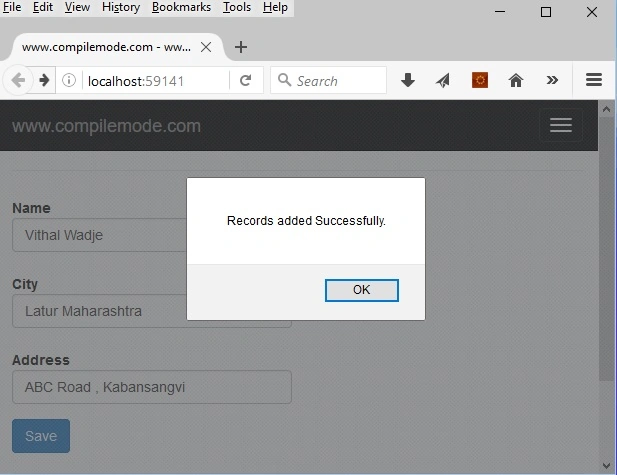
Now click on save button, It will shows the following message after successfully inserting data into database as,
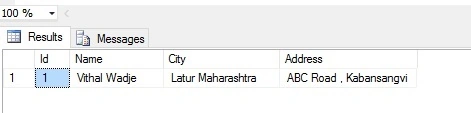
After entering the details click on save button. The details will get added into the database as in the following:
From all the above examples we have learned how to post strongly typed Html.BeginForm view data Into Database using jQuery Ajax In ASP.NET MVC.
Note
- Do a proper validation such as date input values when implementing.
- Download the Zip file of the sample application for a better understanding.
- Make the changes in the web.config file depending on your server details for the connection string.
Summary
I hope this article is useful for all readers, if you have a suggestion then please contact me.
Read more articles on ASP.NET:
I hope this article is useful for all readers, if you have a suggestion then please contact me.
Read more articles on ASP.NET:
Vithal WadjePosted May 17, 2016, 11:24 PM
Thanks
Kuppurasu NagarajPosted May 17, 2016, 11:30 AM
Nice sharing..
Vithal WadjePosted May 17, 2016, 1:41 AM
Thanks
Sonu ChaudharyPosted May 16, 2016, 3:33 PM
good one...
Prasanna MuraliPosted May 16, 2016, 10:07 AM
Nice one...
Debasis SahaPosted May 16, 2016, 12:53 AM
Nice one..
Pankaj Kumar ChoudharyPosted May 15, 2016, 4:16 AM
Really Nice Information Sir...
Pradeep SahooPosted May 14, 2016, 11:29 PM
Nice information .Thanks for sharing...
Neeraj KumarPosted May 14, 2016, 3:53 PM
Nice Article