

Products sale project in WPF using Expression Blend(Part 2)
Hi guys hope you have already gone through my previous article(Products sale project in WPF using Expression Blend(Part 2)) on this project. If you have really read the previous article than it would not be a tough job for you to understand what's going on with the project and what is the approach followed. In this article you will learn how to interact with the application through designing and coding. For this follow the steps below. In this you will come across designing and coding at the same time for every part of the project.
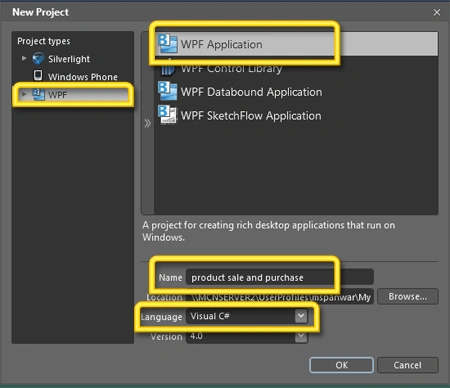
Step 1 : First of all create a WPF application in Expression Blend and name it as "Product sale and purchase" and select C# as the language for writing the code beihind. The fig below shows the screenshot of the start window;
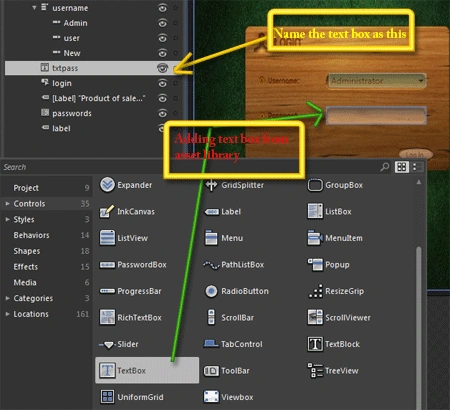
Step 2 : Now the designing window opens up in front of you all you have to do is add the following tools to your project. The fig below will show every step to make you understand it much more clear.
1. Here in this project I have added a image in the background, this is done in either of two ways i.e. by copy and paste the image into the Project window or drag the image directly onto the artboard and fix the image in the window.
2. Combobox : This allows the user to select the login type of the user
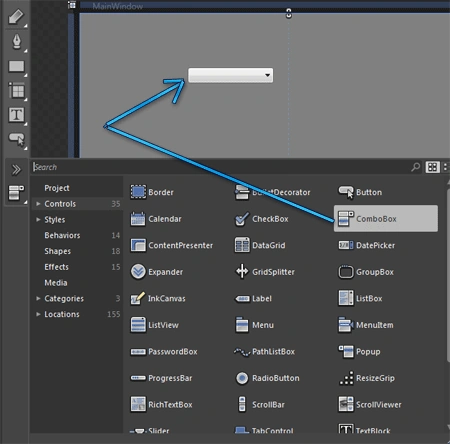
3. Naming the combobox: For this select the combobox and on top of the property window in front of the name title type the name of the combobox.
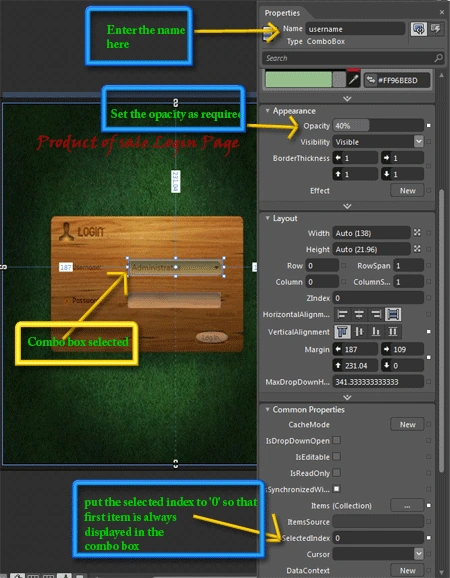
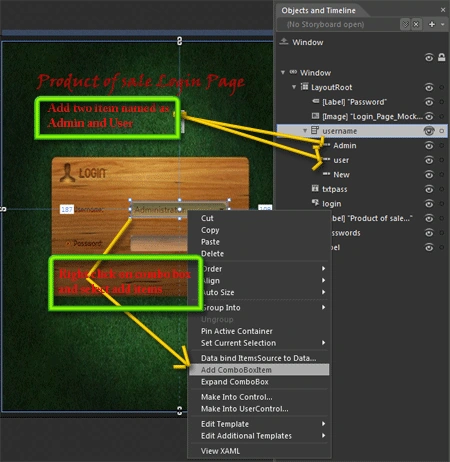
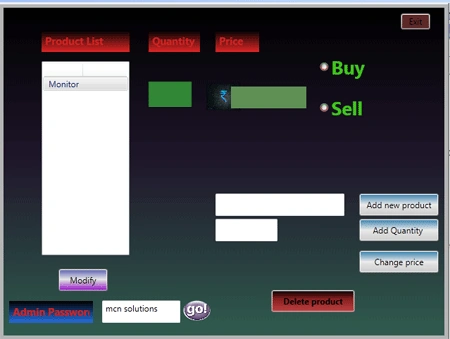
4. Adding combo box item and naming them.
5. Add Textbox for password entry by the user. For this go to the tool box and select text box and draw the text box in the artboard wherever needed.
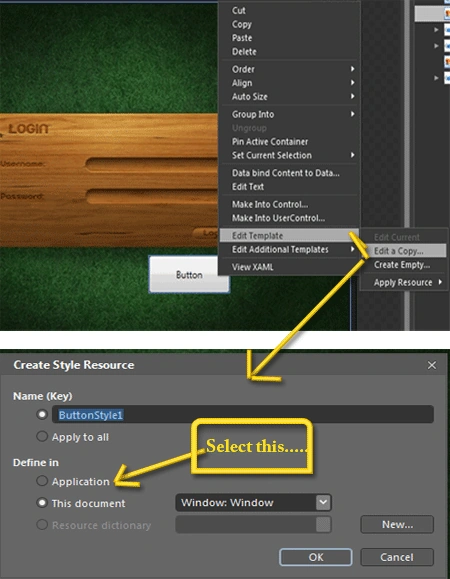
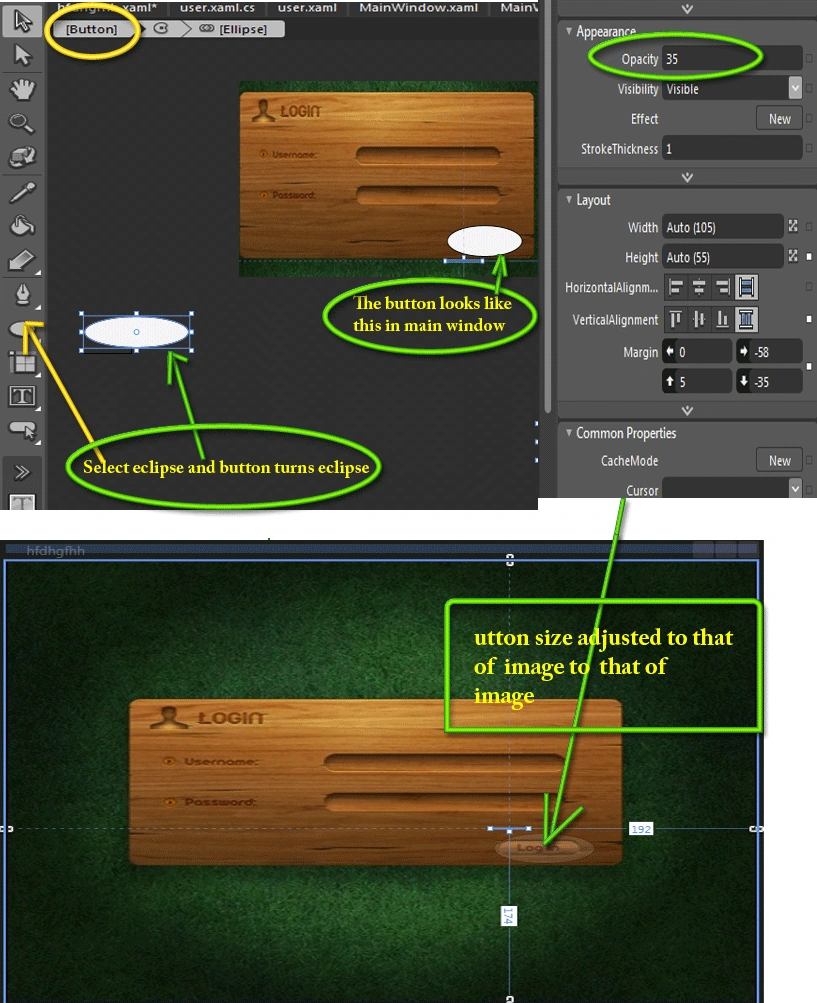
4. Now add the button from the tool box to the artboard. Important thing here is that the button that I have used is not like the ordinary button tools but has a oval shape that fits into the oval image of the background. What we do for this is select the button and right click on it and select Edit Template--> after this a window opens up select the appropriate options, rest of the process is explained through the fig.
5. Now when you get the user designed button, select this button now and go to the event palette there on the Click event give a name to the event and press enter,This opens up the code behind window. Here write these line for the logging of the user.
private
void
log(object
sender, System.Windows.RoutedEventArgs e)
{
if
(username.SelectionBoxItem.Equals("Administrator")
& txtpass.Text=="mcn
solutions")
{
Admin adm =
new
Admin();
adm.Show();
this.Close();
}
else
{
if (username.SelectionBoxItem.Equals("User")&
txtpass.Text=="value"
)
{
label.Visibility =System.Windows.Visibility.Visible;
label.Content
= " Please Sign up first ";
Admin adm =
new
Admin();
adm.Show();
this.Close();
}
else
{
label.Visibility =System.Windows.Visibility.Visible;
label.Content= "Please
Enter valid password";
}
}
}

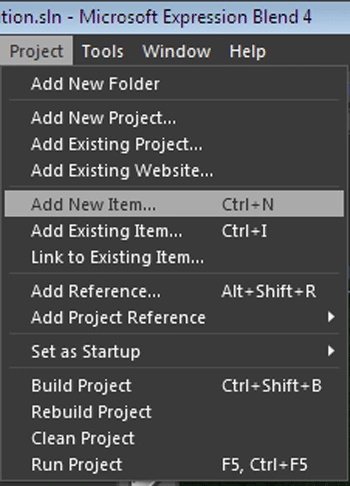
Step 3 : Now Go to Project--> Add new item-->select window and name it as "user". This window is for the registration of the User for logging in.
Step 4 : Then Design the User window like this :
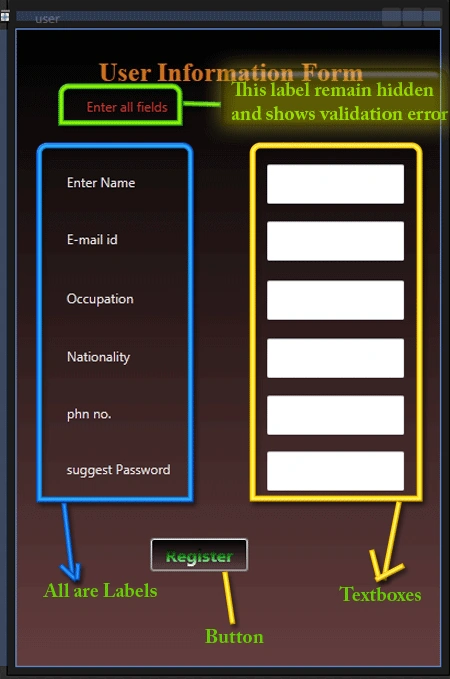
Step 5 : After designing this user window select the Register button and on the click event write the following code:
using System;
using
System.Collections.Generic;
using
System.Text;
using
System.Windows;
using
System.Windows.Controls;
using
System.Windows.Data;
using
System.Windows.Documents;
using
System.Windows.Input;
using
System.Windows.Media;
using
System.Windows.Media.Imaging;
using
System.Windows.Shapes;
using
System.Windows.Navigation;
namespace
product_of_sale_application
{
public
partial
class
user : Window
{
int id =
101;
public
user()
{
id +=1;
this.InitializeComponent();
}
private
void
registering(object
sender, System.Windows.RoutedEventArgs e)
{
if(name.Text
==""||
eid.Text==""||occ.Text==""||nation.Text
==""||phn.Text
==""||usertxtpass.Text=="")
{
userpass.Content = "please
enter all the fields";
}
else
{
userpass.Visibility = System.Windows.Visibility.Visible;
string value = usertxtpass.Text +id ;
MainWindow mw = new
MainWindow(value);
mw.Show();
this.Close();
}
}
}
}
Things will be more clear from the fig below:
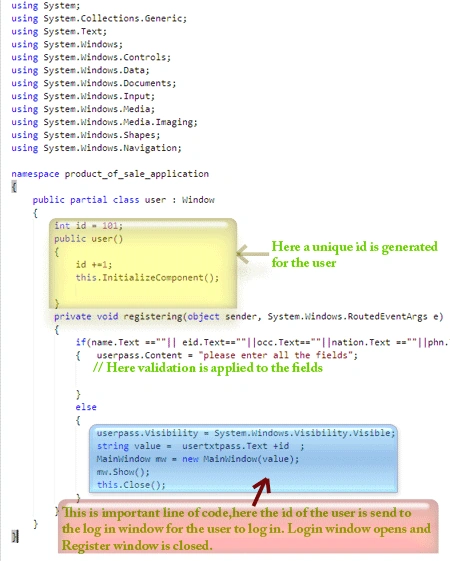
At the same time the login window should also be able to hold the value from this window for this we code these lines in the login window. Infact we are creating a parameterized constructor of the MainWindow or the login window which takes parameter from the user window or register window. This parameter here is the password generated in the user window.
using System;
using
System.Collections.Generic;
using
System.Text;
using
System.Windows;
using
System.Windows.Controls;
using
System.Windows.Data;
using
System.Windows.Documents;
using
System.Windows.Input;
using
System.Windows.Media;
using
System.Windows.Media.Imaging;
using
System.Windows.Shapes;
namespace product_of_sale_application
{
public
partial
class
MainWindow : Window
{
public MainWindow()
{
this.InitializeComponent();
}
public MainWindow(string
value1)
{
string
value = value1;
label.Visibility =System.Windows.Visibility.Visible;
label.Content=
value;
}
private
void
log(object
sender, System.Windows.RoutedEventArgs e)
{
if (username.SelectionBoxItem.Equals("Administrator")
& txtpass.Text=="mcn
solutions")
{
Admin adm = new
Admin();
adm.Show();
this.Close();
}
else
{
if (username.SelectionBoxItem.Equals("User")&
txtpass.Text=="value"
)
{
label.Visibility =System.Windows.Visibility.Visible;
label.Content = " Please
Sign up first ";
Admin adm = new
Admin();
adm.Show();
this.Close();
}
else
{
label.Visibility =System.Windows.Visibility.Visible;
label.Content= "Please
Enter valid password";
}
}
}
}
}
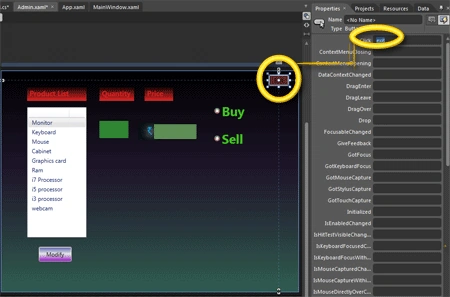
Step 6 : Now again Go to Project--> Add new item-->select window and name it as "Admin". This window is for the Product details and information for buy and sell activity after sucessful logging in. Design this window like this :
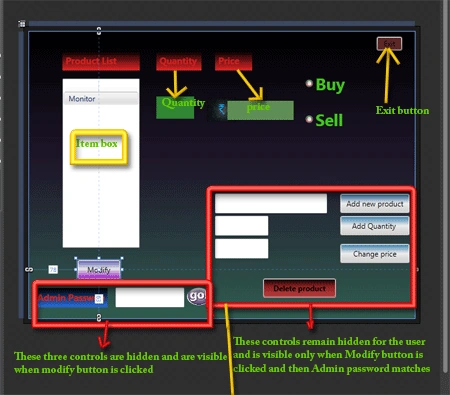
Step 7 : This Admin window is same for both the User as well as the User but the only difference is that Admin can modify the values, add product, delete product etc by providing the Administrator password. This is done through the click event of Modify button, When modify button is clicked the windows shows three new controls i.e. one is the label showing Text - Enter Password , second is the textbox which accepts the password and third is the Go button. On click of this Go button it checks the correctness of the password and if the password is correct then other controls such as - Add product, Delete Product, Add quantity, Add new Price becomes visible and if the password do not match all the controls go hidden again.
Step 8 : To include this functionality write the following code on the modify button click:
private void modifyclick(object sender, System.Windows.RoutedEventArgs e)
{
modifypass.Visibility =System.Windows.Visibility.Visible;
adminpass2.Visibility = System.Windows.Visibility.Visible;
go.Visibility = System.Windows.Visibility.Visible;
}
Here the password controls become visible first on modify click.
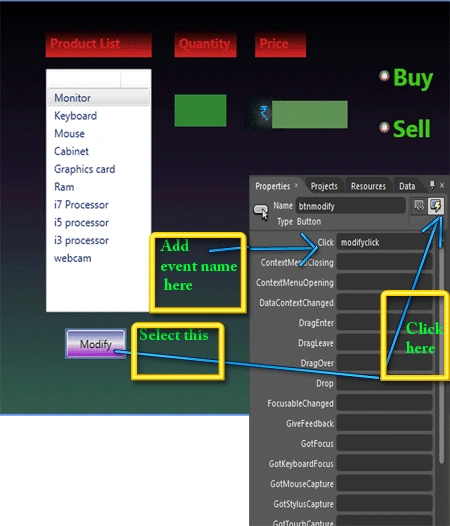
Step 9 : Then After the user enters the password the further event is managed by the Go button click. It matches the password and sets the visibility of other controls visible or hidden depending on the password. The code below is for Go button click event:
private
void
Button_Click(object
sender, System.Windows.RoutedEventArgs e)
{
if
(adminpass2.Text == "mcn
solutions") // This
is the preset password for Admin User.
{
tnewp.Visibility = System.Windows.Visibility.Visible;
tq.Visibility
=System.Windows.Visibility.Visible;
btnnp.Visibility =System.Windows.Visibility.Visible;
btncp.Visibility = System.Windows.Visibility.Visible;
btnqty.Visibility =System.Windows.Visibility.Visible;
btndp.Visibility = System.Windows.Visibility.Visible;
}
else
{
modifypass.Visibility =System.Windows.Visibility.Hidden;
adminpass2.Visibility = System.Windows.Visibility.Hidden;
tnewp.Visibility = System.Windows.Visibility.Hidden;
tq.Visibility
=System.Windows.Visibility.Hidden;
btnnp.Visibility =System.Windows.Visibility.Hidden;
btncp.Visibility = System.Windows.Visibility.Hidden;
btnqty.Visibility =System.Windows.Visibility.Hidden;
btndp.Visibility =System.Windows.Visibility.Hidden;
}
}
Step 10 : Since we are working with none borderstyle window so we have to create own Exit button to quit from the application for this add a button named exit and labeled as EXIT and write the line on its click event :
private
void
exit(object
sender, System.Windows.RoutedEventArgs e)
{
this.Close();
}
Step 11 : Now after the correct match of the admin password the add product and delete product button should work by this code:
private
void
newproduct(object
sender, System.Windows.RoutedEventArgs e)
{
Products.Items.Add(tnewp.Text);
}
private
void
delete(object
sender, System.Windows.RoutedEventArgs e)
{
k = Products.Items.IndexOf(tnewp.Text);
Products.Items.RemoveAt(k);
}
Note : In this application I have included only adding and deleting of product. The modified application to include added functionality will be available very soon.
Output :
On Admin Login select Admin from the combobox.
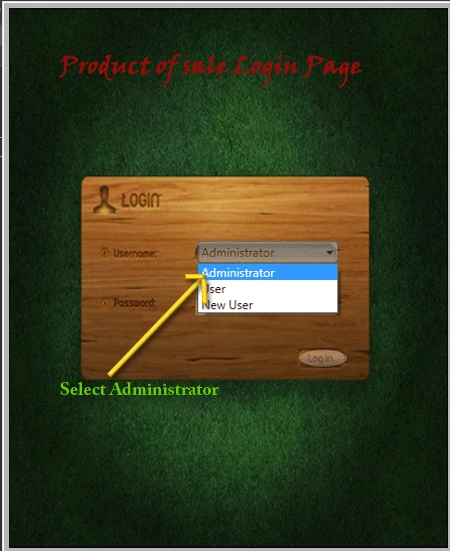
Enter password Wrong password

Select User from the combobox and click login. The register page opens up.
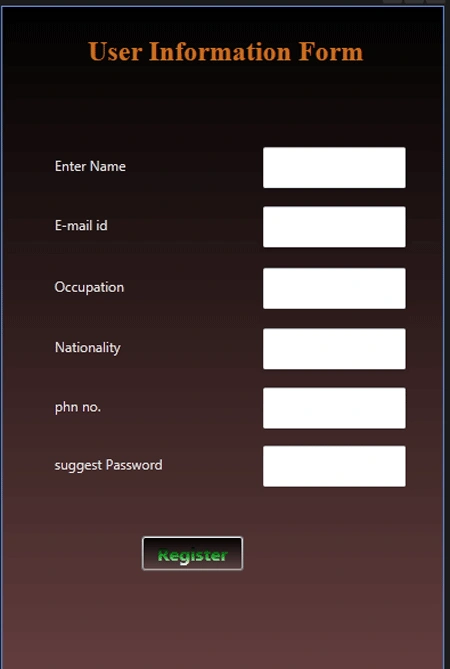
Fill all the fields and the window is redirected to main window with user password.
If fields are not filled completely, Validation error arises.
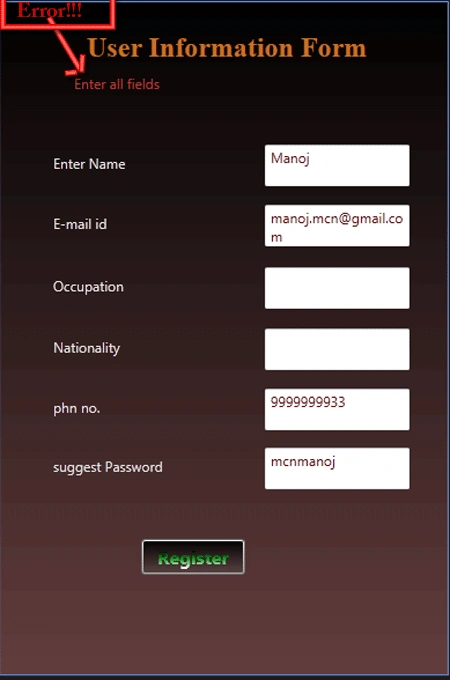
Now Log in with correct password this window opens up.
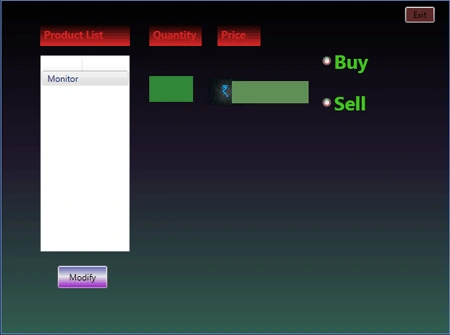
Click "MODIFY" button and enter administrator password and all controls becomes visible. Now you can add and delete products and watch them added or deleted from the Item box
Hope All the stuff that was available to was sufficient enough to clear all the basic concepts regarding an application in WPF using Expression Blend. Do post your comments.
Jovan KulevskiPosted Nov 26, 2017, 8:11 AM
Where is source qode??
qqqqqq qqqqqqqeditedPosted Dec 4, 2011, 11:47 PMEdited Dec 11, 2011, 1:49 AM
.
qqqqqq qqqqqqqPosted Nov 27, 2011, 1:37 AM
Can I receive Project Files?