

Introduction
This article is an introduction to the progress ring control, one of the advanced controls of Metro Style Applications. This control has the same purpose as the old progress control to show progress of an ongoing process except it has more features and properties. Here we will use the progress ring control on a Save button and show the ongoing process of saving data from a list.
In the following we are including the entire code of the XAML file and the code behind file to create this mini application.
Step 1 : First, you will create a new Metro Style Application. Let us see the description with images of how you will create it.
- Open Visual Studio 2012
- File -> New -> Project
- Choose Template -> Visual C# -> Metro Style Application
- Rename the application
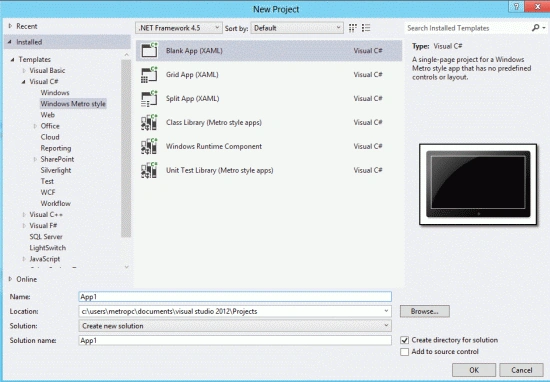
Step 2 : In the Solution Explorer there are two files that we will primarily work with; the MainPage.xaml and MainPage.xaml.cs files.

Step 3 : The MainPage.xaml file is as in the following code:
Code :
<Page
x:Class="App21.MainPage"
IsTabStop="false"
xmlns="http://schemas.microsoft.com/winfx/2006/xaml/presentation"
xmlns:x="http://schemas.microsoft.com/winfx/2006/xaml"
xmlns:local="using:App21"
xmlns:d="http://schemas.microsoft.com/expression/blend/2008"
xmlns:mc="http://schemas.openxmlformats.org/markup-compatibility/2006"
mc:Ignorable="d">
<Grid x:Name="LayoutRoot" Background="White">
<Grid.RowDefinitions>
<RowDefinition />
</Grid.RowDefinitions>
<Grid.ColumnDefinitions>
<ColumnDefinition />
</Grid.ColumnDefinitions>
<Rectangle Fill="#FFDEE6FB" Grid.Column="0" Grid.Row="0" RadiusX="20"
RadiusY="20" Opacity="0.8" StrokeThickness="0" />
<Grid Grid.Column="0" Grid.Row="0" Margin="10,10,10,10">
<Grid.ColumnDefinitions>
<ColumnDefinition Width="260" />
<ColumnDefinition Width="260" />
</Grid.ColumnDefinitions>
<Grid.RowDefinitions>
<RowDefinition Height="50" />
<RowDefinition Height="50" />
<RowDefinition Height="50" />
<RowDefinition Height="100" />
<RowDefinition Height="100" />
</Grid.RowDefinitions>
<TextBlock Text="EMP_NAME" Margin="10,5,10,5" Grid.Row="0" Grid.Column="0"
FontSize="20" Foreground="BlueViolet" />
<TextBlock Text="DESIGNATION" Margin="10,5,10,5" Grid.Row="1" Grid.Column="0"
FontSize="20" Foreground="BlueViolet" />
<TextBlock Text="ADDRESS" Margin="10,5,10,5" Grid.Row="2" Grid.Column="0"
FontSize="20" Foreground="BlueViolet" />
<TextBox x:Name="eName" Margin="10,5,10,5" Grid.Row="0" Grid.Column="2"
FontSize="20" Foreground="Black" />
<TextBox x:Name="desi" Margin="10,5,10,5" Grid.Row="1" Grid.Column="2"
FontSize="20" Foreground="Black" />
<TextBox x:Name="eADD" Margin="10,5,10,5" Grid.Row="2" Grid.Column="2"
FontSize="20" Foreground="Black" />
<Button x:Name="bindData" Margin="10,5,10,5" Grid.Row="3" Grid.Column="2"
Content="SaveValue" Background="Green" FontSize="20" Foreground="Red"
Click="bindData_Click" />
<ProgressRing x:Name="pring1" Grid.Row="3" Grid.Column="0" Foreground="Red"
IsActive="False" Margin="81,10,66,10" Width="113" Height="80">
</ProgressRing>
</Grid>
</Grid>
</Page>
Step 4 : After running this code the output looks like this:


manjunath hindupurPosted Mar 13, 2014, 3:21 AM
you are showing progress ring at column 0 and row 3, how we can show same progress ring center of screen or top of grid?
manjunath hindupurPosted Mar 13, 2014, 3:20 AM
how to show progress ring center of screen or grid?
vishwajeet kumarPosted Feb 18, 2014, 6:34 AM
We just need to add "Pring1.IsActive= true" in Button Click Event "bindData_Click" defined above in XAML file
Vivek KhatriPosted Nov 27, 2012, 4:27 AM
where is the code-behind ??? pls provide it too....
Vivek KhatriPosted Nov 27, 2012, 4:27 AM
where is the code-behind ??? pls provide it too....
Bayu AlvianPosted Nov 24, 2012, 2:58 AM
do I need to declare "pring1.isactive=true" in code behind or it will hapen automaticly when you click the button?
Quoc NguyenPosted Jul 6, 2012, 3:25 AM
Thanks for useful tip about Progress Ring (or Busy Indicator on WPF/SL) but i think you missed adding code behind, right? Regards.