

Introduction
This article will help you to create your own web-based project scheduling using ASP.Net GridView. In one of my projects I created a web-based project scheduling, but in that project I used a Telerik pivot grid. But I thought to create the same functionality without using any third-party controls. As a result I developed the same functionality using an ASP.Net GridView, so that everyone can download and use it.
Project Scheduling is a very important part in project planning. The project might be any type, for example software project development planning, Production Planning and and so on. For a realistic example let's consider a Car Seat Manufacturing Company. Every week they will produce, for example, 100 set of seats for a model of car. In the factory everything will go as planned, for example from this week beginning Monday to this week ending Friday a total of 100 seats need to be manufactured and delivered to the customer. Here we can see this is the plan since we need to produce 100 seats and deliver them to the customer. But for some reason the production could only make 90 sets of seats or production has made 100 set of seats in time. To track the Production Plan with the Actual Plan we use the Production Schedule Chart. The Production Plan will have both a Start and End Date, when the production must be started and when the production needs to be finished. The Actual date is the real production start and end date. The actual Start and End dates will be set after the production is completed. If the Actual date is the same or below the Production End date then it's clear that the production is on time and it can be delivered to the customer. If the Actual End date is past the production plan date then the production line must be closely watched and again the next time the same delay should be avoided.
In the project there might be 2 dates available, one is the Scheduled Start and End Dates (this is the initial planned date or the target date for our project) and another one is the Actual Start and End Date (this is when the project is actually started and completed). For all the projects we need to compare both the Scheduled and Actual dates, if there are greater differences in both of the dates then we need to check whether the project is completed within the scheduled time or if there was a delay in project development.
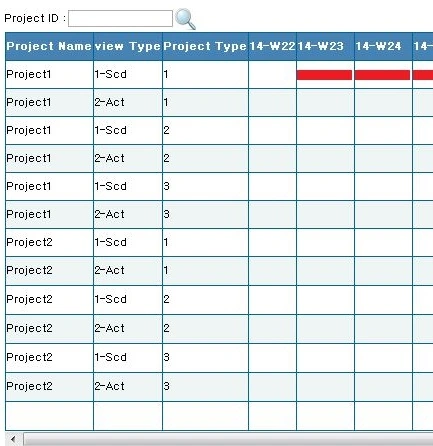
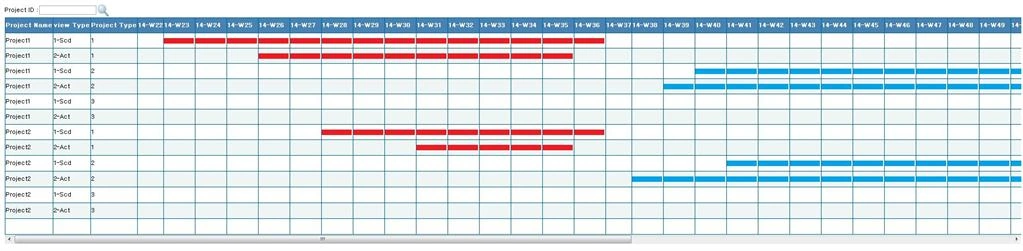
In my program I will display both the Scheduled and Actual plan details. By this the manager can view all the projects or he can search for one project and view the details and produce the report.
I have created the following two kinds of scheduling program:
- Production Plan Schedule with Actual Date comparison (the top image is the first type); it is Default.aspx
- Production Plan Schedule with Actual date with End Date Status display (see the following image); it is Default2.aspx
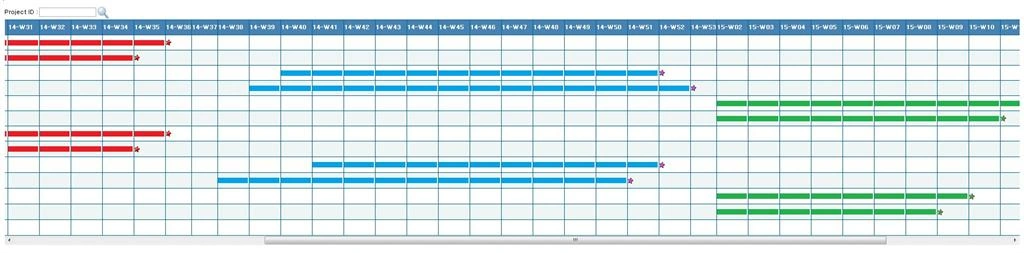
We can see here I have displayed the *Star in each end row so the user can easily find each project Schedule and Actual End Date.
Code Part
The main purpose of this article is to create a simple project scheduling and compare the results with the Scheduled date and with the Actual date.
The code part can be divided as:
- Back end part (used Stored Procedure in DB)
- Front end part (ASP.NET GridView)
In ASP.Net I have created a GridView dynamically using the GridView helper class created by me. Let's see each part in detail.
- First we start with the Back End
- CREATE TABLE [dbo].[SCHED_Master](
- [ID] [int] NOT NULL,
- [ProjectName] [varchar](100) NULL,
- [ProjectType] int NULL,
- [ProjectTypeName] [varchar](100) NULL,
- [SCHED_ST_DT] [datetime] NULL,
- [SCHED_ED_DT] [datetime] NULL,
- [ACT_ST_DT] [datetime] NULL,
- [ACT_ED_DT] [datetime] NULL,
- [status] int null
- PRIMARY KEY CLUSTERED
- (
- [ID] ASC
- )WITH (PAD_INDEX = OFF, STATISTICS_NORECOMPUTE = OFF, IGNORE_DUP_KEY = OFF, ALLOW_ROW_LOCKS = ON, ALLOW_PAGE_LOCKS = ON) ON [PRIMARY]
- ) ON [PRIMARY]
- Insert Query
- INSERT INTO [dbo].SCHED_Master
- ([ID],[ProjectName],[ProjectType],[ProjectTypeName],[SCHED_ST_DT],[SCHED_ED_DT],[ACT_ST_DT],[ACT_ED_DT],[status])
- VALUES
- (1001,'Project1',1,'Urgent','2014-06-01 00:00:00.000','2014-09-02 00:00:00.000'
- ,'2014-06-22 00:00:00.000','2014-08-26 00:00:00.000',1)
- INSERT INTO [dbo].SCHED_Master
- ([ID],[ProjectName],[ProjectType],[ProjectTypeName],[SCHED_ST_DT],[SCHED_ED_DT],[ACT_ST_DT],[ACT_ED_DT],[status])
- VALUES
- (1002,'Project1',2,'Important','2014-09-22 00:00:00.000','2014-12-22 00:00:00.000'
- ,'2014-09-19 00:00:00.000','2014-12-29 00:00:00.000',1)
- INSERT INTO [dbo].SCHED_Master
- ([ID],[ProjectName],[ProjectType],[ProjectTypeName],[SCHED_ST_DT],[SCHED_ED_DT],[ACT_ST_DT],[ACT_ED_DT],[status])
- VALUES
- (1003,'Project1',3,'Normal','2015-01-01 00:00:00.000','2015-03-24 00:00:00.000'
- ,'2015-01-01 00:00:00.000','2015-03-14 00:00:00.000',1)
- INSERT INTO [dbo].SCHED_Master
- ([ID],[ProjectName],[ProjectType],[ProjectTypeName],[SCHED_ST_DT],[SCHED_ED_DT],[ACT_ST_DT],[ACT_ED_DT],[status])
- VALUES
- (1004,'Project2',1,'Urgent','2014-07-01 00:00:00.000','2014-09-02 00:00:00.000'
- ,'2014-07-22 00:00:00.000','2014-08-26 00:00:00.000',1)
- INSERT INTO [dbo].SCHED_Master
- ([ID],[ProjectName],[ProjectType],[ProjectTypeName],[SCHED_ST_DT],[SCHED_ED_DT],[ACT_ST_DT],[ACT_ED_DT],[status])
- VALUES
- (1005,'Project2',2,'Important','2014-09-29 00:00:00.000','2014-12-22 00:00:00.000'
- ,'2014-09-08 00:00:00.000','2014-12-14 00:00:00.000',1)
- INSERT INTO [dbo].SCHED_Master
- ([ID],[ProjectName],[ProjectType],[ProjectTypeName],[SCHED_ST_DT],[SCHED_ED_DT],[ACT_ST_DT],[ACT_ED_DT],[status])
- VALUES
- (1006,'Project2',3,'Normal','2015-01-01 00:00:00.000','2015-03-04 00:00:00.000'
- ,'2015-01-01 00:00:00.000','2015-02-24 00:00:00.000',1)
- -- Select Query
- select ID,ProjectName,ProjectType,ProjectTypeName,SCHED_ST_DT,SCHED_ED_DT,ACT_ST_DT,ACT_ED_DT,status from SCHED_Master
Stored Procedure: In this Stored Procedure I have applied all the logic to produce our schedule output using a Pivot query. In my procedure I have added a comment in each section for better understanding by the user.
- -- =============================================
- -- Author : Shanu
- -- Create date : 2014-11-24
- -- Description : To get all prject Schedule details
- -- Latest
- -- Modifier : Shanu
- -- Modify date : 2014-11-24
- -- =============================================
- -- usp_ProjectSchedule_FNStatus 'Project1'
- -- usp_ProjectSchedule_FNStatus ''
- -- =============================================
- Alter PROCEDURE [dbo].[usp_ProjectSchedule_FNStatus]
- @projectId VARCHAR(10) = ''
- AS
- BEGIN
- -- 1. Declared for setting the Schedule Start and End date
- --1.Start /////////////
- Declare @FromDate VARCHAR(20) = '2014-05-29'--DATEADD(mm,-12,getdate())
- Declare @ToDate VARCHAR(20) = '2015-05-01'--DATEADD(mm, 1, getdate())
- -- used for the pivot table result
- DECLARE @MyColumns AS NVARCHAR(MAX),
- @SQLquery AS NVARCHAR(MAX)
- --// End of 1.
- -- 2.This Temp table is to created for get all the days between the start date and end date to display as the Column Header
- --2.Start /////////////
- IF OBJECT_ID('tempdb..#TEMP_EveryWk_Sndays') IS NOT NULL
- DROP TABLE #TEMP_EveryWk_Sndays
- DECLARE @TOTALCount INT
- Select @TOTALCount= DATEDIFF(dd,@FromDate,@ToDate);
- WITH d AS
- (
- SELECT top (@TOTALCount) AllDays = DATEADD(DAY, ROW_NUMBER()
- OVER (ORDER BY object_id), REPLACE(@FromDate,'-',''))
- FROM sys.all_objects
- )
- SELECT distinct DATEADD(DAY, 1 - DATEPART(WEEKDAY, AllDays), CAST(AllDays AS DATE))WkStartSundays ,1 as status
- into #TEMP_EveryWk_Sndays
- FROM d
- where
- AllDays <= @ToDate
- AND AllDays >= @FromDate
- -- test the sample temptable with select query
- -- select * from #TEMP_EveryWk_Sndays
- --///////////// End of 2.
- -- 3. This temp table is created toScedule details with result here i have used the Union ,
- --the 1st query return the Schedule Project result and the 2nd query returns the Actual Project result both this query will be inserted to a Temp Table
- --3.Start /////////////
- IF OBJECT_ID('tempdb..#TEMP_results') IS NOT NULL
- DROP TABLE #TEMP_results
- SELECT ProjectName,viewtype,ProjectType,resultnew,YMWK
- INTO #TEMP_results
- FROM(
- SELECT
- A.ProjectName ProjectName -- Our Project Name
- ,'1-Scd' viewtype -- Our View type first we display Schedule Data and then Actual
- , A. ProjectType ProjectType -- Our Project type here you can use your own status as Urgent,normal and etc
- , Case when cast(DATEPART( wk, max(A.SCHED_ED_DT)) as varchar(2)) = cast(DATEPART( wk, WkStartSundays) as varchar(2)) then 2 else
- case when min(A.SCHED_ST_DT)<= F.WkStartSundays AND max(A.SCHED_ED_DT) >= F.WkStartSundays
- then 1 else 0 end end resultnew -- perfectResult as i expect
- , RIGHT(YEAR(WkStartSundays), 2)+'-'+'W'+convert(varchar(2),Case when len(DATEPART( wk, WkStartSundays))='1' then '0'+
- cast(DATEPART( wk, WkStartSundays) as varchar(2)) else cast(DATEPART( wk, WkStartSundays) as varchar(2)) END
- ) as 'YMWK' -- Here we display Year/month and Week of our Schedule which will be displayed as the Column
- FROM -- here you can youe your own table
- SCHED_Master A (NOLOCK)
- LEFT OUTER JOIN
- #TEMP_EveryWk_Sndays F (NOLOCK) ON A.status= F.status
- WHERE -- Here you can check your own where conditions
- A.ProjectName like '%' + @projectId
- AND A.status=1
- AND A.ProjectType in (1,2,3)
- AND A.SCHED_ST_DT <= @ToDate
- AND A.SCHED_ED_DT >= @FromDate
- GROUP BY
- A.ProjectName
- , A. ProjectType
- ,A.SCHED_ED_DT
- ,F.WkStartSundays
- UNION -- This query is to result the Actual result
- SELECT
- A.ProjectName ProjectName -- Our Project Name
- ,'2-Act' viewtype -- Our View type first we display Schedule Data and then Actual
- , A. ProjectType ProjectType -- Our Project type here you can use your own status as Urgent,normal and etc
- , Case when cast(DATEPART( wk, max(A.ACT_ED_DT)) as varchar(2)) = cast(DATEPART( wk, WkStartSundays) as varchar(2)) then 2 else
- case when min(A.ACT_ST_DT)<= F.WkStartSundays AND max(A.ACT_ED_DT) >= F.WkStartSundays
- then 1 else 0 end end resultnew -- perfectResult as i expect
- , RIGHT(YEAR(WkStartSundays), 2)+'-'+'W'+convert(varchar(2),Case when len(DATEPART( wk, WkStartSundays))='1' then '0'+
- cast(DATEPART( wk, WkStartSundays) as varchar(2)) else cast(DATEPART( wk, WkStartSundays) as varchar(2)) END
- ) as 'YMWK' -- Here we display Year/month and Week of our Schedule which will be displayed as the Column
- FROM -- here you can youe your own table
- SCHED_Master A (NOLOCK)
- LEFT OUTER JOIN
- #TEMP_EveryWk_Sndays F (NOLOCK) ON A.status= F.status
- WHERE -- Here you can check your own where conditions
- A.ProjectName like '%' + @projectId
- AND A.status=1
- AND A.ProjectType in (1,2,3)
- AND A.ACT_ST_DT <= @ToDate
- AND A.ACT_ED_DT >= @FromDate
- GROUP BY
- A.ProjectName
- , A. ProjectType
- ,A.SCHED_ED_DT
- ,F.WkStartSundays
- ) q
- --3.End /////////////
- --4.Start /////////////
- --here first we get all the YMWK which should be display in Columns we use this in our next pivot query
- select @MyColumns = STUFF((SELECT ',' + QUOTENAME(YMWK)
- FROM #TEMP_results
- GROUP BY YMWK
- ORDER BY YMWK
- FOR XML PATH(''), TYPE
- ).value('.', 'NVARCHAR(MAX)')
- ,1,1,'')
- --here we use the above all YMWK to disoplay its result as column and row display
- set @SQLquery = N'SELECT ProjectName,viewtype,ProjectType,' + @MyColumns + N' from
- (
- SELECT
- ProjectName,
- viewtype,
- ProjectType,
- YMWK,
- resultnew as resultnew
- FROM #TEMP_results
- ) x
- pivot
- (
- sum(resultnew)
- for YMWK in (' + @MyColumns + N')
- ) p order by ProjectName, ProjectType,viewtype'
- exec sp_executesql @SQLquery;
- END
- ASP.Net GridView Code part
In my previous article http://www.c-sharpcorner.com/UploadFile/asmabegam/creating-dynamic-datagridview-using-helper-class/ I explained how to create a Helper class for a DataGridView C# Windows Forms application. The same logic has been used to create a helper class for an ASP.Net GridView. You can find my Helper Class in the attached source file.
- Layout
- DataBind
- Template Column
- protected void InitializeGridControl()
- {
- ShanuGDVHelper.Layouts(Grid1, 600, 99, true, false, false, true, true);
- ShanuGDVHelper.BoundColumnFormat(Grid1, "Project Name", "ProjectName", HorizontalAlign.Left, 0, "", "", false, true, VerticalAlign.Middle, HorizontalAlign.Left);
- ShanuGDVHelper.BoundColumnFormat(Grid1, "view Type", "viewtype", HorizontalAlign.Left, 0, "", "", false, true, VerticalAlign.Middle, HorizontalAlign.Left);
- ShanuGDVHelper.BoundColumnFormat(Grid1, "Project Type", "ProjectType", HorizontalAlign.Left, 0, "", "", false, true, VerticalAlign.Middle, HorizontalAlign.Left);
- SortedDictionary<string, string=""> sd = new SortedDictionary<string, string="">() { };
- sd.Add("@projectId", txtProjectID.Text.Trim());
- DataSet ds = new DataSet();
- ds = new ShanuProjectScheduleBizClass().SelectList(sd);
- for (int i = 3; i < ds.Tables[0].Columns.Count; i++)
- {
- ShanuGDVHelper.Templatecolumn(Grid1, ds.Tables[0].Columns[i].ColumnName, ds.Tables[0].Columns[i].ColumnName, HorizontalAlign.Left, 0, GDVControlType.placeholder, "", true, VerticalAlign.Middle, HorizontalAlign.Left);
- }
- //grid events
- ////////Grid1.RowCommand+=new GridViewCommandEventHandler(Grid1_RowCommand);
- //////// Grid1.RowCreated+=new GridViewRowEventHandler(Grid1_RowCreated);
- }
- void plcHolder_DataBinding(object sender, EventArgs e)
- {
- PlaceHolder txtdata = (PlaceHolder)sender;
- GridViewRow container = (GridViewRow)txtdata.NamingContainer;
- object dataValue = DataBinder.Eval(container.DataItem, DataFieldName);
- object dataValue1 = DataBinder.Eval(container.DataItem, "ProjectType"); // here I have used this column as static user can change this to work with your program .here i have used this to check for Project type status and load the images
- Image img = new Image();
- if (Convert.ToInt32(dataValue) == 1)
- {
- img.ImageUrl = GetImage(Convert.ToInt32(dataValue1.ToString()));
- }
- else if (Convert.ToInt32(dataValue) == 2)
- {
- img.ImageUrl = GetImage_ScdEnd(Convert.ToInt32(dataValue1.ToString()));
- }
- else
- {
- img.ImageUrl = "~/Images/blanks.jpg";
- }
- img.Style["float"] = "center";
- txtdata.Controls.Add(img);
- }
- private string GetImage(int value)
- {
- if (value == 1)
- {
- return "~/Images/red_new1.jpg";
- }
- else if (value == 2)
- {
- return "~/Images/blue_new1.jpg";
- }
- else
- {
- return "~/Images/green_new1.jpg";
- }
- }
Bind Dataset to GridView: In my project I used a Biz Class and a SQL helper class to connect to the database and return the dataset to bind to the GridView. You can find the Biz and SQL helper classes under the “App_code” folder in my Zip file. The user can search the project by projectName, for example in a button click event I called the SelectList Method to bind the result to the GridView.
- public void SelectList()
- {
- SortedDictionary<string, string=""> sd = new SortedDictionary<string, string="">() { };
- sd.Add("@projectId", txtProjectID.Text.Trim());
- DataSet ds = new DataSet();
- ds = new ShanuProjectScheduleBizClass().SelectList(sd);
- if (ds.Tables.Count > 0)
- {
- if (ds.Tables[0].Rows.Count > 0)
- {
- ShanuGDVHelper.DataBinds(Grid1, ds, false);
- }
- }
- }
- // Button Click event
- protected void btnSearch_Click(object sender, ImageClickEventArgs e)
- {
- SelectList();
- }
- //to return the dataset
- public DataSet SelectList(SortedDictionary<string, string=""> sd)
- {
- try
- {
- return SqlHelper.ExecuteDataset(ConnectionString, CommandType.StoredProcedure, "usp_ProjectSchedule", GetSdParameter(sd));
- }
- catch (Exception ex)
- {
- throw ex;
- }
- }
- Create the table and Stored Procedure to your database.
- Change the WebConfig database connection string to your local DB Server, UID and PWD.
Syed ShanuPosted Apr 10, 2015, 7:50 PM
Thank You Karthik
Karthik Muthu KaruppanPosted Apr 10, 2015, 2:08 PM
good one
Sibeesh VenuPosted Apr 10, 2015, 5:04 AM
Syed Shanu yeah it was great. We really enjoyed it.
Syed ShanuPosted Apr 10, 2015, 1:34 AM
Thank You Sibeesh hope you had very good time at Delhi :)
Sibeesh VenuPosted Apr 10, 2015, 1:34 AM
Good one.
Syed ShanuPosted Apr 10, 2015, 1:16 AM
Thank You Nitin Tyagi
NitinPosted Apr 10, 2015, 1:13 AM
nice
Santhakumar MunuswamyPosted Apr 9, 2015, 10:54 PM
Thanks for nice article.....
Syed ShanuPosted Apr 9, 2015, 4:31 AM
Thank You Gowtham
Gowtham RajamanickamPosted Apr 9, 2015, 4:27 AM
good one..
Syed ShanuPosted Apr 9, 2015, 4:11 AM
Thank You Khargesh Rajput.
Khargesh RajputPosted Apr 9, 2015, 4:08 AM
nice work sir