

Introduction
In this article, I will demonstrate to you two types of demos that are how we can make a signal & slot operation and a simple progress bar for Python applications by using PyQt5 (Qt designer) GUI toolkit.
Prerequisites
- PyQt5 (Qt Designer)
- PyCharm 2019.2
PyQt5 - Signal and slot function
The signal and slot operation are used to handle events and signals of the objects or widgets at the python app development level. It will also enable communication between some designed objects.
The following steps are needed for creating a Python signal and slot operations.
Step 1 - Create QDialog (new form)
Start by creating a new dialog. New Form >> Dialog without Buttons >> Create
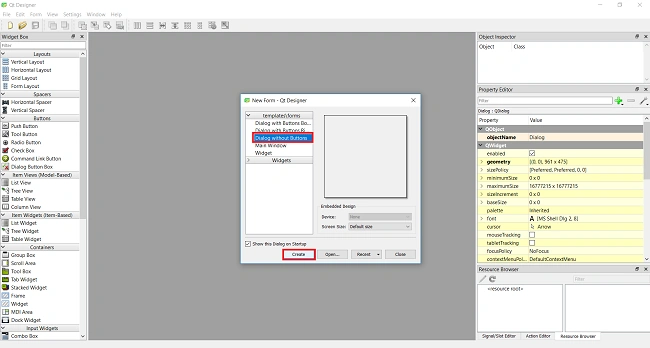
Step 2 - Create two widgets
For our signal and slot example, we will handle two types of widgets such as LineEdit and Label. Under the input widgets, choose “QLineEdit” and drag and drop to the Dialog form. In the same way, click a Qlabel from the Display widgets drag and drop to the Dialog form.

Step 3 - Handling signal and slot
After designing the form, we need to give signals for the widgets.
- In signal and slot editor >> Click + (Add) icon.
- Sender = lineEdit
- Signal = textChanged (QString)
- Receiver = Label
- Slot = setText (QString)
Now it's time to preview our demo, Form>> preview.

Now, we have successfully finished our signal and slot demo with the help of PyQt5 (Qt Designer) GUI toolkit.
Source example
Here, we can view our demo project source by doing a simple trick; that is converting the .ui file into .py format. I already published an article about that, Click here
- from PyQt5 import QtCore, QtGui, QtWidgets
- class Ui_Dialog(object):
- def setupUi(self, Dialog):
- Dialog.setObjectName("Dialog")
- Dialog.resize(820, 443)
- self.lineEdit = QtWidgets.QLineEdit(Dialog)
- self.lineEdit.setGeometry(QtCore.QRect(210, 140, 331, 61))
- self.lineEdit.setObjectName("lineEdit")
- self.label = QtWidgets.QLabel(Dialog)
- self.label.setGeometry(QtCore.QRect(220, 260, 311, 51))
- font = QtGui.QFont()
- font.setPointSize(14)
- self.label.setFont(font)
- self.label.setObjectName("label")
- self.retranslateUi(Dialog)
- self.lineEdit.textChanged['QString'].connect(self.label.setText)
- QtCore.QMetaObject.connectSlotsByName(Dialog)
- def retranslateUi(self, Dialog):
- _translate = QtCore.QCoreApplication.translate
- Dialog.setWindowTitle(_translate("Dialog", "Dialog"))
- self.label.setText(_translate("Dialog", "TextLabel"))
- if __name__ == "__main__":
- import sys
- app = QtWidgets.QApplication(sys.argv)
- Dialog = QtWidgets.QDialog()
- ui = Ui_Dialog()
- ui.setupUi(Dialog)
- Dialog.show()
- sys.exit(app.exec_())
Simple PyQt5 progress Bar
Generally, the progress bar performs as an activity indicator to represent graphically of computer operations such as file transfer, download, or installation.
Let’s create a simple progress bar using the PyQt5 tool kit.
First of all, we need to create a new form for our demo.
- New form >> Dialog without Button>> Create
- Here, we are going to create a simple Progress Bar using the PyQt5 tool kit.
- Under the Display Widgets, drag and drop Progress bar to QDialog form.
- Next, drag and drop a Push Button to the QDialog form for the fake progress operation demo.

Step 3 - Create download progress
- Here, we will create a simple fake progress bar that represents how the progress bar will perform well.
- After finishing the progress Bar design, we can save and convert the .ui file to .py format for viewing the source code.
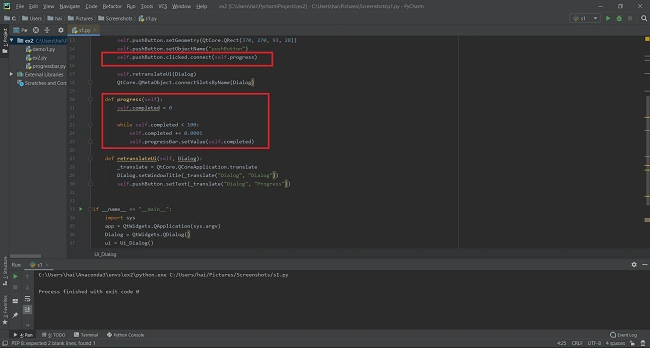
- self.pushButton.clicked.connect(self.progress)
- def progress(self):
- self.completed = 0
- while self.completed < 100:
- self.completed += 0.0001
- self.progressBar.setValue(self.completed)
- The button clicked method () is used when we click on the Push Button named “Progress” then the progress function will execute.
- In the progress function, we have a variable named as complete.
- The while condition will iterate 0 (complete) to 100. In the meantime, the fake download progress will be visible.
Step 4 - Save and run
Here, I will give the full source code of our demo.
Full Source code
- from PyQt5 import QtCore, QtGui, QtWidgets
- class Ui_Dialog(object):
- def setupUi(self, Dialog):
- Dialog.setObjectName("Dialog")
- Dialog.resize(961, 475)
- self.progressBar = QtWidgets.QProgressBar(Dialog)
- self.progressBar.setGeometry(QtCore.QRect(240, 150, 401, 31))
- self.progressBar.setProperty("value", 24)
- self.progressBar.setObjectName("progressBar")
- self.pushButton = QtWidgets.QPushButton(Dialog)
- self.pushButton.setGeometry(QtCore.QRect(370, 270, 93, 28))
- self.pushButton.setObjectName("pushButton")
- self.pushButton.clicked.connect(self.progress)
- self.retranslateUi(Dialog)
- QtCore.QMetaObject.connectSlotsByName(Dialog)
- def progress(self):
- self.completed = 0
- while self.completed < 100:
- self.completed += 0.0001
- self.progressBar.setValue(self.completed)
- def retranslateUi(self, Dialog):
- _translate = QtCore.QCoreApplication.translate
- Dialog.setWindowTitle(_translate("Dialog", "Dialog"))
- self.pushButton.setText(_translate("Dialog", "Progress"))
- if __name__ == "__main__":
- import sys
- app = QtWidgets.QApplication(sys.argv)
- Dialog = QtWidgets.QDialog()
- ui = Ui_Dialog()
- ui.setupUi(Dialog)
- Dialog.show()
- sys.exit(app.exec_())
Now it's time to run our demo, file >> save all and click on Run icon.

Now, we have successfully finished our Python Progress Bar demo by the PyQt5 GUI (Qt Designer) tool kit.
Mageshwaran RPosted Nov 16, 2019, 9:16 AM
Great Article Elavarasan...
Sudeshna SurPosted Sep 17, 2019, 4:23 PM
This is awesome! Great article.
John RitchiePosted Sep 17, 2019, 4:12 PM
Cool! Great example.
Kokila RaniPosted Sep 17, 2019, 11:33 AM
Interesting .Simple and clear explanation.. very useful information... looking forward to your next article.
Guest UserPosted Sep 17, 2019, 9:44 AM
Nice Explanation... Thanks for sharing your valuable article...