

This is a series of articles which will guide you to build a Python Flask web app and host it in Azure Websites as a free web app. This is aimed at absolute beginners who would like to start with Python development and know about the Read API. The requirements for following this series is,
-
Azure Account(If not you can get a free account with ₹13,300 worth of credits from here. If you are a student you can verify student status to get it without entering credit card details else credit card details are mandatory)
-
Python 3.x installed on your machine(If not go to here to get step by step guidance)
In this series we aim to build a website which has a browse button to browse our local computer for files and an upload button to process the input file by calling Azure Cognitive Services Read API and save the result to a CSV file that is generated from the JSON result which Azure Cognitive Services Read API gives. The website takes image/pdf as input and gives output as a CSV file with each page of pdf/image in separate rows with words on separate columns.
Input
As given in attached PDF.
Output
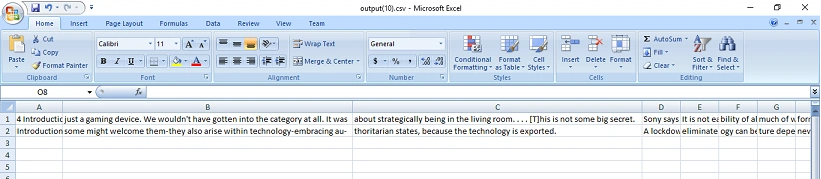
.png?lastModify=1601820360)
In this article we will cover up to creating a html page for uploading a file and rendering it using flask and how to handle the file with Python on the server by just returning the uploaded file. In the next article we will cover integrating Read API and converting the resultant data to CSV.
Flask Installation
You can just install Flask with pip by the following command in command prompt/powershell/terminal
- pip install Flask
Now create a folder for Application.
Here I'm creating a folder with name Reader
Render HTML Page
In this section we aim to render an HTML Page.
HTML Page
Create a HTML file with browse file type button and an upload button inside the app folder.
Here I'm creating an HTML file with name home.html and creating a file type browse button and an upload button on a form inside Reader folder. The form has attributes for submitting action. It's a POST method with encryption type as form-data and is submitted to url ''/uploader". This enables you to upload the file and other form fields (here there are no other form fields) as submit type button (here Upload button) is clicked.

The page if viewed in a browser will be similar to the below screenshot.
Now create a folder inside Reader folder with name templates and copy the file into the folder.
Python App
Create a Python file to render the above HTML webpage inside the app folder.
Here I'm creating a Python file with name app.py with the following code to render the above webpage inside Reader folder.
- from flask import Flask, render_template
- > app = Flask(__name__)
- > @app.route('/')
- > def home():
- > return render_template('home.html')
- > if __name__ == '__main__':
- > app.run(debug=True)
Now save the file and run the python file app.py with the following command.
python app.py
Explanation of the above code segment
First line: We imported the Flask class and render_template which allows us to render an HTML template.
Second line: We created an instance of this Flask class which will be our WSGI application. Name of the application’s module or package is the first argument. While using a single module (as in this example), you should use __name__ because depending on if it’s started as application or imported as module the name will be different ('__main__' versus the actual import name). This is needed so that Flask knows where to look for templates, static files, and so on. For more information have a look at the Flask documentation.
Third line: We use a decorator route() to tell Flask what URL should trigger our function. Here we use '/'.
Fourth line: The function is given a name which is also used to generate URLs for that particular function.
Fifth Line: The render_templatemethod from the flask framework and then we passed an HTML file to that method. The method will generate a jinja2 template object out of that HTML and return it to the browser when the user visits associated URL.
Now by going to localhost:5000 it should display the webpage shown in the screenshot at the above subsection.
Great! Let’s add these buttons to the functionality...
Return the uploaded file
In this section we are looking into how we can handle a file in server. ie; How we can get the uploaded file and filename and how to return file. For this to execute we need to import request, send_from_directory, and redirect from flask. So the updated Import Flask Statement is:
- from flask import Flask,request, render_template,send_from_directory,redirect
Here we have our HTML template ready for submitting the file but the Python server side code does not handle this.
- @app.route('/uploader', methods=['POST'])
- def upload_file():
- if 'file' not in request.files:
- return redirect(request.url)
- file = request.files['file']
- if file.filename == '':
- return redirect(request.url)
- if file:
- return redirect('/uploads/'+file.filename)
- return ''
Explanation
In order to handle files we have to add another function with decorator "@app.route('/uploader', methods=['POST'])". The decorator tell Flask the URL for triggering the function is '/uploader' which we add as action in HTML page (refer the HTML code) and the method is a POST type.
The 'file = request.files['file']' sets the file variable with the uploaded file. The first if statement checks if the post request has the file part and redirects if it does not. The second if statement checks if the user has selected a file. If users have not selected a file, browser also submits an empty part without filename.
The 'file.filename' gives the file name and if file exists we redirect it to url "'/uploads/'+file.filename".
For sending a file to user we need to know the current location and filename. We already have filename but don't know the current location. For getting the current location you need to import os module and call os.path.dirname(). For this add the following two lines to your code.
- import os
- dirname = os.path.dirname(__file__)
So now we need another function to handle the sending back file functionality. The code below helps you for the same.
- @app.route('/uploads/<filename>')
- def uploaded_file(filename):
- return send_from_directory(dirname,
- filename)
Explanation
In order to return a file to client we have to add another function with decorator "@app.route('/uploads/<filename>')". The decorator tells Flask the URL for triggering the function is '/uploads/<something> and this "something" here is bound to the parameter of the function. In our case it's the filename.
send_from_directory function in Flask will take two compulsory arguments first directory name and second file name. It also can be overloaded with optional arguments which can be found in the official documentation.
Now save the HTML file(home.html) and Python file(app.py) and run using python <filename> command (python app.py).
Yep! You must be able to upload a file and return the same file to you.
But as of now you don't have any use of this in any application, but we now know how to handle a file in server. The next article in the series will help you to complete the task of integrating Read API and enable users to download the result as a CSV file.
To go to next article [Integrating Read API, Converting The Resultant JSON To CSV And Deploy App To Azure] in this series click here.
For knowing about "Passing An HTML Table To Client And Passing Multiple Values As JSON From Server To Client" go to my article by clicking here.
Below is the complete code of my home.html and app.py as of now.
app.py
- from flask import Flask,request, render_template,send_from_directory,redirect
- import os
-
- dirname = os.path.dirname(__file__)
- app = Flask(__name__)
-
- @app.route('/uploads/<filename>')
- def uploaded_file(filename):
- return send_from_directory(dirname,
- filename)
- @app.route('/')
- def home():
- return render_template('home.html')
-
- @app.route('/uploader', methods=['POST'])
- def upload_file():
- if 'file' not in request.files:
- return redirect(request.url)
- file = request.files['file']
- if file.filename == '':
- return redirect(request.url)
- if file:
- return redirect('/uploads/'+file.filename)
- return ''
-
-
- if __name__ == '__main__':
- app.run(debug=True)
home.html
- <html>
- <body>
- <form id="fileUploadForm" method='post' enctype='multipart/form-data' action='/uploader'>
- <input type="file" name="file" id="fileSelect">
- <button type="submit" id="btnSubmit">Upload</button>
- </form>
- </body>
- </html>
Join the conversation! Your thoughts help the community grow.