

Introduction
This article is about your Raspberry Pi device where you can switch on/off your LED lights connected on the breadboard by giving data from Azure Mobile Services.
Requirements :
- Visual studio 2015
- Raspberry Pi 2 Model B
- Azure Mobile Service
- Bread Broad
- Connecting Wires
- LED
Activities We do
- Circuit Connection
- Creating Azure Mobile Service
- Creating a Windows10 UWP for Raspberry Pi
- Creating a Client App
- Deploying the App
Step 1: Circuit Connection
- Using GPIO Pin 5,6,13,19,26,7,8,25,24,18,15,14,2,3,4
- I take GPIO Pin 5 and 3.3v power supply

Connection can be made as to the Circuit below,

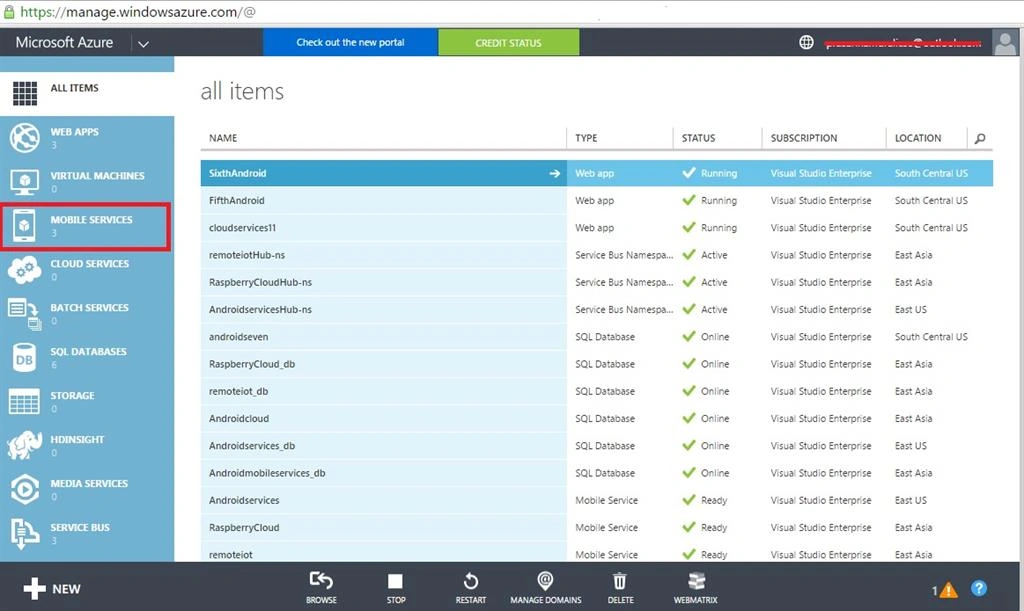
- Click the Portal Link Windows Azure Management Portal.
- Click the NEW Mobile Service tab.
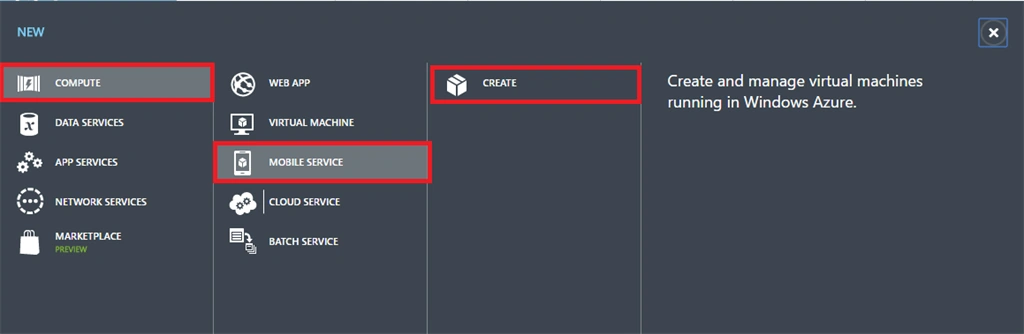
New Mobile Dialog Box Opens, Click on COMPUTEà MOBILE SERVICE à CREATE,
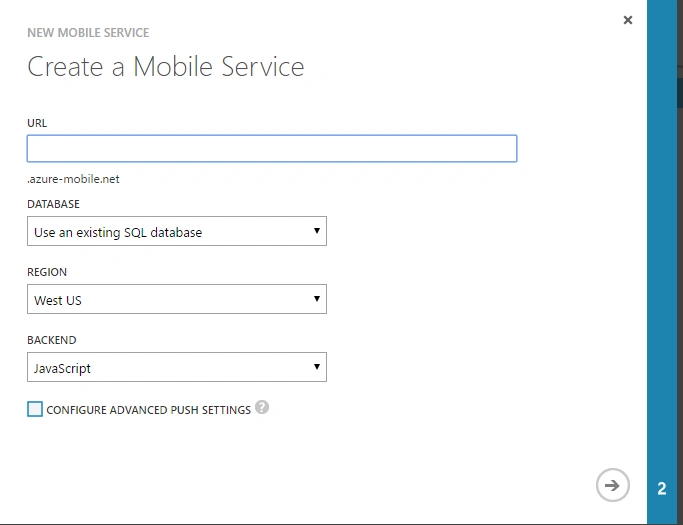
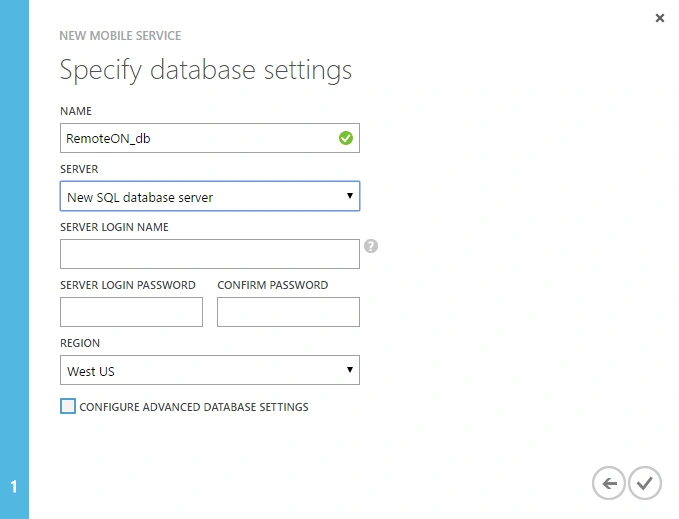
- Using existing SQL database, the below dialog box will open otherwise create new database & create new server options available.
- If you are Creating new SQL database it means:
- Enter the Server Login Name & Password.
- Click Ok,
After creating mobile service, add a new table.
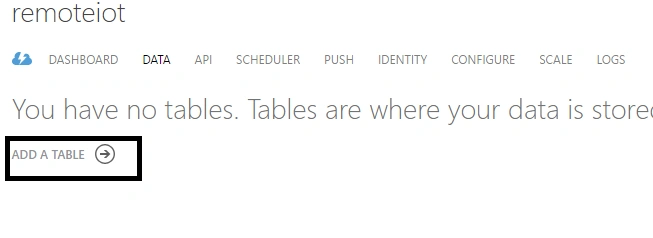
Enter the table name as powercontrol.

Step 2: Creating a Windows10 Universal App for Raspberry PI,
Below are the steps to create an app to the Azure Mobile Service,
- Create a new Universal Blank App,

- Right Click on Reference Tab On Project & select “Manage NuGet Package”,
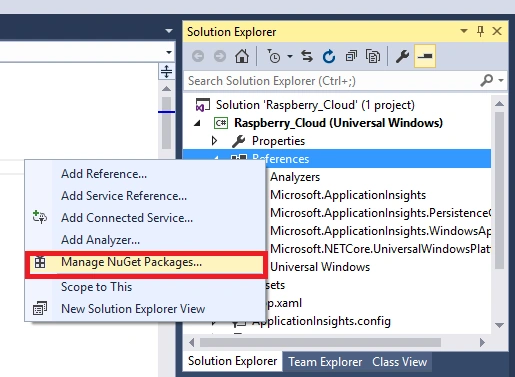
- NuGet Package page will open & search for “Microsoft Azure Mobile Service."
- Select from the list & click on Install button.
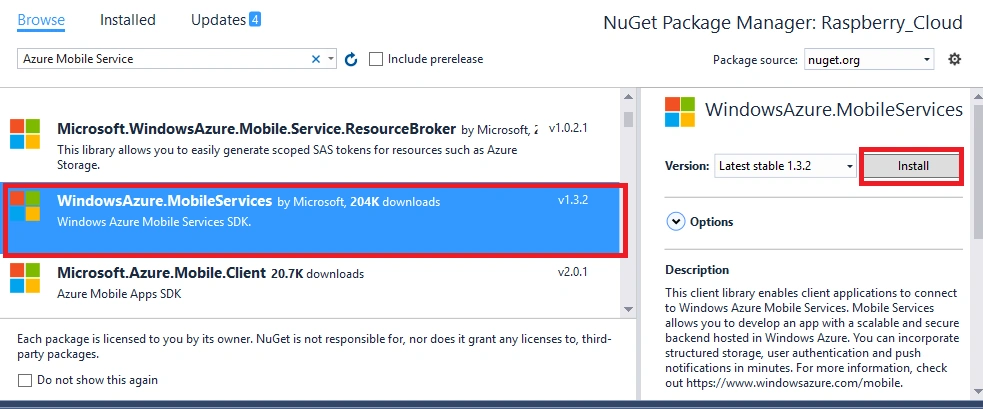
Connect your app to Azure
- Again go to the Azure Management portal.
- Select mobile service first tab & select windows platform.
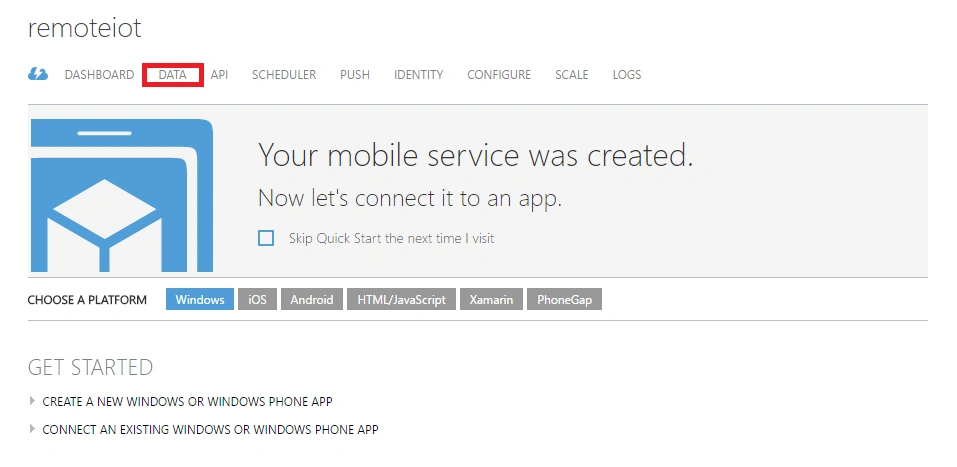
- Start Visual Studio & Open App.mainpage.xaml.cs,
- Copy App Connection String From the Azure Portal.
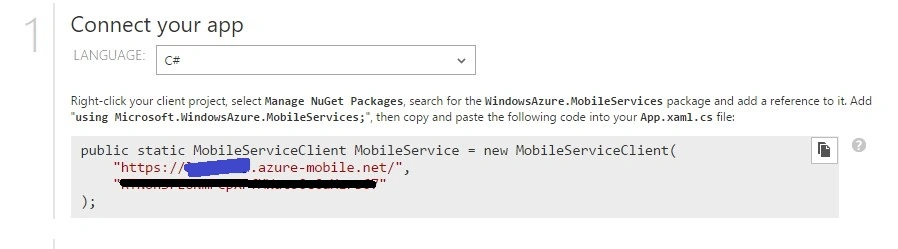
- sealed partial class App : Application
- {
- /// <summary>
- /// Initializes the singleton application object. This is the first line of authored code
- /// executed, and as such is the logical equivalent of main() or WinMain().
- /// </summary>
- public App()
- {
- this.InitializeComponent();
- this.Suspending += OnSuspending;
- }
- public static MobileServiceClient MobileService = new MobileServiceClient(
- "https://mobileservice.azure-mobile.net/",
- "jwernSrEUNmPcpXPfMWatoCcCahglki89"
-
Create one class (right-click on project name & add a new class item from the list).
- Note: table name on Azure & class name in the project must be the same name.
- namespace RaspberryCloud
- {
- public class powercontrol
- {
- public string id { get; set; }
- public string status { get; set; }
- }
- }
- Open Mainpage.xaml.
- Add the Code.
- <Grid Background="{ThemeResource ApplicationPageBackgroundThemeBrush}">
- <StackPanel HorizontalAlignment="Center" VerticalAlignment="Center">
- <Ellipse x:Name="LED" Fill="LightGray" Stroke="White" Width="100" Height="100" Margin="10"/>
- <TextBlock x:Name="GpioStatus" Text="Waiting to initialize GPIO..." Margin="10,50,10,10" TextAlignment="Center" FontSize="26.667" />
- <StackPanel Orientation="Horizontal" Width="500">
- <TextBlock x:Name="DelayText" Text="Current Status" Margin="10" FontSize="26.667" />
- <ListBox Name="l1" HorizontalAlignment="Center">
- <ListBox.ItemTemplate>
- <DataTemplate>
- <StackPanel>
- <TextBlock FontSize="30" Foreground="Red" Text="{Binding status}"/>
- </StackPanel>
- </DataTemplate>
- </ListBox.ItemTemplate>
- </ListBox>
- </StackPanel>
- </StackPanel>
- </Grid>
- Open MainPage.xaml.cs.
- Add Reference for GPIO.
- Add Namespace using Windows.Devices.Gpio in Mainpage.xaml.cs.
- Add Windows IoT Extensions for the UWP from the Reference Library tab.
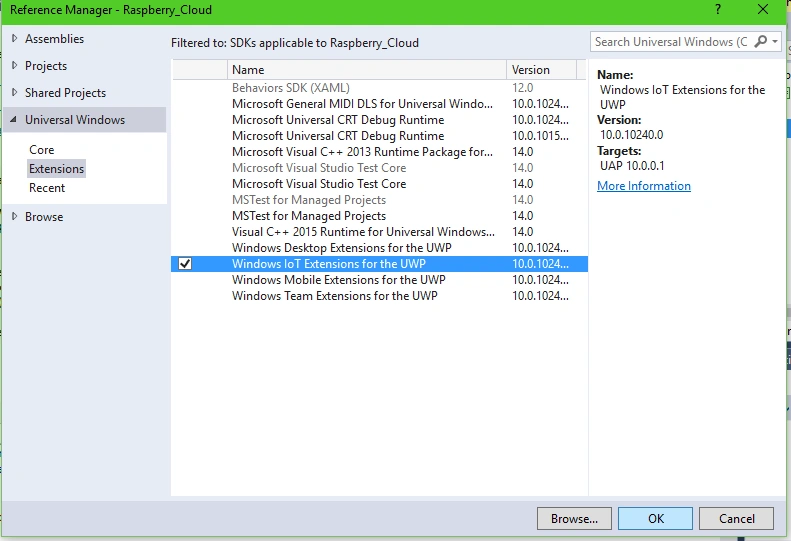
- Add Below Code in Mainpage.xaml.cs,
- namespace Raspberrycloud
- {
- /// <summary>
- /// An empty page that can be used on its own or navigated to within a Frame.
- /// </summary>
- public sealed partial class MainPage : Page
- {
- private const int LED_PIN = 5;
- private GpioPin pin;
- private GpioPinValue pinValue;
- private DispatcherTimer timer;
- private SolidColorBrush redBrush = new SolidColorBrush(Windows.UI.Colors.Red);
- private SolidColorBrush grayBrush = new SolidColorBrush(Windows.UI.Colors.LightGray);
- public MainPage()
- {
- this.InitializeComponent();
- timer = new DispatcherTimer();
- timer.Interval = TimeSpan.FromSeconds(5);
- timer.Tick += Timer_Tick;
- InitGPIO();
- if (pin != null)
- {
- timer.Start();
- }
- }
- private void InitGPIO()
- {
- var gpio = GpioController.GetDefault();
- // Show an error if there is no GPIO controller
- if (gpio == null)
- {
- pin = null;
- GpioStatus.Text = "There is no GPIO controller on this device.";
- return;
- }
- pin = gpio.OpenPin(LED_PIN);
- pinValue = GpioPinValue.High;
- pin.Write(pinValue);
- pin.SetDriveMode(GpioPinDriveMode.Output);
- GpioStatus.Text = "GPIO pin initialized correctly.";
- }
- public string value;
- private async void Timer_Tick(object sender, object e)
- {
- List<powercontrol> datalist = await App.MobileService.GetTable<powercontrol>().ToListAsync();
- l1.ItemsSource = datalist;
- foreach (var x in datalist)
- {
- value = x.status.ToString();
- }
- if (value == "on")
- {
- pinValue = GpioPinValue.Low;
- pin.Write(pinValue);
- LED.Fill = redBrush;
- }
- else
- {
- pinValue = GpioPinValue.High;
- pin.Write(pinValue);
- LED.Fill = grayBrush;
- }
- }
- }
To Deploy this App to Raspberry pi -- you need to change Architecture to ARM,
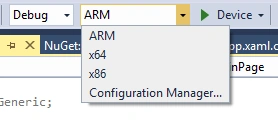
- To Run this App, use Remote Machine to deploy.
- Change Target device to Remote Machine.
- Enter the Remote Machine IP address or DeviceName of Raspberry Pi.
- Authentication mode: Universal (Unencrypted Protocol).
- Using WINDOWS IOT CORE WATCHER to track IOT Devices easily.

- Click on “Remote Machine” to run the app

Step 4: Creating a Client App
To perform this experiment there are two samples that we need to create,- Right Click on Reference Tab On Project & select “Manage NuGet Package”.
- Add Azure Mobile Service Reference to the project.
- Open Azure Management portal & Copy the Connection String and Paste the string in App.xaml.cs.
Create one class (right-click on project name & add new class item from list).
- namespace RaspberryCloud
- {
- public class powercontrol
- {
- public string id { get; set; }
- public string status { get; set; }
- }
- }
- Open Mainpage.xaml
- Add the below code.
- <StackPanel Margin="0,100,0,0" Width="200">
- <Button x:Name="btnOn" Content="On" Click="btnOn_Click" HorizontalAlignment="Stretch"/>
- <Button x:Name="btnOff" Content="Off" Click="btnOff_Click" HorizontalAlignment="Stretch" Margin="0,50,0,0"/>
- <Button x:Name="btnInsert" Content="Reset" Click="btnInsert_Click" HorizontalAlignment="Stretch" Margin="0,50,0,0"/>
- </StackPanel>
- Open the Mainpage.xaml.cs
- Add the below code.
- Namespace RaspberryClientApp
- {
- public sealed partial class MainPage: Page
- {
- IMobileServiceTable < powercontrol > userTable = App.MobileService.GetTable < powercontrol > ();
- public MainPage()
- {
- this.InitializeComponent();
- }
- private async void btnOn_Click(object sender, RoutedEventArgs e)
- {
- List < powercontrol > datalist = await App.MobileService.GetTable < powercontrol > ().ToListAsync();
- powercontrol obj = new powercontrol();
- foreach(var x in datalist) {
- obj.id = x.id;
- obj.status = "on";
- }
- await userTable.UpdateAsync(obj);
- }
- private async void btnOff_Click(object sender, RoutedEventArgs e)
- {
- List < powercontrol > datalist = await App.MobileService.GetTable < powercontrol > ().ToListAsync();
- powercontrol obj = new powercontrol();
- foreach(var x in datalist)
- {
- obj.id = x.id;
- obj.status = "off";
- }
- await userTable.UpdateAsync(obj);
- }
- private async void btnInsert_Click(object sender, RoutedEventArgs e)
- {
- powercontrol obj1 = new powercontrol();
- obj1.status = "on";
- await userTable.InsertAsync(obj1);
- }
- }
- }
- Now run the app on Local Machine and execute On/Off operations from your Azure Mobile Services
Conclusion
Read more articles on Raspberry Pi:
Former memberPosted Dec 23, 2016, 12:06 AM
Nice one and very well explained. I am trying it out for android mobile, can you help me with that.
Santhakumar MunuswamyPosted May 21, 2016, 2:36 AM
Thank you for nice work
Prasanna MuraliPosted May 20, 2016, 10:18 AM
Nice one...
Prasanna MuraliPosted May 18, 2016, 11:05 AM
Nice one...
Shakti Singh DulawatPosted Apr 21, 2016, 6:38 AM
Interesting reading , very well written
Tamilan SPosted Apr 20, 2016, 11:02 PM
tq for your support
Sr KarthigaPosted Apr 20, 2016, 10:55 PM
good one
Sr KarthigaPosted Apr 20, 2016, 10:55 PM
nice start
Tamilan SPosted Apr 20, 2016, 10:23 PM
Thanks
Vignesh ManiPosted Apr 20, 2016, 3:57 PM
Nice