

Introduction
Anomaly detection is crucial for identifying outliers in real-time data streams, such as:
- ✔️ IoT telemetry
- ✔️ Financial transactions
- ✔️ System logs
Anomalies can indicate security threats, system failures, fraud, or operational inefficiencies. Without an automated detection mechanism, businesses may struggle to catch critical issues in real time.
Azure Cognitive Services Anomaly Detector enables developers to easily integrate anomaly detection capabilities into applications without requiring deep expertise in machine learning. The service handles various types of time-series data, using advanced statistical techniques to differentiate normal and anomalous patterns.
In this guide, we will walk through:
- ✅ Setting up the Anomaly Detector API in Azure
- ✅ Using the API to analyze real-time data streams
- ✅ Processing API responses to detect anomalies
- ✅ Integrating alerts for detected anomalies
- ✅ Use cases for IoT, finance, and operational monitoring
Step 1. Setting Up the Anomaly Detector API
Prerequisites
Before you begin, ensure you have:
✔️ An Azure subscription
✔️ An Anomaly Detector resource created in the Azure Portal
✔️ Python or another programming language that supports HTTP requests
Creating an Anomaly Detector Resource
1️⃣ Sign in to the Azure Portal
2️⃣ Search for "Anomaly Detector" in the marketplace
3️⃣ Click "Create", then select:
- Subscription
- Resource Group
- Pricing Tier
4️⃣ Choose the appropriate pricing tier based on expected API usage
5️⃣ After deployment, navigate to the "Keys and Endpoint" section and copy your API key and endpoint
For detailed steps, refer to the Azure Anomaly Detector documentation
Step 2. Sending Data to the API
To detect anomalies, send time-series data to the API. The data must:
✔️ Contain at least 12 data points
✔️ Be structured as a list of timestamps with numerical values
✔️ Maintain a consistent interval between data points to improve accuracy
For instance, in IoT monitoring, sensor data collected at fixed intervals can be sent to the API for anomaly detection. Similarly, in financial transactions, recorded amounts over time can be analyzed for fraud detection.
Sample Code. Sending Data to Anomaly Detector
import requests
import json

# Replace with your Anomaly Detector resource details
API_KEY = "<your_api_key>"
ENDPOINT = "<your_endpoint>/anomalydetector/v1.0/timeseries/entire"

headers = {
    "Ocp-Apim-Subscription-Key": API_KEY,
    "Content-Type": "application/json"
}

data = {
    "series": [
        {"timestamp": "2024-01-01T00:00:00Z", "value": 10.0},
        {"timestamp": "2024-01-02T00:00:00Z", "value": 15.0},
        {"timestamp": "2024-01-03T00:00:00Z", "value": 30.0},
        {"timestamp": "2024-01-04T00:00:00Z", "value": 500.0},  # Anomaly
        {"timestamp": "2024-01-05T00:00:00Z", "value": 20.0}
    ],
    "granularity": "daily"
}

response = requests.post(ENDPOINT, headers=headers, json=data)
print(response.json())
For full API details, refer to the Anomaly Detector API Reference
Step 3. Processing API Responses
The API returns a response indicating whether each data point is an anomaly. It also provides expected values and confidence scores, which help users understand the anomaly’s significance.
Example Response
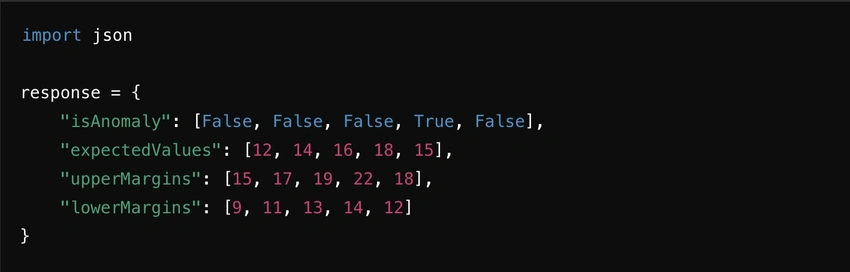
📌 This response suggests an anomaly occurred at the fourth data point, where the observed value deviated significantly from the expected trend.
Extracting Anomalies in Python


The expectedValues, upperMargins, and lowerMargins provide further insights into detected anomalies. Developers can use these threshold-based alerting systems to automate responses.
Step 4. Integrating Alerts for Anomalies
Once anomalies are detected, trigger alerts using Azure services like:
- ✔️ Azure Logic Apps
- ✔️ Power Automate
- ✔️ Azure Functions
Use Case: Industrial IoT Monitoring
- Scenario: A manufacturing company uses IoT sensors to monitor machine performance.
- Implementation: Anomaly detection alerts engineers about unexpected vibration levels, preventing machine failures.
- Outcome: Reducing unplanned downtime and increasing production efficiency.
Sending an Alert via Email (Using Azure Logic Apps)
- 1️⃣ Navigate to Azure Logic Apps in the Azure Portal
- 2️⃣ Create a new Logic App and select a trigger (e.g., HTTP request)
- 3️⃣ Add an action "Send Email" using Office 365, SendGrid, or SMTP
- 4️⃣ Configure the email body to include anomaly details
- 5️⃣ Deploy and test with API output
For more on automation, visit Azure Logic Apps Documentation
Conclusion
In this guide, we covered:
- ✅ Setting up the Anomaly Detector API
- ✅ Sending real-time time-series data to the API
- ✅ Processing API responses to detect anomalies
- ✅ Integrating alerts using Azure services
- ✅ Real-world applications of anomaly detection
Azure Cognitive Services Anomaly Detector simplifies real-time anomaly detection, making it ideal for:
- ✔️ IoT monitoring
- ✔️ Financial fraud detection
- ✔️ Predictive maintenance
By leveraging automated alerts and response mechanisms, businesses can improve operational efficiency and reduce risk.
For further learning, visit Azure Anomaly Detector Documentation.
Join the conversation! Your thoughts help the community grow.