

Introduction
RecyclerView is the advanced version of ListView in Andriod. In this article, we will learn about RecyclerView in Android with Java programming language.
RecyclerView in Android
RecyclerView is the advanced version of ListView in Android. RecyclerView is used to show the data in the form of a scrollable list. It is a ViewGroup to display a large set of data. For each item in a large dataset, it displays a View. RecyclerView is an efficient way to implement a scrollable list.
RecyclerView is a ViewGroup that arranges our views on the screen like LinearLayout, RelativeLayout, etc. It shows the data on the screen in the form of a list. The views in the list are represented by objects with view holder. Such objects are instances of a class you define. Each view holder is responsible for showing a view of a single object.
Why use RecyclerView on Android?
One reason is so we can create a List through the LinearLayout, and the orientation can be vertical. For example, in the Gmail application, all emails will be rendered as many views in our inbox. Now if we will take LinearLayout, all the mail will create separate views in the memory, but only a few emails will be shown on the screen of the device. This is a waste of memory.
Data = ["item1", "item2", "item3",........"item500"]
For each item, we have a view, but if we create a separate view holder for each item, we can only see 10-15 views at a time. This will also be a waste of memory.
RecyclerView creates only the number of views that can be shown on the screen of the device because it recycles the views. RecyclerView is used to overcome the problem of memory waste.
So, RecyclerView provides an efficient way to create a scrollable list. For example, if we have data for 500 items.
How does RecyclerView work in Android?
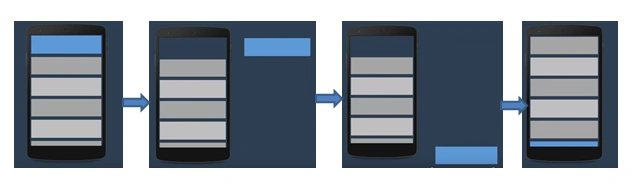
As we know, RecyclerView recycles the views. We will understand how RecyclerView works internally through the image given below.
Explanation
As we saw in the first device of the image, there are 5 items visible at a time. So, we know that the recycler view recycles the views. When the user scrolls the screen, the first view from the top will be removed, and it will be shifted below the last one.
Now, we will see the example code of RecyclerView in Android step-by-step.
Step 1. First, we will create an Android Studio project named RecyclerView Example. Android Studio will create two files in the project: MainActivity.java and activity_main.xml.
Step 2. Before starting with RecyclerView, we have to add the RecyclerView dependency in our build.gradle code file of the application. Here is our build.gradle file.
apply plugin: 'com.android.application'

android {
    compileSdkVersion 29

    defaultConfig {
        applicationId "manigautam.apps.recyclerviewexample"
        minSdkVersion 21
        targetSdkVersion 29
        versionCode 1
        versionName "1.0"

        testInstrumentationRunner "androidx.test.runner.AndroidJUnitRunner"
    }

    buildTypes {
        release {
            minifyEnabled false
            proguardFiles getDefaultProguardFile('proguard-android-optimize.txt'), 'proguard-rules.pro'
        }
    }
}

dependencies {
    implementation fileTree(dir: "libs", include: ["*.jar"])
    implementation 'androidx.appcompat:appcompat:1.1.0'
    implementation 'androidx.constraintlayout:constraintlayout:1.1.3'
    implementation 'androidx.recyclerview:recyclerview:1.1.0'
    testImplementation 'junit:junit:4.12'
    androidTestImplementation 'androidx.test.ext:junit:1.1.1'
    androidTestImplementation 'androidx.test.espresso:espresso-core:3.2.0'

    implementation "androidx.recyclerview:recyclerview:1.1.0" //RecyclerView depedency
    implementation "androidx.recyclerview:recyclerview-selection:1.1.0-rc01"
}
After adding the RecyclerView dependency to our project, sync the project.
Step 3. Now, we will add the RecyclerView layout in our activity_main.xml file. Here is our activity_main.xml file.
<?xml version="1.0" encoding="utf-8"?>
<RelativeLayout xmlns:android="http://schemas.android.com/apk/res/android"
xmlns:app="http://schemas.android.com/apk/res-auto"
xmlns:tools="http://schemas.android.com/tools"
android:layout_width="match_parent"
android:layout_height="match_parent"
tools:context=".MainActivity">

<androidx.recyclerview.widget.RecyclerView
    android:id="@+id/recyclerView"
    android:layout_width="match_parent"
    android:layout_height="match_parent" />

</RelativeLayout>
Step 4. Now, we will make an xml file in the drawable folder of the project named border_file.xml, which we will use to make the border of the RecyclerView. Here is the code of this file.
<?xml version="1.0" encoding="utf-8"?>
<shape xmlns:android="http://schemas.android.com/apk/res/android"
    android:shape="rectangle">
    <stroke android:color="@color/colorAccent" android:width="2dp"/>
    <corners android:radius="5dp" />
</shape>
Step 5. Now, we will create a custom row layout that will represent the layout of every single element displayed in the RecyclerView. We create a layout file named row_layout.xml.
<?xml version="1.0" encoding="utf-8"?>
<RelativeLayout xmlns:android="http://schemas.android.com/apk/res/android"
    android:layout_width="match_parent"
    android:layout_height="match_parent"
    android:orientation="horizontal">

    <ImageView
        android:id="@+id/image"
        android:layout_width="300px"
        android:layout_height="300px"
        android:layout_marginLeft="10dp"
        android:layout_marginTop="10dp"
        android:src="@color/colorPrimaryDark" />

    <TextView
        android:id="@+id/description"
        android:layout_width="250dp"
        android:layout_height="55dp"
        android:layout_toRightOf="@id/image"
        android:layout_marginLeft="15dp"
        android:layout_marginTop="35dp"
        android:text="abcd"
        android:textColor="#000"
        android:textSize="30sp" />

</RelativeLayout>
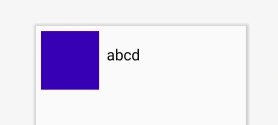
In this row_layout.xml file, we create an ImageView and TextView for every row of the RecyclerView. The design of the row of RecyclerView is shown in the figure below.
Step 6. The RecyclerView, which we will create, will show the list of some randomly chosen programming languages. We need a class that represents a single RecyclerView item data to create a file named Data.java. The code of this Data.java file is listed below.
public class Data {

    public String name;

    public String getName() {
        return name;
    }

    public void setName(String name) {
        this.name = name;
    }

    public int getImageId() {
        return imageId;
    }

    public void setImageId(int imageId) {
        this.imageId = imageId;
    }

    public int imageId;

    Data(String name, int imageId) {
        this.name = name;
        this.imageId = imageId;
    }
}
In this Data.java class file, we create a public constructor for the image, the name of the programming language, and the setter and getter method for these variables.
Step 7. In this step, we will create a custom RecyclerView.Adapter file named RecyclerView_Adapter.java. The RecyclerView.Adapter is similar to the adapters used on a ListView, but with performance improvement, ViewHolder provided.
A ListView has adapters for various sources, such as ArrayAdapter for arrays and CursorAdapter for the output of databases. The RecyclerView.Adapter requires a custom implementation to supply the adapter with data.
The code file of RecyclerVIew_Adapter.java is listed below.
import android.app.Application;
import android.content.Context;
import android.view.LayoutInflater;
import android.view.View;
import android.view.ViewGroup;

import androidx.annotation.NonNull;
import androidx.recyclerview.widget.RecyclerView;
import java.util.Collections;
import java.util.List;

public class RecyclerView_Adapter extends RecyclerView.Adapter<View_Holder> {

    List<Data> list = Collections.emptyList();
    Context context;

    public RecyclerView_Adapter(List<Data> data, Application application) {
        this.list = data;
        this.context = application;
    }

    @NonNull
    @Override
    public View_Holder onCreateViewHolder(@NonNull ViewGroup parent, int viewType) {
        //Inflate the layout, initialize the View Holder
        View v = LayoutInflater.from(parent.getContext()).inflate(R.layout.row_layout, parent, false);
        View_Holder holder = new View_Holder(v);
        return holder;
    }

    @Override
    public void onBindViewHolder(@NonNull View_Holder holder, int position) {

        //Use the provided View Holder on the onCreateViewHolder method to populate the current row on the RecyclerView
        holder.name.setText(list.get(position).name);
        holder.imageView.setImageResource(list.get(position).imageId);

    }

    @Override
    public int getItemCount() {
        return list.size();
    }
}
In this recyclerView_Adapter.java file, we extend RecyclerView.Adapter and create its constructor. It shows an error, so we have to implement its methods onCreateViewHolder(), onBindViewHolder(), and getItemCount().
onCreateViewHolder()- It inflates the row layout and initializes the view holder. It handles findViewById) (methods, find views once and recycle them so that repetitive calls are avoided.
onBindViewHolder()- It uses the onCreateViewHolder() View Holder to fill in the current RecyclerView row with data.
getItemCount()- This method returns the collection size, which contains the items that we wish to show
Step 8. Now, we will create a ViewHolder class named View_Holder.java Java file because, for the one entry in the RecyclerView, the RecyclerView uses a ViewHolder to store references to the respective view. This solution avoids all the findViewById() method calls in the adapter to find out which views to fill with data.
The code file of the ViewHolder Java class is listed below.
import android.view.View;
import android.widget.ImageView;
import android.widget.TextView;
import androidx.recyclerview.widget.RecyclerView;

public class View_Holder extends RecyclerView.ViewHolder {

    TextView name;
    ImageView imageView;

    View_Holder(View itemView) {
        super(itemView);
        name = (TextView) itemView.findViewById(R.id.name);
        imageView = (ImageView) itemView.findViewById(R.id.image);
    }
}
This is the ViewHolder file class that extends RecyclerView.ViewHolder class and a constructor with super().
Step 9. Here is the MainActivity.java class file.
import androidx.appcompat.app.AppCompatActivity;
import androidx.recyclerview.widget.LinearLayoutManager;
import androidx.recyclerview.widget.RecyclerView;

import android.os.Bundle;

import java.util.ArrayList;
import java.util.List;

public class MainActivity extends AppCompatActivity {

    @Override
    protected void onCreate(Bundle savedInstanceState) {
        super.onCreate(savedInstanceState);
        setContentView(R.layout.activity_main);

        List<Data> data = fill_with_data();

        RecyclerView recyclerView = (RecyclerView) findViewById(R.id.recyclerView);
        RecyclerView_Adapter adapter = new RecyclerView_Adapter(data, getApplication());
        recyclerView.setAdapter(adapter);
        recyclerView.setLayoutManager(new LinearLayoutManager(this));

    }

    public List<Data> fill_with_data() {

        List<Data> data = new ArrayList<>();
        data.add(new Data("C", R.drawable.c));
        data.add(new Data("C++", R.drawable.cc));
        data.add(new Data("Java", R.drawable.java));
        data.add(new Data("Android", R.drawable.android));
        data.add(new Data("Kotlin", R.drawable.kotlin));
        data.add(new Data("Html", R.drawable.html));
        data.add(new Data("CSS", R.drawable.css));
        data.add(new Data("JavaScript", R.drawable.js));
        data.add(new Data("SQL", R.drawable.sql));
        data.add(new Data("SQL Server", R.drawable.sqls));
        data.add(new Data("Data Structure", R.drawable.data_structure));
        data.add(new Data("Json", R.drawable.json));
        data.add(new Data("JSP", R.drawable.jsp));
        data.add(new Data("Alexa Skills", R.drawable.alexa));

        return data;
    }
}
In this MainActivity.java file, Create an instance of the Recycler View Adapter in the onCreate() method of the MainActivity class, and send this adapter the list of data and background. The method getApplication() will provide the context for an application.

We need sample data. For this example, we generated a method named fill_with_data(). In this method, we provide the text as a string and images to show in the RecyclerView.
Output
Summary
In this article, we learned about RecyclerView in Android Studio with Java programming language, along with an example program.
bobPosted Dec 2, 2023, 3:41 PM
What is View_Holder and where is it defined? The closest thing to it is an ABSTRACT class ViewHolder which "can not be instantiated"