

Introduction
In this article, I'm going to create an application to perform the registration page of a user and display the user details in React Js with Axios using Web API. We look at how to use Formik with the help of an example. The backend is a SQL Server database.
Mainly, we will see how to check the form validation easily and quickly before submitting the data on our registration page. We will transfer the data or consume the data in UI from an application using a Web API. A Web API is used to provide data connectivity between the database and the front end application and building Restful services. On the UI side, I will use Formik and react-bootstrap to create a rich, interactive, device-independent user experience. It's often used to build a beautiful UI. In this example, I will create a registration page and bind the user details. Let's see step by step.
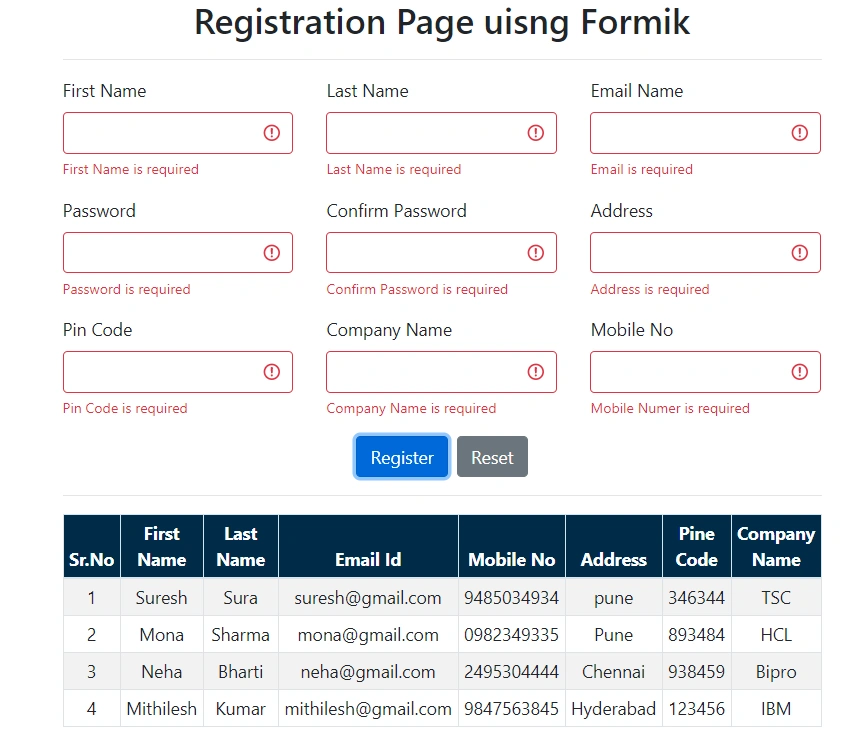
First, take a look at our output...
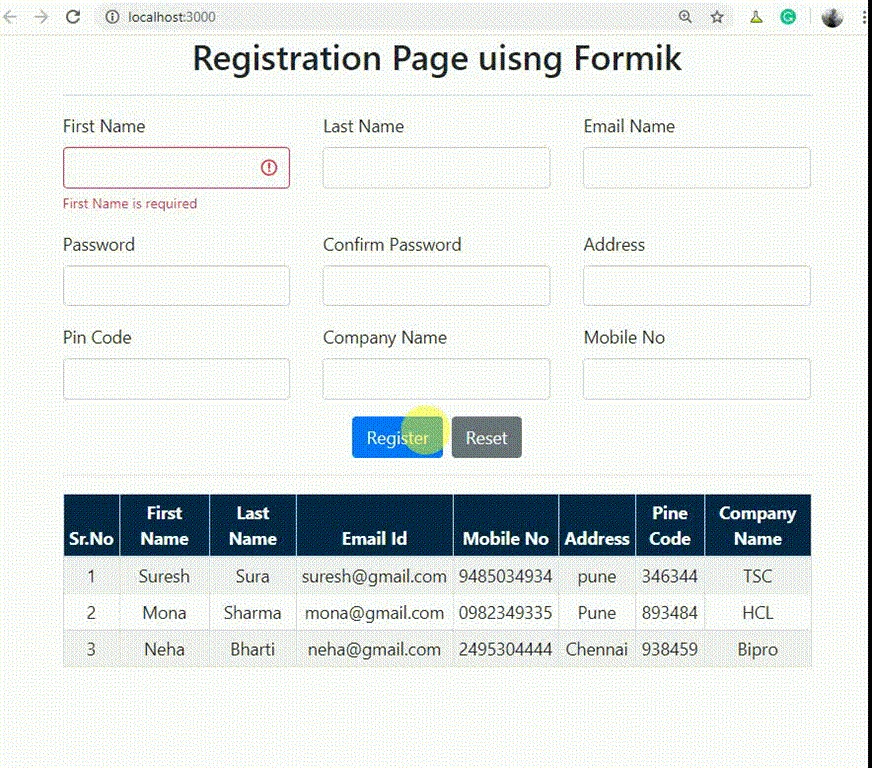
I'm using Visual Studio Code as a tool to build my application. If you don't have Visual studio code in your system, then first you have to download and install it. Here is the Visual Studio Code download link: Download Visual Studio Code Editor
Prerequisites
- Visual studio
- SQL Server
- Node.js version > 10
- React
- React Axios
- Formik
- Visual studio code
- Bootstrap
- React-toastify
- React-bootstrap
Step1. Create a database and table
Create a database. Open SQL Server and create a new database and table. As you can see from the following query, you must use the below SQL Script to create the required ReactDB Database. The table is UserDetails
- CREATE TABLE [dbo].[UserDetails](
- [UserId] [int] IDENTITY(1, 1) NOT NULL,
- [FirstName] [varchar](50) NULL,
- [LastName] [varchar](50) NULL,
- [EmailId] [varchar](100) NULL,
- [Password] [varchar](50) NULL,
- [MobileNo] [varchar](50) NULL,
- [Address] [varchar](500) NULL,
- [PinCode] [char](10) NULL,
- [CompanyName] [varchar](100) NULL,
- CONSTRAINT [PK_UserDetails] PRIMARY KEY CLUSTERED ([UserId] ASC) WITH (
- PAD_INDEX = OFF, STATISTICS_NORECOMPUTE = OFF,
- IGNORE_DUP_KEY = OFF, ALLOW_ROW_LOCKS = ON,
- ALLOW_PAGE_LOCKS = ON
- ) ON [PRIMARY]
- )
Step 2. Create a Web API Project
Now, we will create a Web API with registration page functionality, then bind the user details from a database. Go to Visual Studio >> File >> New >> Project, and select Web Application. After that, click OK and you will see the templates. Select the Web API template.
Now, we will create a Web API with registration page functionality, then bind the user details from a database. Go to Visual Studio >> File >> New >> Project, and select Web Application. After that, click OK and you will see the templates. Select the Web API template.
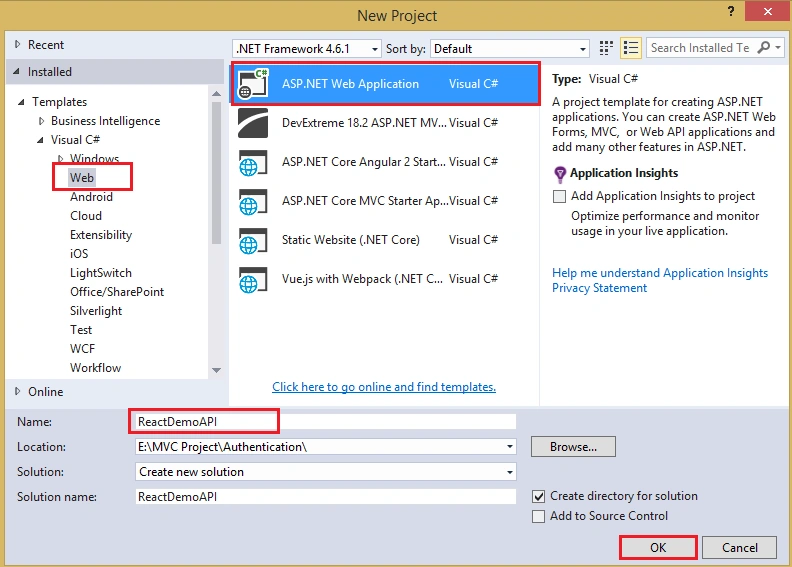
Once you click on the OK button, a new dialog will pop up for selecting project templates, as shown in the below image.
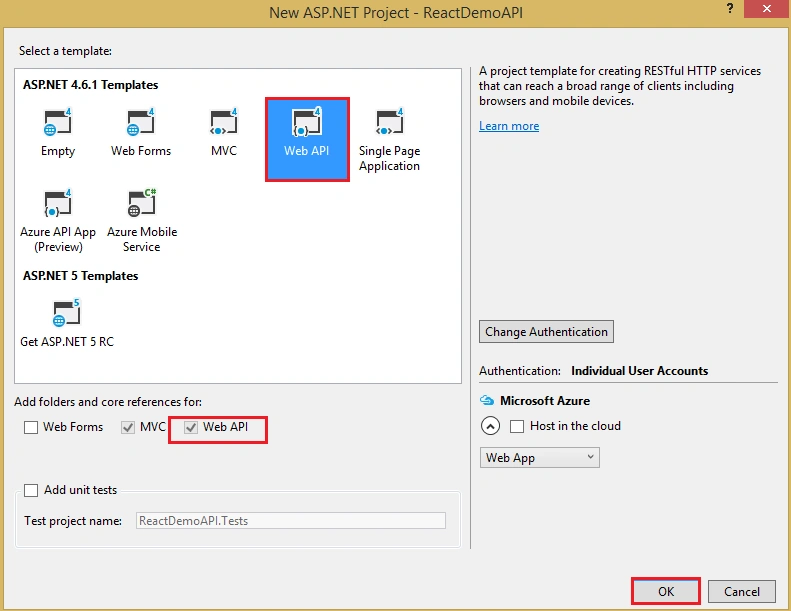
Click OK.
Step3: Adding ADO.NET Entity Data Model
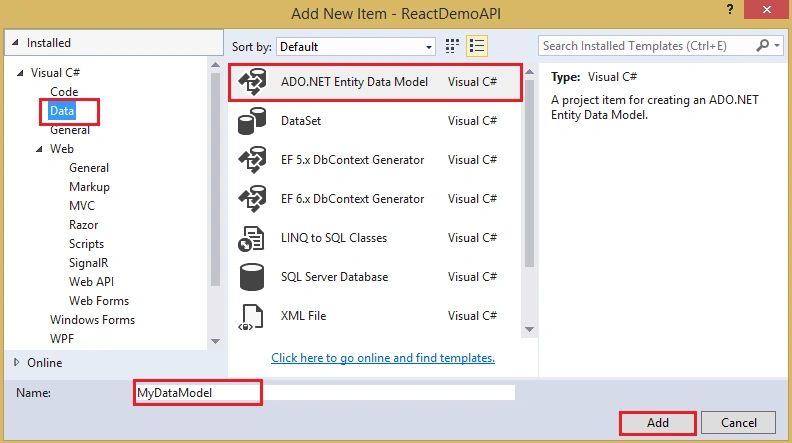
Right-Click on Models Folder, then select Add >> New Item from the context menu which will open the Add New Item window. From the “Add New Item” window, from the left pane expand, Installed >> Visual C# >> Data option. From the middle pane, select the ADO.NET Entity Data Model template. Provide a meaningful name to your data model such as MyDataModel, then finally, click on the Add button as shown in the below image.
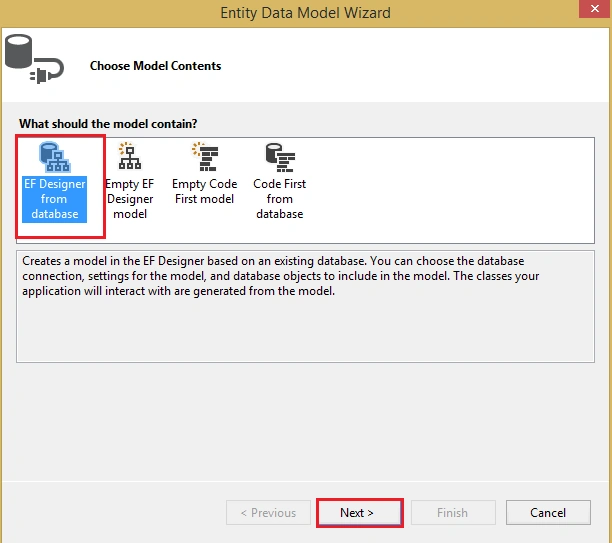
From the next screen, we are going to use the Entity Framework Database First approach. Select EF Designer from Database from Entity Data Model Wizard and click on the Next button, as shown in the image below.
In the next step, click on the new connection from Choose your data connection wizard, as shown below.
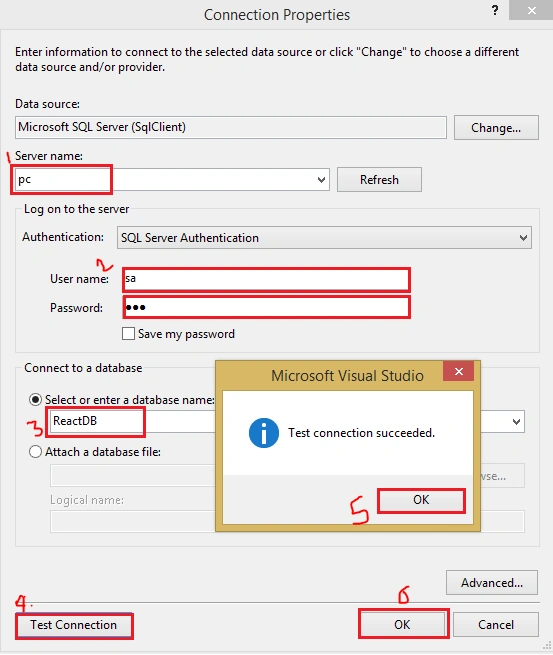
Provide the necessary details to communicate with the database, such as Server name. Select the Authentication Type, select the Database, then click on the Ok button, as shown below.
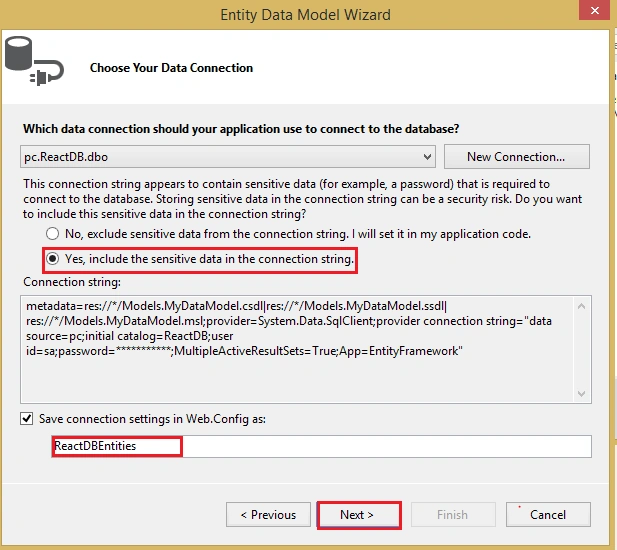
Click the Next button
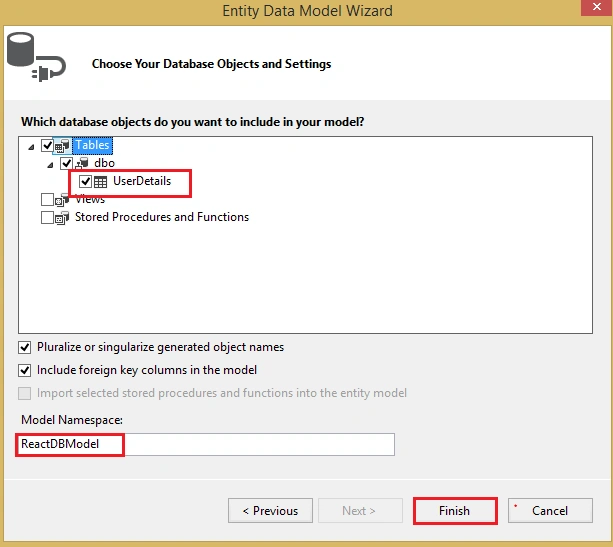
Above, we need to select the database object for our application. We then need to select that UserDetailsTable and finally, click on the Finish button.
See our table entity:
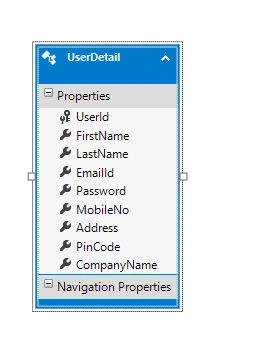
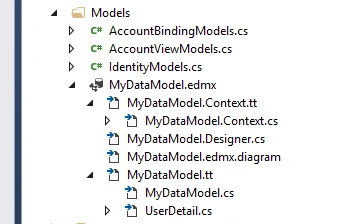
The framework will create the EDMX file within the Models folder.
Step 4. Add API controller logic
Go to the Controller folder in our API Application and right-click >> Add >> Controller >> Select Web API 2 Controller-Empty
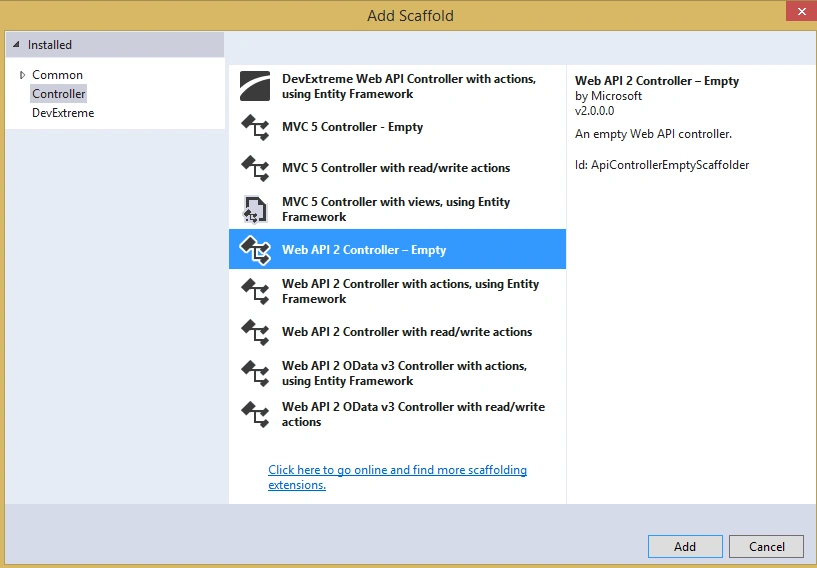
Click Add button
Now we will write the logic to bind the data and register the user data. We will go to the controller class and set the attribute routing to make it more user-friendly by writing the below code.
- using ReactDemoAPI.Models;
- using System;
- using System.Collections.Generic;
- using System.Linq;
- using System.Web.Http;
- namespace ReactDemoAPI.Controllers {
- [RoutePrefix("Api/User")]
- public class UserAPIController: ApiController {
- [HttpGet]
- [Route("GetUserDetails")]
- public IEnumerable < UserDetail > GetUser() {
- try {
- ReactDBEntities objEntity = new ReactDBEntities();
- return objEntity.UserDetails.ToList();
- } catch (Exception) {
- throw;
- }
- }
- [HttpPost]
- [Route("InsertUserData")]
- public string AddUserData(UserDetail data) {
- try {
- ReactDBEntities objEntity = new ReactDBEntities();
- objEntity.UserDetails.Add(data);
- int result = objEntity.SaveChanges();
- if (result > 0) {
- return "Data has been inserted";
- } else {
- return "Data insetion has been faild";
- }
- } catch (Exception) {
- throw;
- }
- }
- }
- }
Now, our API has been completed. As you may see from the above code, it has the functionality to bind and register the user data.
Step 5.Create and Install React js
Now we will create a react project thought below command. But before that just check Node and NPM installed or not. Also, we are using Visual Studio code to write Angular code for a UI application. First, make sure it is installed. If not installed, then go to this link to download it.
Let's create a react project to open a new terminal and run the following command to install and create a react project.
npx create-react-app formikexample-app
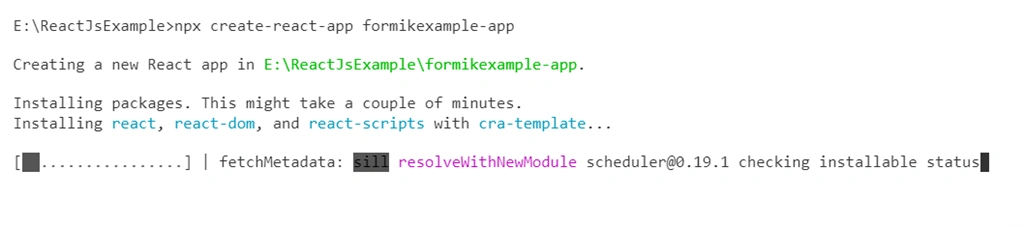
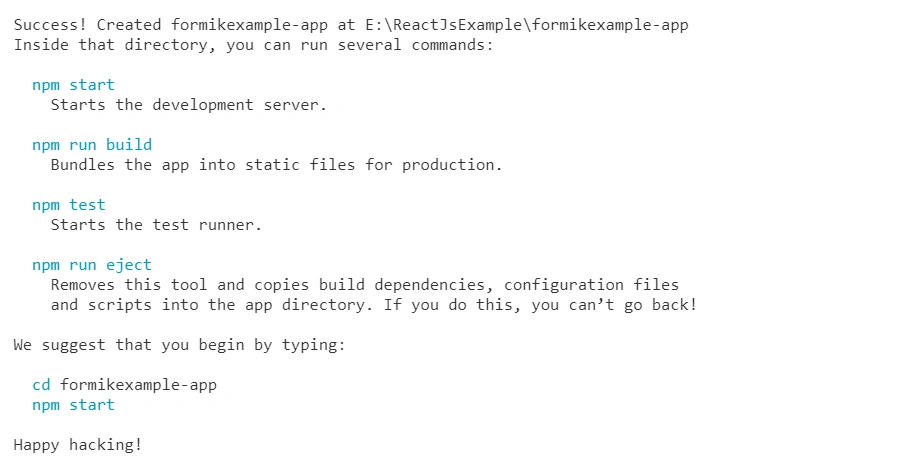
Your React project has been created.
Step 6. Set Visual studio code for react
Open Visual Studio Code and go inside the folder. Open the project inside the visual studio code.
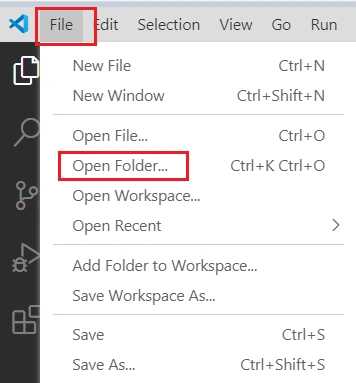
Select the correct folder.
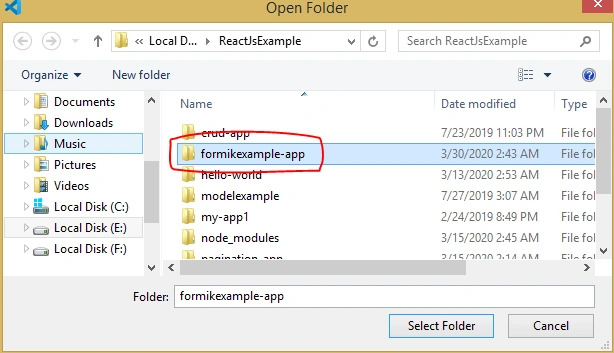
Click on the Select Folder button.
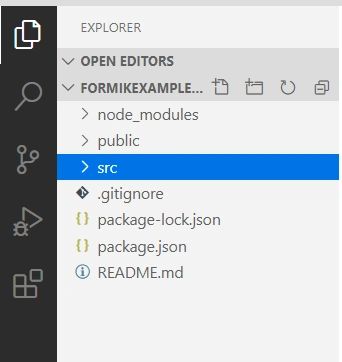
Step 7. Install bootstrap
Now, we will install bootstrap to building a beautiful UI of our react application.
npm install bootstrap --save
Next, we will install react-bootstrap bootstrap for design table, button, etc.
npm install react-bootstrap bootstrap

Step 8. Install Axios library
Axios is a modern and promise based java scrip HTTP client library which is works asynchronously and allows us to make HTTP calls and consume to REST API.
Let's install Axios in our React project using the following command.
npm install --save axios

Step 9. Introduction Formik
Formik is a small group of react components and hooks for building forms to React and React Native. It helps with the three most annoying parts:
- Getting values in and out of form state.
- Validation and error messages
- Handling form submission
Generally, we pass our form's initial values and a submission function to the useFormik() hook. The hook then returns all values in the group of form state and helpers in a variable we are calling formik.
- handleSubmit: A submission handler
- handleChange: A change handler to pass to each <input>, <select>, or <textarea>
- values: Our form's current values
For more details, you can follow the Formik Doc.
Step 10. Install Formik
Go to Terminal and set the Project path. Type the below command:
npm install formik

Step 11. Install Yup
Yup is a JavaScript object schema validator and an immutable object responsible for validating an object. It makes our lives far easier for validating the data our apps consume and manipulate.
Install Yup with the below command:
npm install yup--save

Step 12. Install react-toastify
React-Toastify allow us to add notifications to our app. We can get the notification with an interactive popup UI.
Install the react-toastify with the below command:
npm install yup--save

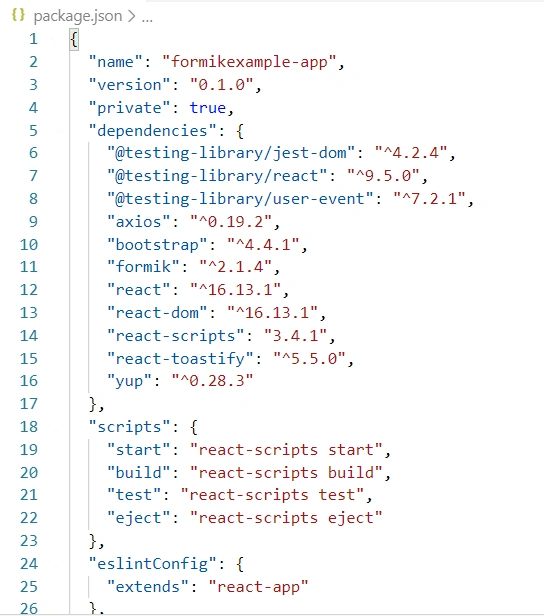
Step 13. Check to react dependency
Go to the package.json file and check the React dependency.
Step 14. Add React Component
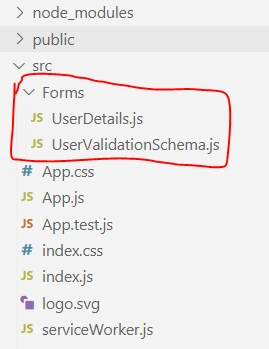
Go inside the src folder and create a new folder. Here, I created a form folder with 2 files.
UserDetails.js
UserValidationSchema.js
Step 15. Write code in js file to perform our operation
Now we will write our logic to perform a validation of the registration page.
Open UserValidationSchema.js file and write the validation of properties of the registration page.
First, import dependency libraries.
- import * as Yup from "yup";
- export const UserValidationSchema = Yup.object().shape({
- firstName: Yup.string()
- .required('First Name is required'),
- lastName: Yup.string()
- .required('Last Name is required'),
- emailId: Yup.string()
- .email('Email is invalid')
- .required('Email is required'),
- password: Yup.string()
- .min(6, 'Password must be at least 6 characters')
- .required('Password is required'),
- confirmPassword: Yup.string()
- .oneOf([Yup.ref('password'), null], 'Passwords must match')
- .required('Confirm Password is required'),
- mobileNo: Yup.string()
- .required('Mobile Numer is required'),
- address: Yup.string()
- .required('Address is required'),
- pinCode: Yup.string()
- .min(6, 'Password must be at 6 digits')
- .max(6,'Password must be at 6 digits')
- .required('Pin Code is required'),
- companyName: Yup.string()
- .required('Company Name is required')
- });
Now go inside the Forms folder and open UserDetails.js file and import the necessary library, then write the below code in the file.
- Add necessary library
- Create a custom function for mobile validation
- Declare the properties in state
- Write a method for bind user details in component did mount
- Declare the properties in intialValues
- Design the registration page with formik.
- Set the error message
- Write the logic for submitting the data
- import React from 'react';
- import { Formik, Field, Form, ErrorMessage } from 'formik';
- import {
- Row,
- Col,
- Container,
- Table
- } from 'react-bootstrap';
- import Axios from 'axios';
- import { toast } from 'react-toastify';
- import 'react-toastify/dist/ReactToastify.css';
- import 'bootstrap/dist/css/bootstrap.css';
- import { UserValidationSchema } from "./UserValidationSchema";
- toast.configure()
- toast.configure({
- autoClose: 8000,
- draggable: false,
- });
- const apiUrl = "http://localhost:63377/Api/User";
- function validateMobile(value) {
- let error = '';
- const mob = /^[1-9]{1}[0-9]{9}$/;
- if (value === '') {
- error = 'Required';
- } else if (!mob.test(value)) {
- error = 'Invalid mobile number';
- }
- return error;
- }
- class UserDetails extends React.Component {
- state = {
- userData: {},
- userList: [],
- }
- componentDidMount() {
- this.bindUserData();
- }
- bindUserData() {
- Axios.get(`${apiUrl}/GetUserDetails`).then(
- (result) => {
- this.setState({
- userList: result.data,
- });
- },
- (error) => {
- this.setState({
- error
- });
- })
- }
- render() {
- const txtAlign = {
- 'textAlign': 'left'
- }
- const colStyle = {
- backgroundColor: '#002b48',
- color: "#ffffff",
- width: '60px'
- }
- return (
- <Formik
- validationSchema={UserValidationSchema}
- initialValues={{
- firstName: '',
- lastName: '',
- emailId: '',
- password: '',
- confirmPassword: '',
- mobileNo: '',
- address: '',
- pinCode: '',
- companyName: '',
- }}
- onSubmit={async (input, { resetForm }) => {
- await Axios.post(`${apiUrl}/InsertUserData`, input).then(res => {
- toast.success(res.data)
- this.bindUserData();
- resetForm({})
- })
- .catch(err => {
- toast.error('Something went wrong.');
- });
- }
- }
- render={({ errors, touched }) => (
- <Container>
- <Form>
- <Row>
- <Col>
- <h2>Registration Page uisng Formik</h2>
- <hr />
- </Col>
- </Row>
- <Row>
- <Col className="form-group" md={4} sm={4} xs={4} style={txtAlign}>
- <label htmlFor="firstName">First Name</label>
- <Field name="firstName" type="text" className={'form-control' + (errors.firstName && touched.firstName ? ' is-invalid' : '')} />
- <ErrorMessage name="firstName" component="div" className="invalid-feedback" />
- </Col>
- <Col className="form-group" md={4} sm={4} xs={4} style={txtAlign}>
- <label htmlFor="lastName">Last Name</label>
- <Field name="lastName" type="text" className={'form-control' + (errors.lastName && touched.lastName ? ' is-invalid' : '')} />
- <ErrorMessage name="lastName" component="div" className="invalid-feedback" />
- </Col>
- <Col md={4} className="form-group" sm={4} xs={4} style={txtAlign}>
- <label htmlFor="emailId">Email Name</label>
- <Field name="emailId" type="text" className={'form-control' + (errors.emailId && touched.emailId ? ' is-invalid' : '')} />
- <ErrorMessage name="emailId" component="div" className="invalid-feedback" />
- </Col>
- </Row>
- <Row>
- <Col className="form-group" md={4} sm={4} xs={4} style={txtAlign}>
- <label htmlFor="password">Password</label>
- <Field name="password" type="text" className={'form-control' + (errors.password && touched.password ? ' is-invalid' : '')} />
- <ErrorMessage name="password" component="div" className="invalid-feedback" />
- </Col>
- <Col className="form-group" md={4} sm={4} xs={4} style={txtAlign}>
- <label htmlFor="confirmPassword">Confirm Password</label>
- <Field name="confirmPassword" type="text" className={'form-control' + (errors.confirmPassword && touched.confirmPassword ? ' is-invalid' : '')} />
- <ErrorMessage name="confirmPassword" component="div" className="invalid-feedback" />
- </Col>
- <Col className="form-group" md={4} sm={4} xs={4} style={txtAlign}>
- <label htmlFor="address">Address</label>
- <Field name="address" type="text" className={'form-control' + (errors.address && touched.address ? ' is-invalid' : '')} />
- <ErrorMessage name="address" component="div" className="invalid-feedback" />
- </Col>
- </Row>
- <Row>
- <Col md={8} sm={8} xs={8}>
- <Row>
- <Col className="form-group" md={6} sm={6} xs={6} style={txtAlign}>
- <label htmlFor="pinCode">Pin Code</label>
- <Field name="pinCode" type="text" className={'form-control' + (errors.pinCode && touched.pinCode ? ' is-invalid' : '')} />
- <ErrorMessage name="pinCode" component="div" className="invalid-feedback" />
- </Col>
- <Col className="form-group" md={6} sm={6} xs={6} style={txtAlign}>
- <label htmlFor="companyName">Company Name</label>
- <Field name="companyName" type="text" className={'form-control' + (errors.companyName && touched.companyName ? ' is-invalid' : '')} />
- <ErrorMessage name="companyName" component="div" className="invalid-feedback" />
- </Col>
- </Row>
- </Col>
- <Col className="form-group" md={4} sm={4} xs={4} style={txtAlign}>
- <label htmlFor="mobileNo">Mobile No</label>
- <Field validate={validateMobile} name="mobileNo" type="text" size={'sm'} className={'form-control' + (errors.mobileNo && touched.mobileNo ? ' is-invalid' : '')} />
- <ErrorMessage name="mobileNo" component="div" className="invalid-feedback" />
- </Col>
- </Row>
- <Row>
- <Col>
- <button type="submit" className="btn btn-primary mr-2">Register</button>
- <button type="reset" className="btn btn-secondary">Reset</button>
- </Col>
- </Row>
- </Form>
- <hr/>
- <Row>
- <Col>
- <Table striped bordered hover size="sm">
- <thead style={colStyle}>
- <tr>
- <th>Sr.No</th>
- <th>First Name</th>
- <th>Last Name</th>
- <th>Email Id</th>
- <th>Mobile No</th>
- <th>Address</th>
- <th>Pine Code</th>
- <th>Company Name</th>
- </tr>
- </thead>
- <tbody>
- {this.state.userList.map((user, i) => (
- <tr key={user.UserId}>
- <td>{i + 1}</td>
- <td>{user.FirstName}</td>
- <td>{user.LastName}</td>
- <td>{user.EmailId}</td>
- <td>{user.MobileNo}</td>
- <td>{user.Address}</td>
- <td>{user.PinCode}</td>
- <td>{user.CompanyName}</td>
- </tr>
- ))}
- </tbody>
- </Table>
- </Col>
- </Row>
- </Container>
- )}
- />
- )
- }
- }
- export default UserDetails;
Now open index.js file and First import necessary library and add root component.
- import React from 'react';
- import './App.css';
- import UserDetails from './Forms/UserDetails';
- function App() {
- return (
- <div className="App">
- <UserDetails/>
- </div>
- );
- }
- export default App;
Finally, our coding part also has been completed.
Step 16. Set CORS (Cross-Origin Resource Sharing)
Go to the Web API project.
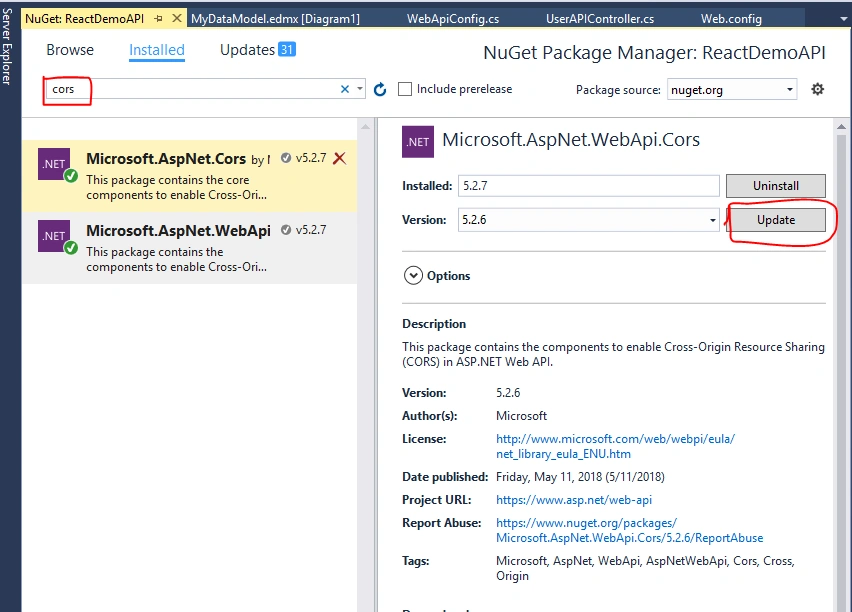
Download a NuGet package for CORS. Go to NuGet Package Manager and download the following file.
After that, go to the App_Start folder in Web API project and open WebApiConfig.cs class. Here, modify the Register method with the below code.
Add namespace
- using System.Web.Http.Cors;
After that, add the below code inside the Register method.
- var cors = new EnableCorsAttribute("*", "*", "*");
- config.EnableCors(cors);
Step 17. Run
We have completed all the needed code functionality. Before running the application, first, make sure to save your work.
Now, let's run the app and see how it works.
Open TERMINAL and write the following command to run the program.
npm start
The output looks like the following image. There's a stunning UI that's been created.
Conclusion
We have completed an operation to the registration page with validation using Formik in React and Axios using Web API and SQL server. We started by installing and creating the create-react-app, then used it to create our React project. Next, we installed bootstrap and react-bootstrap and react-bootstrap-table-next in the React application. After that, we installed the Axios client and the Formik library.
I hope this article helps you with your needs, such as quick and easy validation functionality. I would like your feedback, so please post your feedback, questions, or comments about this article!
Join the conversation! Your thoughts help the community grow.