

Introduction
In this article I will show you how to create a remember me dialog box for your app. Sometimes it is required to show user some alerts about the requirements of the app and to allow the user to suppress such alerts by one time response to alerts user may check the remember me checkbox. It's same as we see in most of the login pages. To create this I'll use the Custom message box control of windows phone toolkit. In our app we can use the default message box to show alerts or messages to user But it is very limited. Like we won't be able to show a scrollable message or hyperlinks or other UI elements except text. Wp8 toolkit removes the limitations of default message box by providing a custom message box control. So let's get started.
Custom Message Box
Custom message box is a control provided in wp8 toolkit for customizing the interface and content of the message box. It enables you to add various UI element in the message box that is not possible in default message box. In this demo , We will create our UI from C# only.
In the following demo I have used the following properties of custom message box:
-
Content
It takes object as a value. It is displayed in the message box as we see a text in our default message box. String is also an object and can be used for adding text in message box. -
Height
To set the height of the message box. It can be set or left to auto fit as per content size.I'm using the default height that is fit to content. -
Opacity
To set the opacity of the message box. Value ranging from 0 to 1. -
Left Button Content
It also takes object as value. It is the left message button of the message box. -
Right Button Content
It also takes object as value. It is the right message button of the message box.
Apart from the properties, the following method is also used
-
Show
This method is used to show the message box. -
SetIsTiltEnabled
To enable a tilt effect on the control.
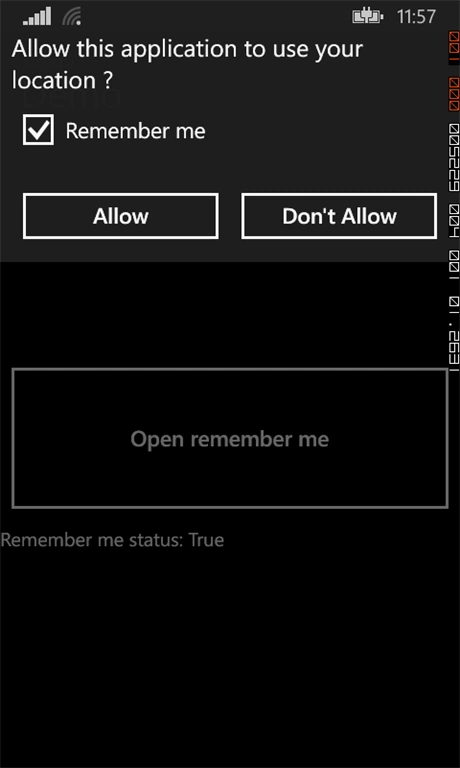
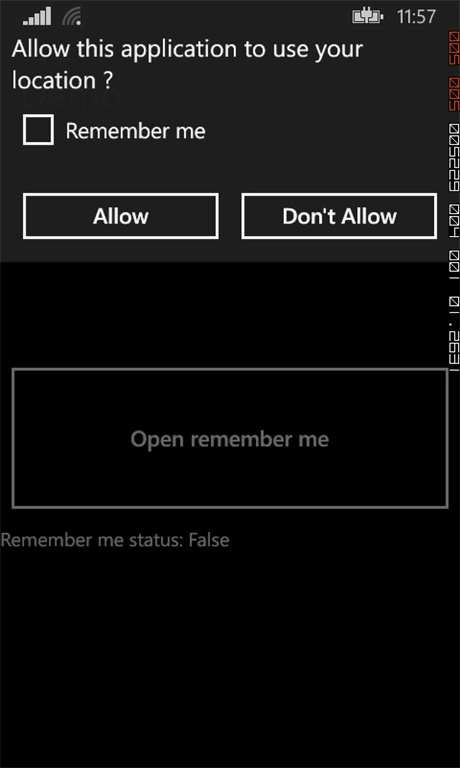
To handle the user response to the dialog we are handling the click event of dialog buttons. For this I'm handling a dialog dismissing event. In the handler I'm comparing the dialog result to perform the various action on user response.
I'm also handling the checked/unchecked events of combo box to enable the live preview and instant save.
Before you can run the following demo you need to install a Windows Phone 8 toolkit in your project. It's very easy to do this.
Installing Windows Phone 8 Toolkit
Use the following procedure to install the Windows Phone 8 toolkit using Nugget:
-
Open your app project (either an existing one or a new one)
-
From the toolbar select "Tools" -> "NuGet Package Manager" -> "Package Manager Console"
-
Now in the package manager console type the following:
Install-Package WPtoolkit
After typing this you will probably see the log similar to this one:
install-package wptoolkit
'WPtoolkit 4.2013.08.16' already installed.
Adding 'WPtoolkit 4.2013.08.16' to Demo.
Successfully added 'WPtoolkit 4.2013.08.16' to Demo. - The next step is to add its reference to the XAML page. To do this just add this line:
xmlns:toolkit="clr-namespace:Microsoft.Phone.Controls;assembly=Microsoft.Phone.Controls.Toolkit"
Demo
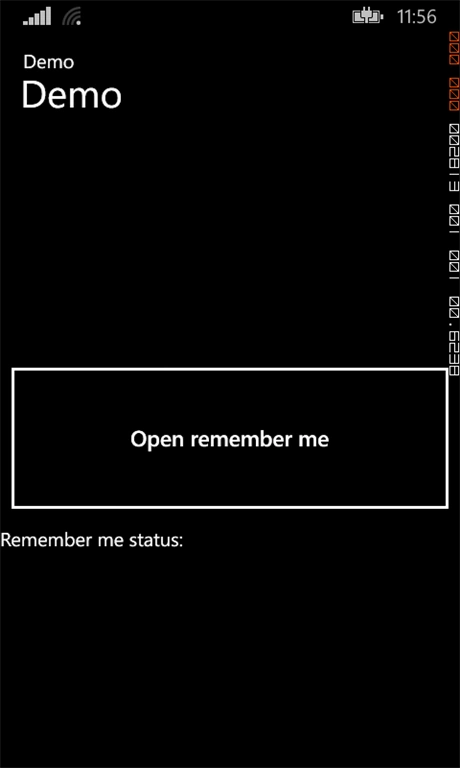
The following code is used for creating this control. You can use the comments of the code to understand it more clearly. Isolated storage settings are used for saving the user response at app exit. This demo requires you to have a basic understanding of saving settings using isolated storage settings. I have created one check box for "remember me" and one text box for the message. These two controls are grouped into one stack panel. That stack panel is assigned to the content property of the message box. On the change of the checkbox check status I'm saving the settings.
Let's see how to code it.
XAML
<phone:PhoneApplicationPage
x:Class="Demo.MainPage"
xmlns="http://schemas.microsoft.com/winfx/2006/xaml/presentation"
xmlns:x="http://schemas.microsoft.com/winfx/2006/xaml"
xmlns:phone="clr-namespace:Microsoft.Phone.Controls;assembly=Microsoft.Phone"
xmlns:shell="clr-namespace:Microsoft.Phone.Shell;assembly=Microsoft.Phone"
xmlns:d="http://schemas.microsoft.com/expression/blend/2008"
xmlns:mc="http://schemas.openxmlformats.org/markup-compatibility/2006"
xmlns:toolkit="clr-namespace:Microsoft.Phone.Controls;assembly=Microsoft.Phone.Controls.Toolkit"
mc:Ignorable="d"
FontFamily="{StaticResource PhoneFontFamilyNormal}"
FontSize="{StaticResource PhoneFontSizeNormal}"
Foreground="{StaticResource PhoneForegroundBrush}"
SupportedOrientations="Portrait" Orientation="Portrait"
shell:SystemTray.IsVisible="True">
<!--LayoutRoot is the root grid where all page content is placed-->
<Grid x:Name="LayoutRoot" Background="Transparent">
<Grid.RowDefinitions>
<RowDefinition Height="Auto"/>
<RowDefinition Height="*"/>
</Grid.RowDefinitions>
<!--TitlePanel contains the name of the application and page title-->
<StackPanel x:Name="TitlePanel" Grid.Row="0" Margin="12,17,0,28">
<TextBlock Text="Demo" Style="{StaticResource PhoneTextNormalStyle}" Margin="12,0"/>
<TextBlock Text="Demo" Margin="9,-7,0,0" FontSize="40" />
</StackPanel>
<!--ContentPanel - place additional content here-->
<Button Content="Open remember me" Click="openMsgBox" Height="171" VerticalAlignment="Bottom" Margin="0,0,0,258" Grid.Row="1"></Button>
<TextBlock Name="clrSel" Text="Remember me status:" Margin="0,396,0,218" Grid.Row="1"></TextBlock>
</Grid>
</phone:PhoneApplicationPage>
C# Code Behind
using Microsoft.Phone.Controls;
using System;
using System.Collections.Generic;
using System.Linq;
using System.Net;
using System.Windows;
using System.Windows.Controls;
using System.Diagnostics;
using Microsoft.Phone.Tasks;
using System.Windows.Media;
using System.Windows.Media.Animation;
using System.IO;
namespace Demo
{
public partial class MainPage : PhoneApplicationPage
{
// Constructor
public MainPage()
{
InitializeComponent();
}
CheckBox cb;
StackPanel sp;
CustomMessageBox cmb;
private void openMsgBox(object sender, RoutedEventArgs e)
{
// create new Stack panel
sp = new StackPanel() { Orientation = System.Windows.Controls.Orientation.Vertical };
// create new Check Box
cb = new CheckBox()
{
Content = "Remember me",
HorizontalAlignment=System.Windows.HorizontalAlignment.Left,
IsChecked=App.remme,
};
//Status of remeber me
clrSel.Text = "Remember me status: " + App.remme;
//Create New Text Block
TextBlock tb = new TextBlock()
{
Text="Allow this application to use your location ?",
FontSize=25,
TextWrapping=TextWrapping.Wrap,
};
//Add grid in Stack panel
sp.Children.Add(tb);
sp.Children.Add(cb);
//enable tilt effect
TiltEffect.SetIsTiltEnabled(cb, true);
TiltEffect.SetIsTiltEnabled(tb, true);
// Create new custom message box instance
cmb = new CustomMessageBox()
{
// Set its content to our Stack Panel
Content = sp,
Opacity = 0.98,
// Left button of message box Button
LeftButtonContent = "Allow",
//Right button of message Box
RightButtonContent = "Don't Allow",
};
//Handle msg box closing
cmb.Dismissing += cmb_Dismissing;
//Handle Check/Unchek of check box
cb.Checked += cb_Checked;
cb.Unchecked += cb_Unchecked;
//Show the message box...
cmb.Show();
}
void cb_Unchecked(object sender, RoutedEventArgs e)
{
App.remme = false;
//Update setting object
App.settings["rm"] = false;
//Save settings
App.settings.Save();
}
void cb_Checked(object sender, RoutedEventArgs e)
{
App.remme = true;
//Update setting object
App.settings["rm"] = true;
//Save settings
App.settings.Save();
}
void cmb_Dismissing(object sender, DismissingEventArgs e)
{
if (e.Result == CustomMessageBoxResult.LeftButton)
{
//Handle left click
}
if (e.Result == CustomMessageBoxResult.RightButton)
{
//Exit
App.Current.Terminate();
//Handle right-click
}
//Update UI
clrSel.Text = "Remember me status: "+App.remme;
}
}
}
The Show method is used to launch the task.
App.xaml.cs
public static System.IO.IsolatedStorage.IsolatedStorageSettings settings = System.IO.IsolatedStorage.IsolatedStorageSettings.ApplicationSettings;
public static bool remme = false;
private void Application_Launching(object sender, LaunchingEventArgs e)
{
try
{
//Get current settings
remme= (bool)settings["rm"];
}
catch (Exception)
{
// First launch or settings not available
settings.Add("rm", false);
remme = false;
}
}
Output
Prince PandeyPosted Jan 30, 2015, 5:43 AM
what if want to add 2 check boxes?