

Introduction
This article explains how to make our Web API service architecture loosely coupled and more flexible. We already learned how to create a RESTful service using the ASP.Net Web API and Entity framework in my last article. If you remember, we ended up with a solution with a design flaw, we'll try to overcome that flaw by resolving the dependencies of dependent components. Those who have not followed my previous article can learn by having the sample project attached as a test application from my first article.

Image source: https://www.pehub.com/wp-content/uploads/2013/06/independent-300x200.jpg
There are various methods you can use to resolve the dependency of components. In this article, I'll explain how to resolve a dependency using Unity Container provided by Microsoft's Unity Application Block.
We'll not go into very detailed theory, for theory and understanding of DI and IOC, you can use the following links: Unity and Inversion of Control(IOC). We'll straight away jump into a practical implementation.
Roadmap

Our roadmap for learning RESTful APIs remains the same; it is.
- RESTful Day #1: Enterprise-level application architecture with Web APIs using Entity Framework, Generic Repository pattern, and Unit of Work.
- RESTful Day #2: Inversion of control using dependency injection in Web APIs using Unity Container and Bootstrapper.
- RESTful Day #3: Resolve dependency of dependencies using Inversion of Control and dependency injection in ASP.Net Web APIs with Unity Container and Managed Extensibility Framework (MEF).
- RESTful Day #4: Custom URL Re-Writing/Routing using Attribute Routes in MVC 4 Web APIs.
- RESTful Day #5: Basic Authentication and Token-based Custom Authorization in Web APIs using Action Filters.
- RESTful Day #6: Request logging and Exception handing/logging in Web APIs using Action Filters, Exception Filters, and NLog.
- RESTful Day #7: Unit Testing and Integration Testing in WebAPI using NUnit and Moq framework (Part 1).
- RESTful Day #8: Unit Testing and Integration Testing in WebAPI using NUnit and Moq framework (Part 2).
- RESTful Day #9: Extending OData support in ASP.NET Web APIs.
I'll purposely use Visual Studio 2010 and .NET Framework 4.0 because there are a few implementations that are very hard to find in .NET Framework 4.0, but I'll make it easy by showing how to do it.
Existing Design and Problem
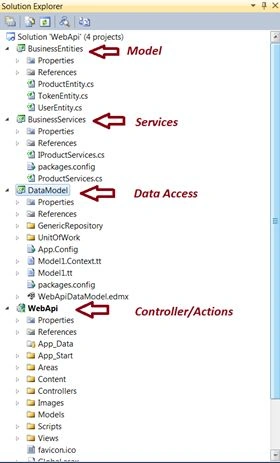
We already have an existing design. If you open the solution, you'll get to see the structure as shown below.
The modules are dependent in a way.
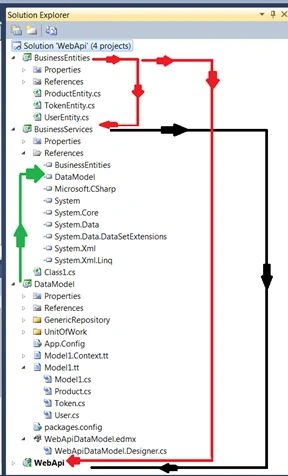
There is no problem with the structure, but the way they interact with each other is really problematic. You must have noticed that we are trying to communicate with layers, making the physical objects of classes.
For example, the Controller's constructor makes an object of the Service layer to communicate as in the following.
/// <summary>
/// Public constructor to initialize product service instance
/// </summary>
public ProductController()
{
    _productServices = new ProductServices();
}
The Service constructor in turn makes an object of UnitOfWork to communicate with the database as in the following.
/// <summary>
/// Public constructor.
/// </summary>
public ProductServices()
{
    _unitOfWork = new UnitOfWork();
}
The problem lies in these portions of code. We see the Controller is dependent upon instantiation of the service and the service is dependent upon UnitOfWork to be instantiated. Our layers should not be that tightly coupled and should be dependent on each other.
The work of creating an object should be assigned to someone else. Our layers should not worry about the creation of objects.
We'll assign this role to a third party that will be called our container. Fortunately, Unity provides that help to us, to eliminate this dependency problem and invert the control flow by injecting a dependency, not by creating objects but by using constructors or properties. There are other methods too, but I am not going into detail.
Introduction to Unity
You can have a read about Unity from this link, I am just quoting some lines.

Image source: http://img.tradeindia.com/fp/1/669/664.jpg
“The Unity Application Block (Unity) is a lightweight, extensible dependency injection container that supports constructor injection, property injection, and method call injection. It provides developers with the following advantages.
- It provides simplified object creation, especially for hierarchical object structures and dependencies that simplify application code.
- It supports the abstraction of requirements; this allows developers to specify dependencies at run time or in configuration and simplifies the management of crosscutting concerns.
- It increases flexibility by deferring component configuration to the container.
- It has a service location capability; this allows clients to store or cache the container. This is especially useful in ASP.NET Web applications where developers can persist the container in the ASP.NET session or application.”
Setup Unity
Open your Visual Studio, I am using Visual Studio 2010, you can use Visual Studio version 2010 or above. Load the solution.
Step 1. Browse to Tools -> Library Packet Manager - > Packet Manager Console as in the following.
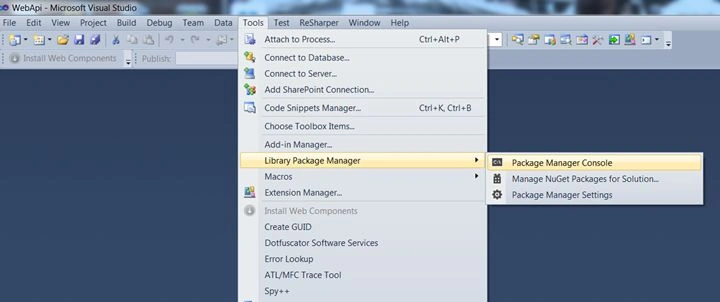
We'll add a package for a Unity Application Block.
In the bottom-left corner of Visual Studio, you'll find where to write the command.
Type the command Unity.MVC3 and choose the “WebApi” project before you fire the command.
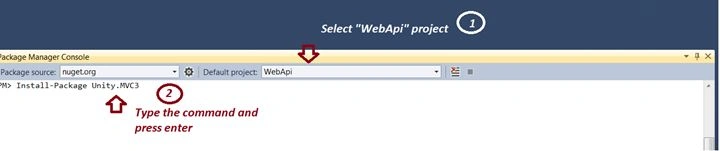
Step 2. Now for the Bootstrapper class.
Unity.MVC3 comes with a Bootstrapper class. As soon as you run the command, the Bootstrapper class will be generated in your WebAPI project as in the following.
using System.Web.Http;
using System.Web.Mvc;
using BusinessServices;
using DataModel.UnitOfWork;
using Microsoft.Practices.Unity;
using Unity.Mvc3;

namespace WebApi
{
    public static class Bootstrapper
    {
        public static void Initialise()
        {
            var container = BuildUnityContainer();
            DependencyResolver.SetResolver(new UnityDependencyResolver(container));
            // register dependency resolver for WebAPI RC
            GlobalConfiguration.Configuration.DependencyResolver = new Unity.WebApi.UnityDependencyResolver(container);
        }
        private static IUnityContainer BuildUnityContainer()
        {
            var container = new UnityContainer();

            // register all your components with the container here
            // it is NOT necessary to register your controllers

            // e.g. container.RegisterType<ITestService, TestService>();
            container.RegisterType<IProductServices, ProductServices>().RegisterType<UnitOfWork>(new HierarchicalLifetimeManager());

            return container;
        }
    }
}
=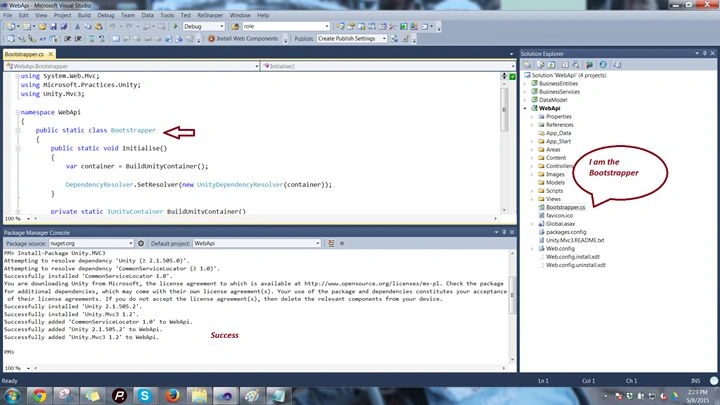
This class comes with an initial configuration to set up your container. All the functionality is built in, we only need to specify the dependencies that we need to resolve in the “BuildUnityContainer”, as it says in the commented statement in the following.
// register all your components with the container here
// it is NOT necessary to register your controllers

// e.g. container.RegisterType<ITestService, TestService>();
Step 3. Just specify the components below these commented lines that we need to resolve. In our case, it's ProductServices and UnitOfWork, so just add.
container.RegisterType<IProductServices, ProductServices>()
    .RegisterType<UnitOfWork>(new HierarchicalLifetimeManager());
"HierarchicalLifetimeManager", for this lifetime manager, as for the ContainerControlledLifetimeManager, Unity returns the same instance of the registered type or object each time you call the Resolve or ResolveAll method or when the dependency mechanism injects instances into other classes. The distinction is that when there are child containers, each child resolves its own instance of the object and does not share one with the parent. When resolving in the parent, the behavior is like a container-controlled lifetime; when resolving the parent and the child you have different instances with each acting as a container-controlled lifetime. If you have multiple children, each will resolve its own instance.
If you don't find “UnitOfWork”, just add a reference to the DataModel project in the WebAPI project.
So our Bootstrapper class becomes.


Kishor JPosted Mar 12, 2019, 1:48 AM
Cannot implicitly convert type 'DataModel.UnitOfWork.IUnitOfWork' to 'DataModel.UnitOfWork.UnitOfWork'. An explicit conversion exists (are you missing a cast?) BusinessServices
Kishor JPosted Mar 12, 2019, 1:47 AM
Cannot implicitly convert type 'BusinessService.IProductServices' to 'BusinessService.ProductServices'. An explicit conversion exists (are you missing a cast?) WebAPI
Hadshana KamalanathanPosted Jul 22, 2018, 1:12 AM
Nice article...
Aakash GPosted Mar 14, 2017, 4:46 AM
For using .Net 4.5, WebAPI 2, get package 1. install-package unity.webapi then in UnityConfig.cs add this line - GlobalConfiguration.Configuration.DependencyResolver = new Unity.WebApi.UnityDependencyResolver(container);
Gowtham RajamanickamPosted Apr 28, 2016, 2:11 AM
good work..
Debasis SahaPosted Mar 31, 2016, 1:08 AM
Good One..
Naseem AkhtarPosted Dec 6, 2015, 12:20 PM
I m getting same error
rakesh patelPosted Aug 28, 2015, 2:36 AM
I am getting same error
vijay BhaskarPosted Aug 27, 2015, 3:21 AM
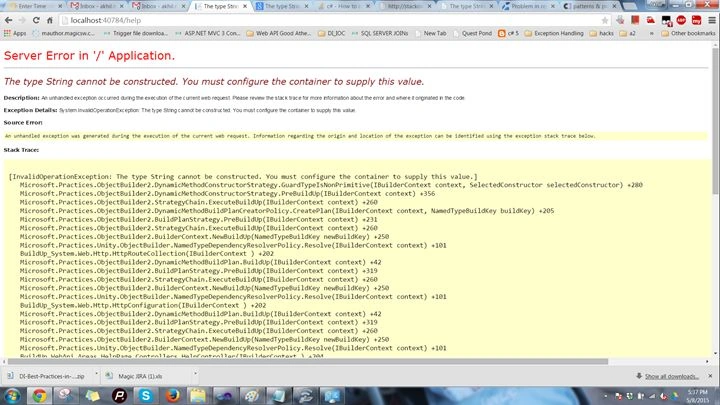
When I am running the code after adding Unity container I am getting the error as mentiioned - {"Message":"An error has occurred.","ExceptionMessage":"Type 'WebApi.Controllers.ProductController' does not have a default constructor","ExceptionType":"System.ArgumentException","StackTrace":" at System.Linq.Expressions.Expression.New(Type type)\r\n at System.Web.Http.Internal.TypeActivator.Create[TBase](Type instanceType)\r\n at System.Web.Http.Dispatcher.DefaultHttpControllerActivator.GetInstanceOrActivator(HttpRequestMessage request, Type controllerType, Func`1& activator)\r\n at System.Web.Http.Dispatcher.DefaultHttpControllerActivator.Create(HttpRequestMessage request, HttpControllerDescriptor controllerDescriptor, Type controllerType)"}. Can you please help me with this.
Santhakumar MunuswamyPosted May 30, 2015, 1:00 PM
Thanks for nice article
NitinPosted May 12, 2015, 12:56 PM
good one
Sibeesh VenuPosted May 12, 2015, 6:27 AM
Good one
Sibeesh VenuPosted May 12, 2015, 6:27 AM
Good one
Santhakumar MunuswamyPosted May 12, 2015, 12:18 AM
Thanks for good work