

Hi Readers, I hope you all are doing well. Please read my previous article, Angular Services For Sharing Data Between Components, in which I have explained the method by which we can share the required data between components using Angular services which is very important for Angular. Today, I am here with one more article, which is Angular Routing.
Now, two things which you should keep in your mind - What is Routing and why we are using it in Angular. I have already explained about routing in my previous article, and here, I am going to explain in more detail.
What is Routing?
You can say simply: Angular provides a Router to make it easier to define routes for the web applications and to navigate from one view to another. The basic concepts behind routing are when a user needs to view any page based on specific URL, Angular provides a routing feature by which the view will be rendered of the specific component according to defined routing.
Why Routing
We are using routing to navigate from one view to another. It's a basic need of all the web applications to move one page to another and show the required data within the view without loading full page. So, in this case, routing comes into the picture. With the help of routing, we can simply move multiple pages with any specified URL which one we need.
There are few steps which we have to do for Angular Routing. First, we will create the required component which is necessary to start the application. For component creation, you can use either command ng g component <componentname> or by the application which I had already explained in my previous tutorial so we will create 2 component as Home and Contact with HTML file for the initial step of routing as,
Step1
- import { Component, OnInit } from '@angular/core';
- @Component({
- selector: 'app-root',
- templateUrl: 'app.home.component.html',
- })
- export class HomeComponent {
- constructor() {
- }
- }
app.home.component.html
- <hr>
- <div style="text-align:center">
- <div>
- <h1>Home Component</h1>
- </div>
- <hr>
app.contact.component.ts
- import { Component, OnInit } from '@angular/core';
- @Component({
- selector: 'contact',
- templateUrl: 'app.contact.component.html',
- })
- export class ContactComponent {
- public data;
- constructor() {
- }
- }
app.contact.component.html
- <hr>
- <div style="text-align:center">
- <h1>Contact component</h1>\
- </div>
- <hr>
Step 2
Now, we will create the routing file as,
app.routing.ts
- import { ModuleWithProviders } from '@angular/core';
- import { Routes, RouterModule } from '@angular/router';
- import { HomeComponent } from './app.home.component';
- import { ContactComponent } from './app.contact.component';
- const appRoutes: Routes = [
- { path: '', redirectTo: 'home',pathMatch: 'full' },
- { path: 'home', component: HomeComponent },
- { path: 'contact', component: ContactComponent },
- ];
- export const routing: ModuleWithProviders =
- RouterModule.forRoot(appRoutes);
As you can see above we have added routing file with required routing according to our component. Here, you need to know a few things about routing which we have added above:
Routes
We can import the Routes from @angular.router that we are using in our application with a component that describes the routes we want to use. As you can see in above within the Routes we have defined the path which match the URL and component which will get the HTML page of the component.
- path: is a string that uses the route matcher URL.
- pathMatch: is a string that specifies the matching strategy as full.
- component: is a component type.
- redirectTo: is the URL fragment which will replace the current matched segment.
ModuleWithProvider
As you can see above, we can import the ModuleWithProvider from @angular/core which we are using with RouterModule which we can import from @angular.router. RouterModule has the method forRoot in which we can pass the Routes which we have created for routing.
Step 3
Now, we will create the navigation menu by which we can use the routing. In the navigation menu, we will add the component where we have added <router-outlet></router-outlet> as in the main component.
app.component.ts
- import { Component, OnInit } from '@angular/core';
- @Component({
- selector: 'app-root',
- templateUrl: 'app.component.html',
- })
- export class AppComponent {
- public title: string = 'Routing example';
- constructor() {
- }
- }
app.component.html
- <div style="text-align:center">
- <div>
- <!-- navigation menu -->
- <nav>
- <ul>
- <li><a [routerLink]="['home']" [routerLinkActive]="['active']">Home</a></li>
- <li><a [routerLink]="['contact']" [routerLinkActive]="['active']">Contact</a></li>
- </ul>
- </nav>
- <div>
- <h1>
- {{title}}
- </h1>
- <img width="100" height="100" alt="Angular Logo" src="data:image/svg+xml;base64,PHN2ZyB4bWxucz0iaHR0cDovL3d3dy53My5vcmcvMjAwMC9zdmciIHZpZXdCb3g9IjAgMCAyNTAgMjUwIj4KICAgIDxwYXRoIGZpbGw9IiNERDAwMzEiIGQ9Ik0xMjUgMzBMMzEuOSA2My4ybDE0LjIgMTIzLjFMMTI1IDIzMGw3OC45LTQzLjcgMTQuMi0xMjMuMXoiIC8+CiAgICA8cGF0aCBmaWxsPSIjQzMwMDJGIiBkPSJNMTI1IDMwdjIyLjItLjFWMjMwbDc4LjktNDMuNyAxNC4yLTEyMy4xTDEyNSAzMHoiIC8+CiAgICA8cGF0aCAgZmlsbD0iI0ZGRkZGRiIgZD0iTTEyNSA1Mi4xTDY2LjggMTgyLjZoMjEuN2wxMS43LTI5LjJoNDkuNGwxMS43IDI5LjJIMTgzTDEyNSA1Mi4xem0xNyA4My4zaC0zNGwxNy00MC45IDE3IDQwLjl6IiAvPgogIDwvc3ZnPg==">
- </div>
- <router-outlet></router-outlet>
- </div>
As you can see above, we have added [routerLink] and <router-outlet></router-outlet> with the app.component.html file which is our main component file. Here, we are using [routeLink] with anchor for moving from one view to another view according to a specified route which we have added in app.routing.ts and <router-outlet></router-outlet> for rendering the view according to the component file.
Step 4
Now, we have to register each component and routing in the app.module.ts file as below,
app.module.ts
- import { BrowserModule } from '@angular/platform-browser';
- import { NgModule } from '@angular/core';
- import { AppComponent } from './app.component';
- import { HomeComponent } from './app.home.component';
- import { ContactComponent } from './app.contact.component';
- import { routing } from './app.routing';
- @NgModule({
- declarations: [
- AppComponent, HomeComponent, ContactComponent,
- ],
- imports: [
- BrowserModule, routing
- ],
- bootstrap: [AppComponent]
- })
- export class AppModule { }
As you can see above we have added the component in the declaration section and routing in imports section where we are using all the modules which is required for our application.
If you want to use some styles for the menu, you can use css within style.css which is global style sheet:
styles.css
- ul {
- list-style-type: none;
- margin: 0;
- padding: 0;
- overflow: hidden;
- background-color: #bda4a4;
- }
- li {
- float: left;
- }
- li a {
- display: block;
- color: white;
- text-align: center;
- padding: 14px 16px;
- text-decoration: none;
- }
- li a:hover:not(.active) {
- background-color: #A09FB1;
- }
- .active {
- background-color: #6AD4AC;
- }
Now, if everything is completed above, you can run the application using two steps,
Step 1
Open the node js command window and move to the location where you have added the application .
Step 2
Execute the command ng serve,
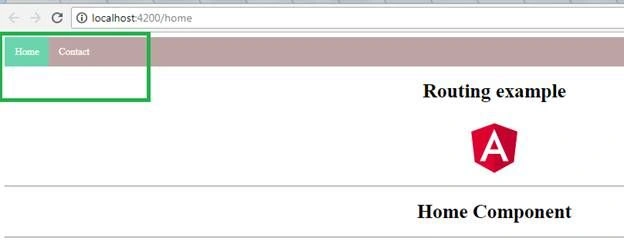
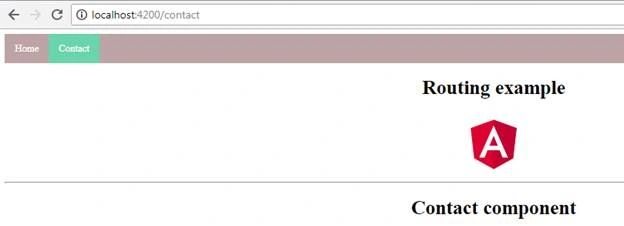
When application runs successfully, the below output should show,
Output for Home
Output for Contact
So, these are the main steps which we have to use for routing in Angular. You can also download the application by zip file which I have shared with this article. You need to know one thing, after downloading the application first add it in any location and then run npm install. When npm install run successfully then you can run the application by ng serve command.
Conclusion
As you can see now the Angular Routing is the main feature of Angular which we are using in almost all the applications for moving from one page to another page without loading the page. I hope you liked this -- please share it if you did.
Rakesh JoganiPosted Jul 7, 2018, 1:45 AM
Nice article sir 404 error occurs when I refresh through the browser. I have one solution with useHash true But this solution append # into URL Any other solution for refresh or reload the browser
Komal SharmaPosted Jul 5, 2018, 4:55 AM
Nice article sir......
rachapalli sankeerthPosted Jul 4, 2018, 9:22 AM
I guess in angular 2 also the same concept is there...so whats the difference between these angular2 and angular4 version in routing concept?
Khumana RamPosted Jul 4, 2018, 5:08 AM
Thanks a lot for sharing this concept in brief
Deepak VermaPosted Jul 4, 2018, 12:35 AM
Very informative sir.......... Thanks a lot for sharing this concept in brief......
Reena LakraPosted Jul 3, 2018, 7:09 AM
Nice explanation sir.....keep posting such articles.
Mahesh VermaPosted Jul 3, 2018, 12:25 AM
Very nice and informative article Sir.....Nice explanation about routing......