

Introduction
This article explains how to implement the select all header check box template in Kendo Grid, using ASP.NET Web API. To explain it, I have created a RESTful GET Service, which is used to load the Data Source of Kendo Grid
Requirements
- VS 2010 and above
- SQL Server 2008 and above
Prerequisites
Basic knowledge of ASP.NET WebAPI, jQuery, Kendo UI.
This article flows, as per the following.
- Set up the table.
- Creating an ASP.NET Web API Application.
- Creating a Controller.
- Testing the REST API.
- Creating a HTML page and implementing select all header check box template in Kendo Grid.
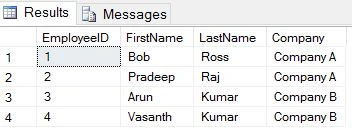
Set up the table
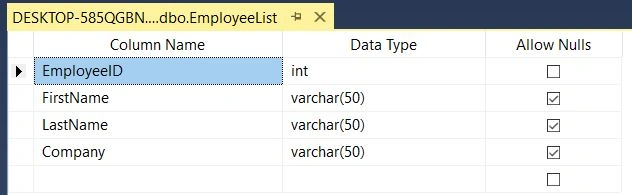
Employee List Table
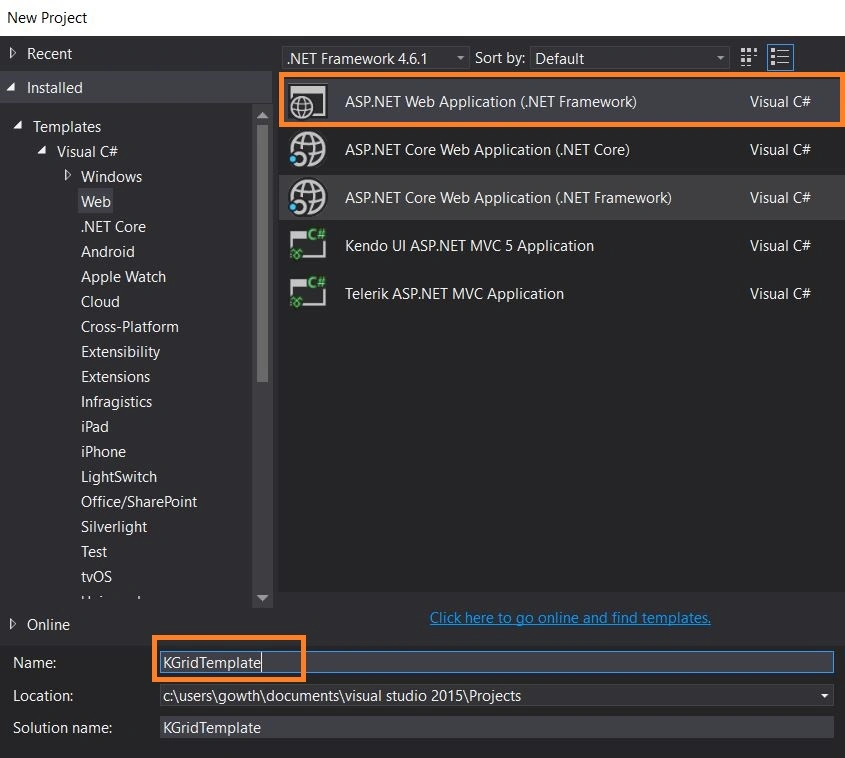
Creating an ASP.NET WEB API Application
Create a Web API Application, using an installed Web template in Visual Studio, as shown below. In my case, I named the Application “KGridTemplate"
Creating model classes
Now, we will create Entity Framework models from the database tables.
Step 1
Right-click the Models folder, select Add -> ADO.NET Entity Data Model or select Add->New Item. In the Add New Item Window, select data in the left pane and ADO.NET Entity Data Model from the center pane. Name the new model file (In my case, I made it as Employee) and click Add.
Step 2
In the Entity Data Model wizard, select "EF Designer" from the database and click Next.
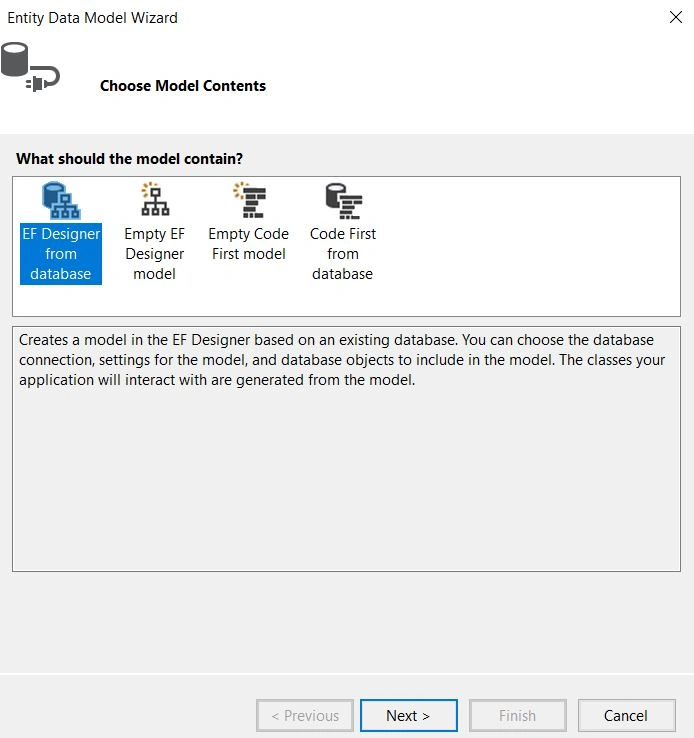
Step 3
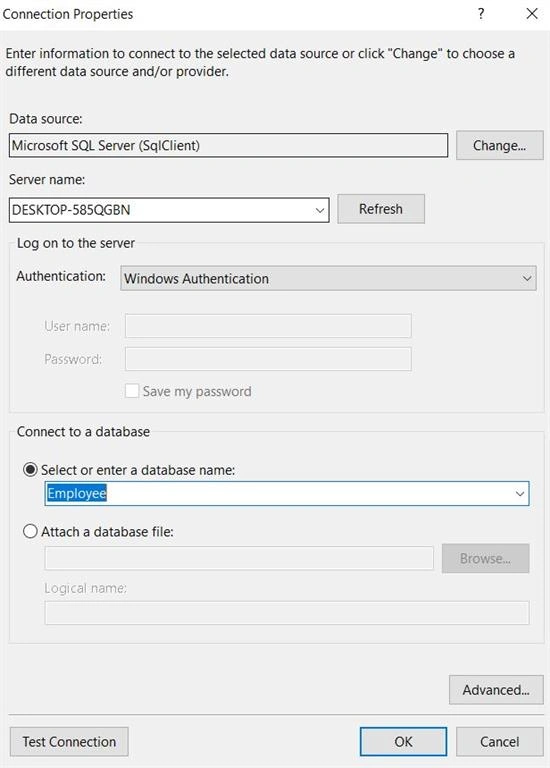
Click New Connection button. The Connection Properties Window will open.
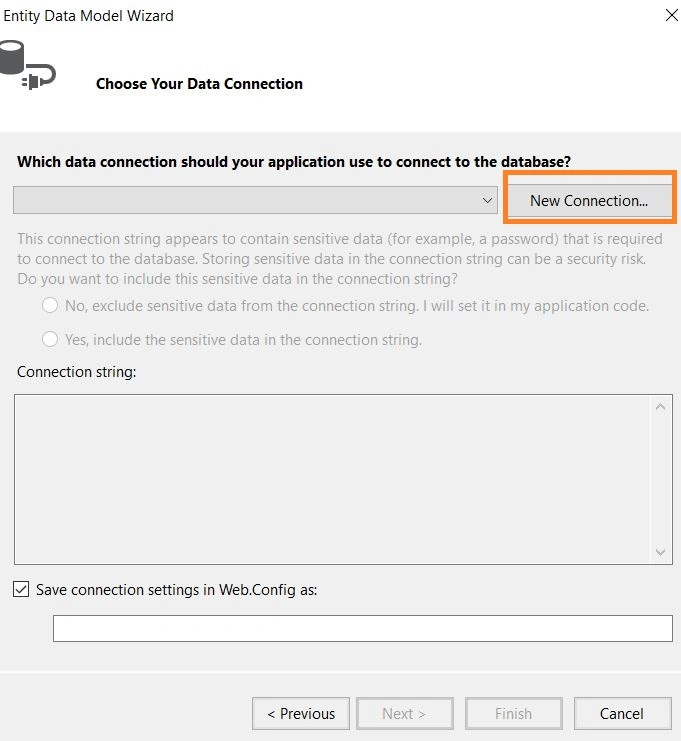
In Connection Properties Window, provide the name of the local Server, where the database was created (in this case, (DESKTOP-585QGBN)). After providing the Server name, select Employee from the available databases and click OK.
Step 5
You can use the default name for the connection to save Web.Config file. Now, click Next.
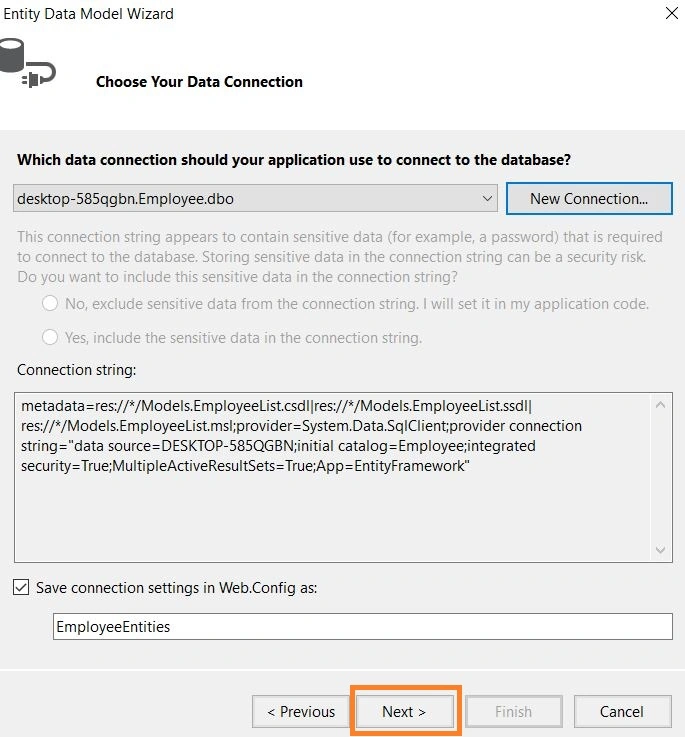
Step 6
Select the table to generate the models for EmployeeList table and click Finish.
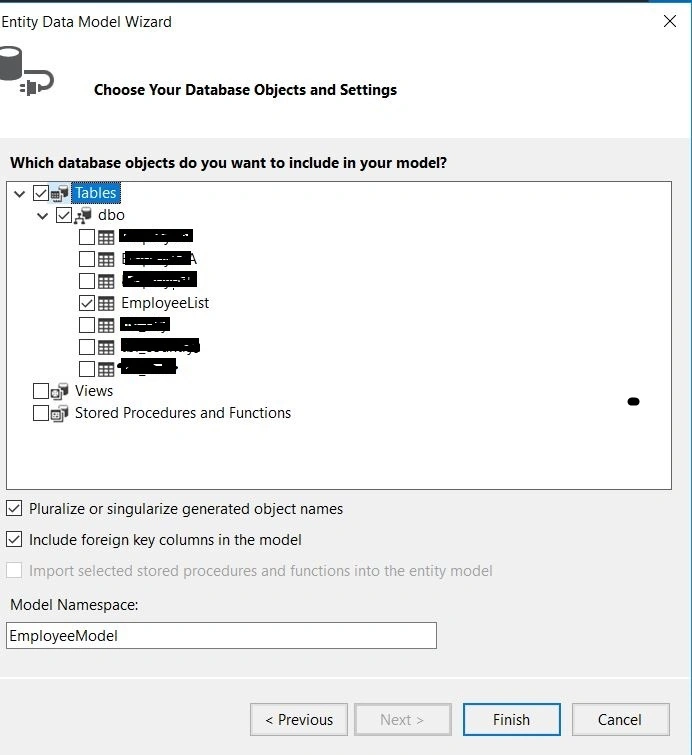
My database schema is shown in the figure given below.
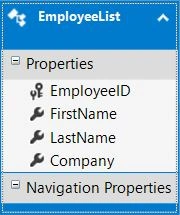
Creating a Controller
Right click on Controller folder and add a new Web API 2 controller- Empty, as shown in the Figure 11. In my case, I named it as EmployeesController.cs.
Write the code given below in EmployeeController.cs
- [RoutePrefix("api/Employee")]
- public class EmployeeController : ApiController
- {
- EmployeeEntities db = new EmployeeEntities();
- [HttpGet]
- [AllowAnonymous]
- [Route("EmployeeList")]
- public HttpResponseMessage GetEmployeeList()
- {
- try
- {
- return Request.CreateResponse(HttpStatusCode.OK, db.EmployeeLists, Configuration.Formatters.JsonFormatter);
- }
- catch(Exception ex)
- {
- return Request.CreateResponse(HttpStatusCode.OK, ex.Message, Configuration.Formatters.JsonFormatter);
- }
- }
- }
Testing API in Postman
- API End Point /API/ Employee/ EmployeeList.
- Type GET.
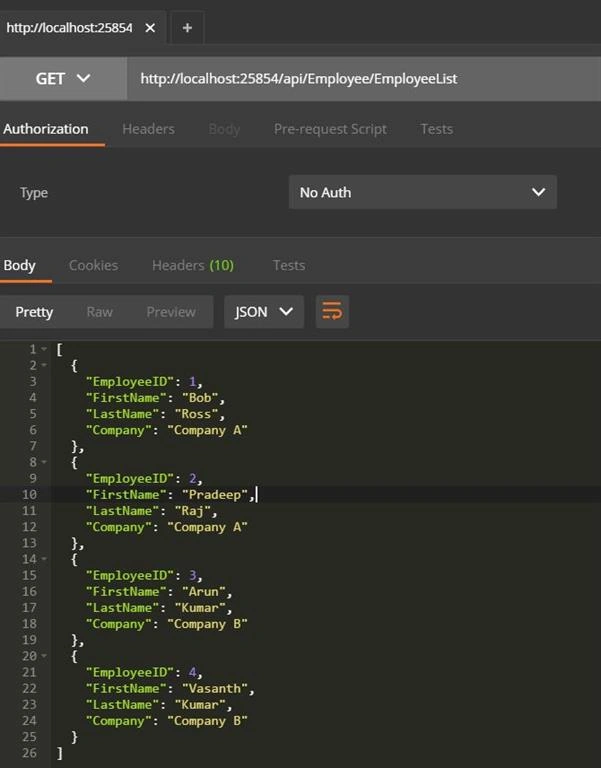
Now, our API is ready. Let's create a Kendo Grid Data Source, using the API.
Creating HTML page
Create one new HTML page in the Application, where we are going to implement Kendo Grid, using the RESTful Service. In my case, I named it as KendoGrid.html.
Click here to learn more about remote Data Source in Kendo Grid
- <!DOCTYPE html>
- <html>
- <head>
- <title>Kendo Grid</title>
- <meta charset="utf-8" />
- <link rel="stylesheet" href="http://kendo.cdn.telerik.com/2017.1.118/styles/kendo.common.min.css" />
- <link rel="stylesheet" href="http://kendo.cdn.telerik.com/2017.1.118/styles/kendo.rtl.min.css" />
- <link rel="stylesheet" href="http://kendo.cdn.telerik.com/2017.1.118/styles/kendo.silver.min.css" />
- <link rel="stylesheet" href="http://kendo.cdn.telerik.com/2017.1.118/styles/kendo.mobile.all.min.css" />
- <script src="http://code.jquery.com/jquery-1.12.4.min.js"></script>
- <script src="http://kendo.cdn.telerik.com/2017.1.118/js/kendo.all.min.js"></script>
- </head>
- <body>
- <div id="example">
- <div id="grid"></div>
- <br />
- <br />
- <button id="showSelection" class="k-button">Get Employee Name</button>
- <script>
- $(document).ready(function() {
- var employeeGrid= $("#grid").kendoGrid({
- dataSource: {
- type: "json",
- transport: {
- read: "/api/Employee/EmployeeList"
- },
- // group:{field:"Company",aggregates:[{field:"Company",aggregate:"count"}]},
- schema: {
- model: {
- fields: {
- EmployeeID: { type: "number" },
- FirstName: { type: "string" },
- LastName: { type: "string" },
- Company:{type:"string"}
- }
- }
- },
- },
- filterable: true,
- sortable: true,
- dataBound:onDataBound,
- pageable: true,
- columns: [
- {
- headerTemplate: `<input type="checkbox" id="headerchb" class="k-checkbox"><label class="k-checkbox-label" for="headerchb"></label>`,
- template: function(dataItem){
- return `<input type="checkbox" id="${dataItem.EmployeeID}" class="k-checkbox"><label class="k-checkbox-label" for="${dataItem.EmployeeID}"></label>`
- },
- width: 50
- },
- {
- field:"EmployeeID",
- filterable: false
- },
- {
- field: "FirstName",
- title: " First Name",
- }, {
- field: "LastName",
- title: "Last Name"
- }, {
- field: "Company",
- title: "Company",
- },
- ]
- }).data("kendoGrid");
- employeeGrid.table.on("click", ".k-checkbox" , selectRow);
- $('#headerchb').change(function (ev) {
- debugger;
- var checked = ev.target.checked;
- $('.k-checkbox').each(function(idx, item){
- if(checked){
- if(!($(item).closest('tr').is('.k-state-selected'))){
- $(item).click();
- }
- } else {
- checkedIds={}
- if($(item).closest('tr').is('.k-state-selected')){
- $(item).click();
- }
- }
- });
- });
- $("#showSelection").bind("click", function () {
- var checked = [];
- for(var i in checkedIds){
- if(checkedIds[i]){
- checked.push(i);
- }
- }
- alert(checked);
- });
- });
- var checkedIds = {}
- //on click of the checkbox:
- function selectRow() {
- debugger;
- var checked = this.checked,
- row = $(this).closest("tr"),
- grid = $("#grid").data("kendoGrid"),
- dataItem = grid.dataItem(row);
- checkedIds[dataItem.FirstName] = checked;
- if (checked) {
- //-select the row
- row.addClass("k-state-selected");
- } else {
- //-remove selection
- row.removeClass("k-state-selected");
- }
- }
- //on dataBound event restore previous selected rows:
- function onDataBound(e) {
- var view = this.dataSource.view();
- for(var i = 0; i < view.length;i++){
- if(checkedIds[view[i].EmployeeID]){
- this.tbody.find("tr[data-uid='" + view[i].uid + "']")
- .addClass("k-state-selected")
- .find(".checkbox")
- .attr("checked","checked");
- }
- }
- }
- </script>
- </div>
- </body>
- </html>
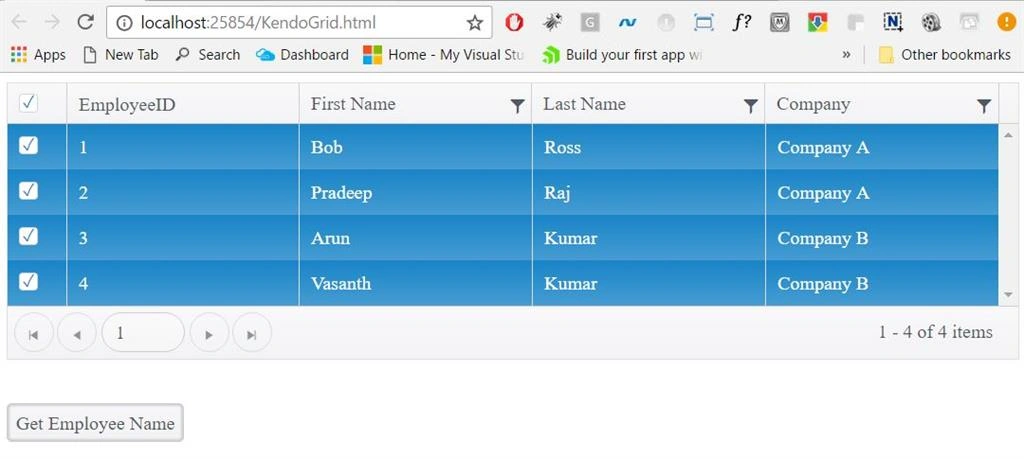
Figure 12
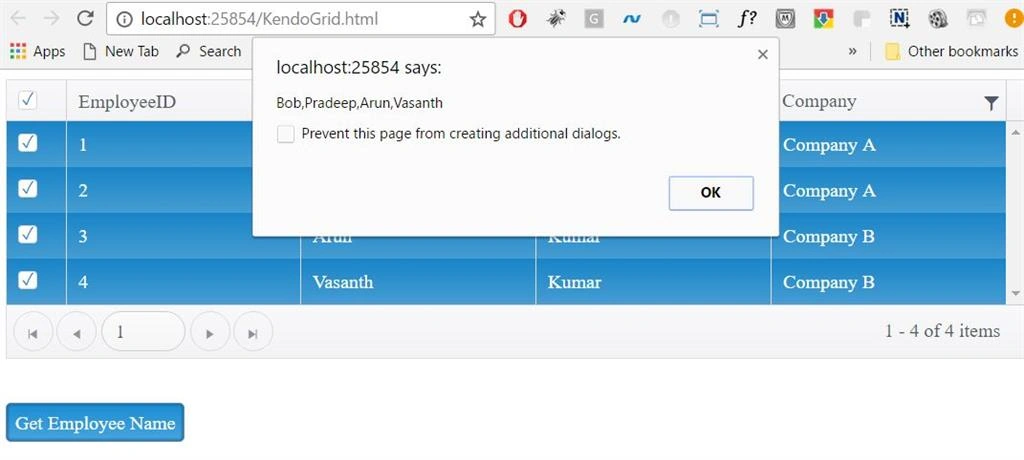
Figure 13
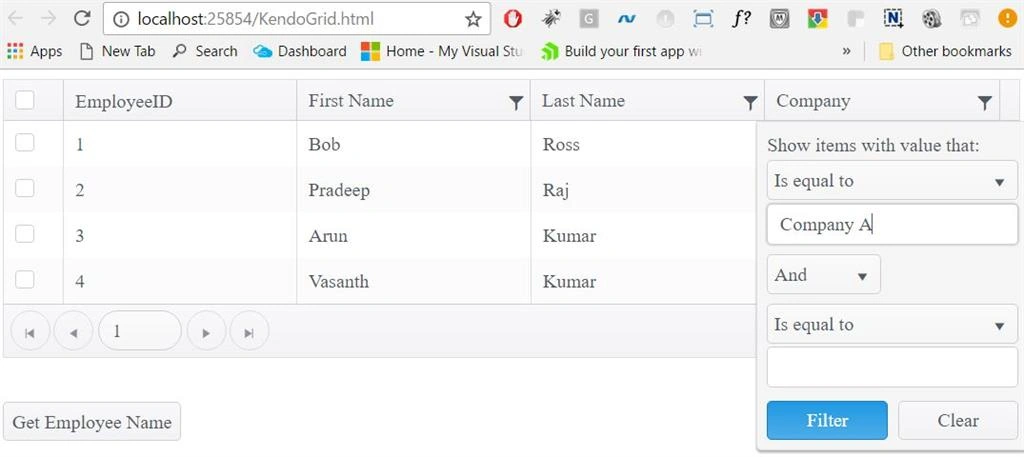
Figure 14
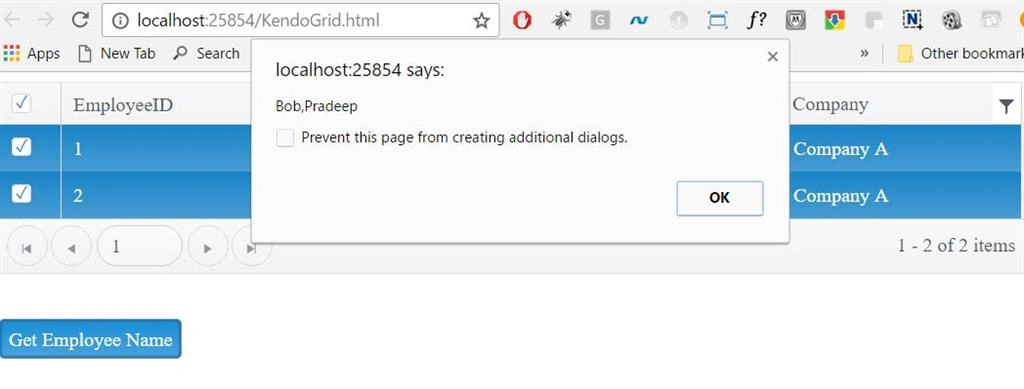
Figure 15
Gopi KrishnanPosted Oct 26, 2018, 7:58 AM
Such a good work.