

Introduction
In many business processes, approvals are a critical step—whether it’s request validation, document approval, or workflow progression. While traditional approval emails often get missed, integrating approvals directly into Microsoft Teams provides a faster and more interactive experience.
In this article, we’ll explore how to send approvals using Adaptive Cards in Microsoft Teams with Power Automate, allowing users to take action directly within Teams.
Why Use Adaptive Cards?
Adaptive Cards offer a modern, interactive UI compared to standard approval actions and have faster response time.
Important Limitation
Before we begin, note:
Adaptive Cards do not support @mentions inside them.
If you need notifications:
Use a separate message with @mention (For mentioning everyone in teams : Visit this..)
Or send the card directly to the user which will automatically notify that user.
Based on your approval process you can configure the adaptive card. I will just showcase a simple 1 level approval system.
Step-by-Step Implementation
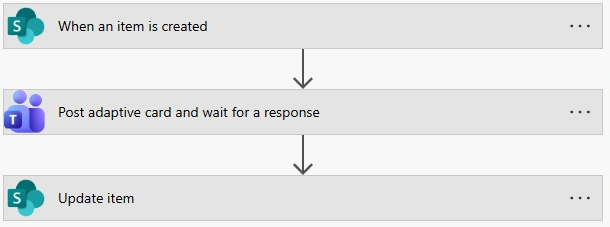
Step 1: Go to Microsoft Power Automate and create a new flow.
You can trigger it using:
SharePoint item creation
Power Apps
Manual trigger (for testing)
I have used on Item creation i.e. when request gets created it goes for approval.
Step 2: Add “Post Adaptive Card and Wait for a Response”
Add action: Post adaptive card and wait for a response
Configure:
Post as: Flow bot
Post in: Channel or Group Chat
Message:
{
    "$schema": "https://adaptivecards.io/schemas/adaptive-card.json",
    "type": "AdaptiveCard",
    "version": "1.4",
    "body": [
        {
            "type": "TextBlock",
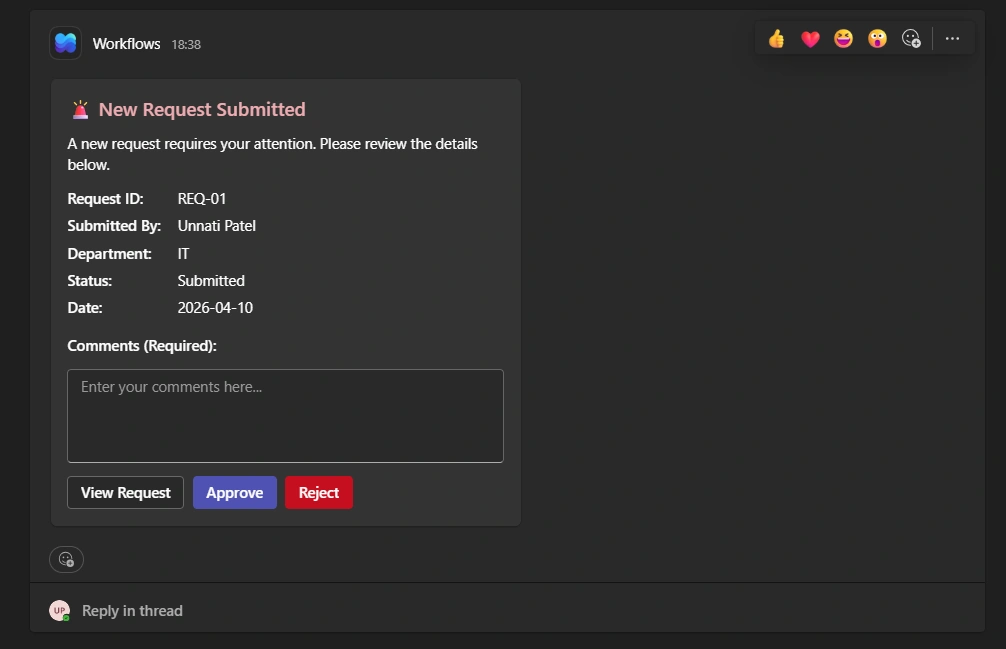
            "text": "🚨 New Request Submitted",
            "weight": "Bolder",
            "size": "Large",
            "color": "Attention"
        },
        {
            "type": "TextBlock",
            "text": "A new request requires your attention. Please review the details below.",
            "wrap": true
        },
        {
            "type": "FactSet",
            "facts": [
                {
                    "title": "Request ID:",
                    "value": "@{triggerOutputs()?['body/Title']}"
                },
                {
                    "title": "Submitted By:",
                    "value": "@{triggerOutputs()?['body/Author/DisplayName']}"
                },
                {
                    "title": "Department:",
                    "value": "@{triggerOutputs()?['body/Department/Value']}"
                },
                {
                    "title": "Status:",
                    "value": "@{triggerOutputs()?['body/OverallStatus/Value']}"
                },
                {
                    "title": "Date:",
                    "value": "@{formatDateTime(triggerOutputs()?['body/Created'],'yyyy-MM-dd')}"
                }
            ]
        },
        {
            "type": "TextBlock",
            "text": "Comments (Required):",
            "weight": "Bolder",
            "spacing": "Medium"
        },
        {
            "type": "Input.Text",
            "id": "acComments",
            "placeholder": "Enter your comments here...",
            "isMultiline": true,
            "isRequired": true,
            "errorMessage": "Comments are required before submitting"
        }
    ],
    "actions": [
        {
            "type": "Action.OpenUrl",
            "title": "View Request",
            "url": "@{triggerOutputs()?['body/Link']}"
        },
        {
            "type": "Action.Submit",
            "title": "Approve",
            "style": "positive",
            "data": {
                "action": "approve"
            }
        },
        {
            "type": "Action.Submit",
            "title": "Reject",
            "style": "destructive",
            "data": {
                "action": "reject"
            }
        }
    ]
}
Update message: Thanks for your response! (This message will appear after response submission)
Group chat: User group (In case you select Group chat)
Team: Select your team
Channel: Select your target channel
Step 3: Update Item
Update status based the outcome provided by approver
Status: In your status field.
if(equals(body('Post_adaptive_card_and_wait_for_a_response')?['data']?['action'],'approve'),'Approved','Rejected')ApprovalComments: In your comments field.
body('Post_adaptive_card_and_wait_for_a_response')?['data']?['acComments']Basically your flow looks like this:
Result
Conclusion
Adaptive Cards provide a powerful way to modernize approval workflows in Microsoft Teams. By combining them with Power Automate, you can create seamless, interactive, and efficient approval systems that allow users to take action instantly without leaving Teams.
Join the conversation! Your thoughts help the community grow.