

Introduction
For the last couple of years, Microsoft was promoting MS flow with various supportive features. Now, flow has been re-branded as Power Automate. It has a lot of connectors and actions which help the power users as well as developers to create the approval process, scheduler and business automate process, etc. Recently, Microsoft has declared the deprecation of SharePoint 2010 workflows in SharePoint online, they are suggesting Power Automate (MS Flow) as the alternative. Microsoft also suggesting their online clients migrate their SP 2010 workflows in MS Flow.
In SP 2010 workflow, there was a feature called impersonation step with which we could change the permission of a list item or files. So, with the deprecation of the SP 2010 workflow, this feature will not be available for us. And in SP 2013 workflow, there is no provided action to change permission. So, without custom code, MS flow is the best approach.
In this article, we will explain how to remove and set custom permission for a list item or a library file. The step by step procedure is given below.
Creating MS Flow
- Go to the following link.
- Log in with your credential
- Click on the “Create” tab as shown in the image (Fig 1) below.
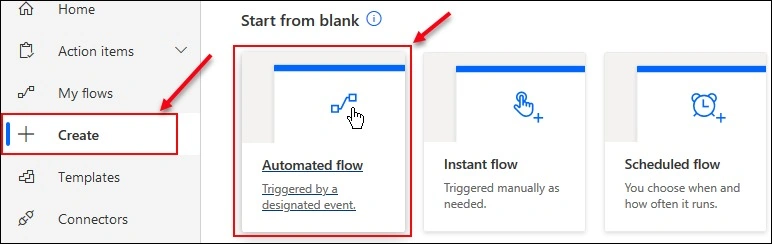
Fig 1. Selecting flow type - It will give us different options to create different types of flows.
- We will select the “Automated flow” as shown in the above image (Fig 1).
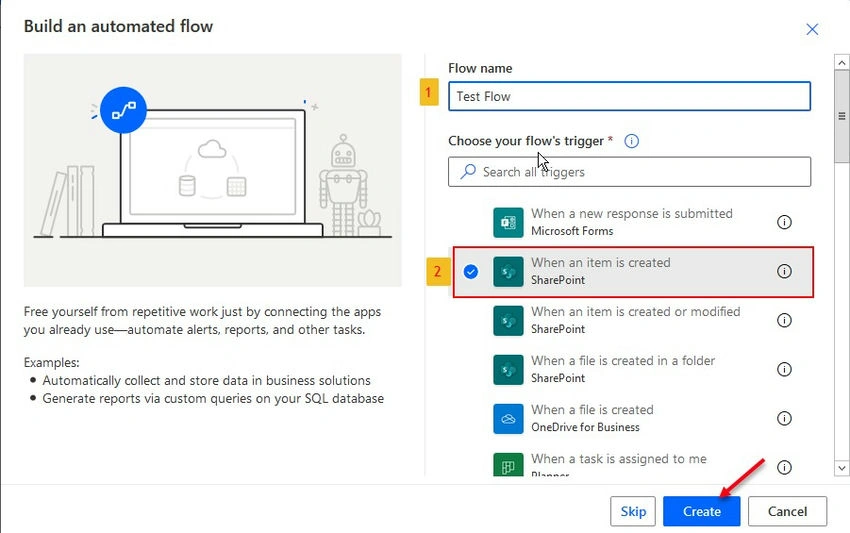
Fig 2. Choosing Trigger type - The above window will be opened where we have to provide the flow name in position 1.
- Now we have to select a trigger by which this flow will be started as shown in position 2. Any of these option can be selected. For this demo, we are selecting the “When an item is created” trigger option.
- Then click on the Create button.
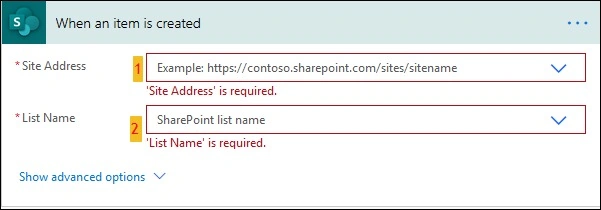
Fig 3. Providing triggering properties - After clicking the create button the above window will be opened where we have to provide the site address and list name, from where the flow will be triggered.
- The site address can be selected from the dropdown in position 1. If the desired site address couldn’t found from the provided options, select the “Enter Custom Value” option from the dropdown and past your site address.
- We can select the List Name from the dropdown in Position 2.
Remove all Permissions

Fig 4. Action - Stop sharing an item or a file
- Now select a new action, “Stop sharing an item or a file” as the next step.
- With this provided action, all permission on the item will be revoked.
- Select/Enter the site address in position 1.
- Select the specific List or Library name from the dropdown in position 2.
- Now click in the text box for ID in position 3 to get the dynamic contents. From the dynamic content, select the ID of the current item.
Note. This provided action will break the item's inheritance permission. But this action has a catch as if any group or user has “full control” permission in the list, will remain for the item. This action can’t remove their permission from the item.
Set Permissions for User

Fig 5. Action – Grant access to an item or a folder
- Now to set permission, flow provides the “Grant access to an item or a folder” action. Select this action as the next step as shown in the image (fig 5).
- Now insert the same site address in position 1.
- Select the list name from the dropdown in position 2 as shown in the above image.
- Now you can insert the ID, as this is dynamic content by putting it from the dynamic content helper as position 3. You can even provide static value in this field.
- To provide permission in the List item or library file, the user or group has to have an email address, by which flow would be able to identify and provide permission. In position 4, we have to provide an email address.
- In position 5, we have to provide the “Role” which will identify the permission level. In this box, two options have been given as dropdowns which are “Can edit” and “Can view”. We can select one of these options. We can also provide a custom value which needs to be a valid value.
- If we want to add a custom value, we have to provide the Role Definition ID of the permission levels that we want to permit for the user.
- If we want to notify the user about this given permission, then select “Yes” in position 7 and put your message in the message box in position 6.
- For this demo, we are not notifying the user, so we have selected “No” in position 7.
Set permissions for SharePoint Group
With this provided action “Grant access to an item or a folder” in MS flow, we can’t change the permissions of the SP group. Because this action could only recognize the user/group who have an AD email address. As the SP group doesn’t have any, we can change permission for the SP group with this action. To change permission for the SharePoint group, we have to call the REST API endpoint for role assignment. We will use the following rest api to change the permission of the SP group.
_api/web/lists/getbytitle('<List Name>')/items(<List Item ID>)/roleassignments/addroleassignment(principalid='<Group/User’s Principle ID>',roleDefId=<Role Definition ID>)
From the above rest api, we have to change the red marked portion with the respective value. The details are given below.
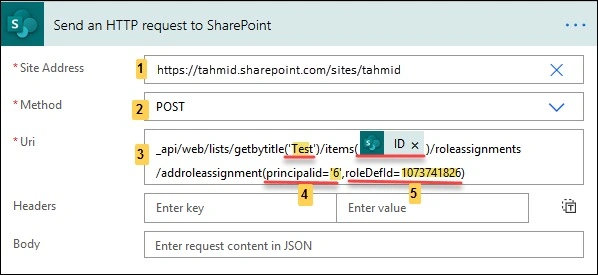
Fig 6. Action – Send an HTTP request to SharePoint
- For the next step, select a new action “Send an HTTP request to SharePoint”.
- Enter the site address in position 1.
- Select “POST” as a method in position 2.
- Put the rest of URI in position 3. Provide your specific list name and list item ID as shown in the above image. (Fig 6)
- In position 5, provide the role definition id. Each SharePoint Permission level has a specific role definition ID which you can get in detail in this article: Get SharePoint Role Definition IDs.
- We have selected the role definition ID “1073741926” which is for “Read” access.
- In position 4, we have to provide the group’s principle ID. To get the principle ID of a group, we have to get it from the site settings as described below.
Get the Group's Principle ID
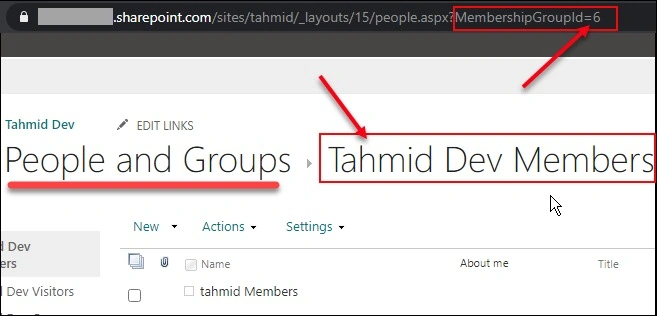
Fig 7. Getting the group's Principle ID
- Go to the Site Settings page.
- Now, click on ‘People and Group’ which is under ‘Users.
- Click on the specific group’s name. Site Settings > Users and Permissions > People and groups > “Groups Name”.
- The group's page will be opened with the group members as shown in the image (fig 7).
- From this group's page, we will get the Group’s Principle ID from the page URL. As an example, on the “Tahmid Dev Members” group’s page, the URL has the parameter “MembershipGroupId” with the value ‘6’. So this group's PrinicipleID is 6.
Run the flow
- Now the flow has been completed. We can test the flow now.
- Here is the image of the full flow given below:

Fig 8. Full Completed Flow - First, save the flow. Then click in the test.
- Then create a new item in the “Test” list.
- Let’s check the item's permission as the flow hasn’t been running yet.
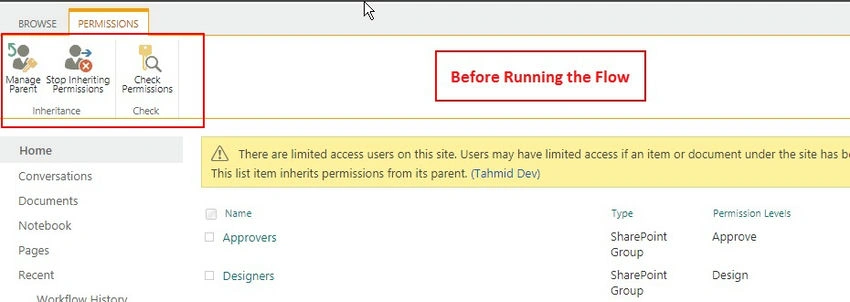
Fig 9. Item’s Permission before running the flow - We can see that the item is inheriting the list’s permission. And two groups have permission on this item which are Approvers and Designers.
- Now, let’s see the situation after running the flow successfully.
 .
.
Fig 10. The item’s permission after running the flow - After running the flow, the list item’s inheritance permission will be broken as shown in the image above (Fig 10).
- The User and Group, for which we provided the permission “Read”, has given as we see can see in the image.
Conclusion
As we already saw, in this approach with the provided actions we can’t grant permission for the SharePoint group. We need rest api end to point to perform that. Similarly to remove a specific user/group’s permission from an item is not achievable with these provided actions till now MS flow is providing. So, in that situation, we have to use rest API endpoints to manage the item level permission in MS flow.
I hope this article will help you. Be safe. Happy Coding.
Matheus KramerPosted Nov 8, 2021, 6:04 PM
Hi Tahmidul, thank you so much for the explanation... Just one think... I need to change permissions for folders, not lists. How can make de HTTP request for folders? And one last doubt: I dont understand how i connect de http request on Figure 5. The figure 5 is for the one user example, not the group. I need to put something on the "recipients" relationed to HTTP Request? Or i can exclude this Figure 5 step because the HTTP give the access by its self? Thank you so much!!!!
Shekhar VillaPosted Aug 6, 2021, 1:50 PM
Can we add external users by email id in the sp group?
Bhavana BhavanaPosted Jun 30, 2021, 11:50 AM
Hi , I have been following the same steps but the Grant Access Step is throwing an 400 Bad Request error.Do we have a solution for this . Thanks in advance.
Alejandro RicaurtePosted May 18, 2021, 4:58 PM
Hi, thanks for the great guide! Is there a way to implement this for documents within document libraries? I haven't been able to implement it. Thanks for your help!
Đặng ĐăngPosted Mar 15, 2021, 12:55 PM
Thank you for sharing this. How about the file? Can we grant permission to a file using this method?
Oluwatosin oniPosted Feb 23, 2021, 2:44 PM
Good Day please i have some issue here, after follow the above solution, i can see that the role was assigned to the user but the user still unable to view the item that the permission was granted for. i choose can edit permission but when i check the unique permission for the item , it was granted as Contribute
Chris tophPosted Oct 15, 2020, 6:28 AM
Thank you for this explanation. It works well for me (SP site owner), but when my colleagues trigger the flow, the Stop sharing an Item or File step fails with a forbidden error. Any advice?