

Document Information
Use the following procedure to deploy your project in the develoment environment.
- Pull the Code from TFS.
- Open the project. After opening the solution file you may get an error as in the following.
ERROR: The Site URL property of the project does not contain a valid URL.
To fix this error In Solution Explorer click on the SharePoint project and press the F4 key. 
Figure 1: SharePoint
You will get a properties window as in the following on right side. Set the Site URL of your project like:
http:// xxxyy.com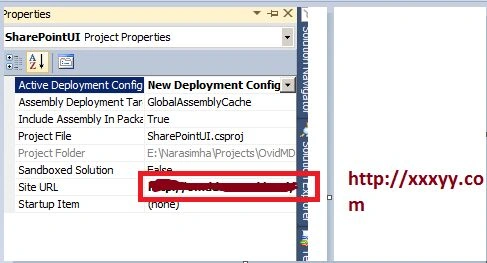
Figure 2: SiteURL
To deploy the SharePoint project, In the Solution Explorer right-click on the SharePoint UI project and select Deploy as as in the following.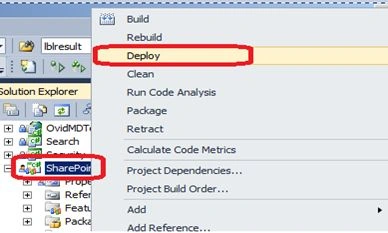
Figure 3: SharePoint project
When you are deploying the project you may get various types of errors as in the following
- A deployment or retraction is already under way for the solution and only one deployment or retraction at a time is supported.
Issue: when we are deploying the solutions in SharePoint, sometimes we encounter the issue that the solution will not be deployed and the error would be ”A deployment or retraction is already under way for the solution and only one deployment or retraction at a time is supported”.
Cause: After analysis I was able to understand that, the reason behind the issue is the timer job is created for the deployment but not running, you will be unable to redeploy or retract the solution due to that.
Solution: please use the following procedure to resolve the issue.
- Go to Central Admin -> System Settings -> Manage Farm Solutions.
- Cancel the deployment for your present solution. It may show the status failed or deploying, which means deployment is not successful.
- Now again try to redeploy the solution.
Admin SVC must be running to create deployment timer job.
So I found the solution for this.
Use the following procedure to resolve this error:
Go to "Control Panel -> Administrative tools -> Services", select SharePoint 2010 Administration and start it. Check the figure below.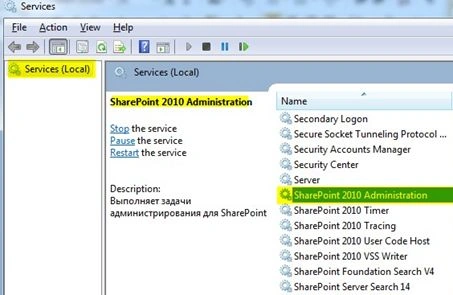
Figure 4: Service
After this you able to add solution in your SharePoint successfully.
Error occurred in deployment step Add Solution': A timeout has occurred when invoking commands in the SharePoint host process.
Or:
Error occurred in deployment step 'Activate Features': A timeout has occurred when invoking commands in SharePoint host process.
This issue occurs due to hardware support. We don't know the exact solution for this but the workaround is manual deployment using a shell script.
- if(!(Get-PSSnapin Microsoft.SharePoint.PowerShell -ea 0))
- {
- Add-PSSnapin Microsoft.SharePoint.PowerShell
- }
- $varSiteUrl = "http://xxxyy.com/"
- write-host "`nupdating wsp" -foregroundcolor Green
- Update-SPSolution –Identity "WKH.MR.OvidMD.wsp" –LiteralPath "C:\Narasimha\Projects\Code
- \Trunk\SharePointUI\Source\SharePointUI\bin\Debug\CNR.XXXYY.wsp" –GACDeployment
- write-host "`nupdated wsp" -foregroundcolor Green
- #Disable-SPFeature –Identity "SharePointUI_BinaryContentList" –url $varSiteUrl -Force
- #Disable-SPFeature –Identity "SharePointUI_Calculators" –url $varSiteUrl -Force
- #Disable-SPFeature –Identity "SharePointUI_ContentUniverseConfiguration" –url $varSiteUrl -
- Force
- #Disable-SPFeature –Identity "SharePointUI_JavaScriptContentFeature" –url $varSiteUrl -Force
- #Disable-SPFeature –Identity "SharePointUI_Navigational Refiners" –url $varSiteUrl -Force
- #Disable-SPFeature –Identity "SharePointUI_Navigational Refiners Schema" Schema –url
- $varSiteUrl -Force
- #Disable-SPFeature –Identity "SharePointUI_NonAuthenticateduserConfiguration" –url
- $varSiteUrl -Force
- #Disable-SPFeature –Identity "SharePointUI_PageTopics" –url $varSiteUrl -Force
- #Disable-SPFeature –Identity "SharePointUI_Core" –url $varSiteUrl -Force
- #Disable-SPFeature –Identity "SharePointUI_Core Schema" –url $varSiteUrl -Force
- Enable-SPFeature –Identity "SharePointUI_Core Schema" –url $varSiteUrl -Force
- Enable-SPFeature –Identity "SharePointUI_Core" –url $varSiteUrl -Force
- Enable-SPFeature –Identity "SharePointUI_Navigational Refiners Schema" Schema –url
- $varSiteUrl -Force
- Enable-SPFeature –Identity "SharePointUI_Navigational Refiners" –url $varSiteUrl -Force
- Enable-SPFeature –Identity "SharePointUI_BinaryContentList" –url $varSiteUrl -Force
- Enable-SPFeature –Identity "SharePointUI_Calculators" –url $varSiteUrl -Force
- Enable-SPFeature –Identity "SharePointUI_ContentUniverseConfiguration" –url $varSiteUrl -
- Force
- Enable-SPFeature –Identity "SharePointUI_JavaScriptContentFeature" –url $varSiteUrl -Force
- Enable-SPFeature –Identity "SharePointUI_NonAuthenticateduserConfiguration" –url $varSiteUrl
- -Force
- Enable-SPFeature –Identity "SharePointUI_PageTopics" –url $varSiteUrl -Force
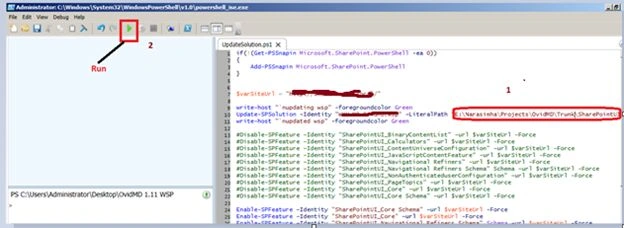
Figure 5: Management Shell
Check Project and App pools of your site in IIS
Now you can run the application in a browser with the URL http://xxxyy.com.
Another Way to Deployg the project
Each time we may not use the preceding procedure, each time we may get the time out errors. So the best practice is.
When you make any changes in the businees logic (.aspx.cs or .ascx.cs) of SharePoint UI project, there is no need to deploy the entire project. The following procedure must be followed.
- Placing the SharePoint UI DLL into a shared assembly
Build the SharePoint UI project and open the Visual Studio command prompt in administrative mode. Enter the command as in the following:
gacutil /i path (path of SharepointUI.dll)
When you make any changes in the UI design (.aspx or .ascx) of the SharePoint UI project, place those changes directly into IIS.
When you make any changes in the dependency projects like Search, Common and and so on. 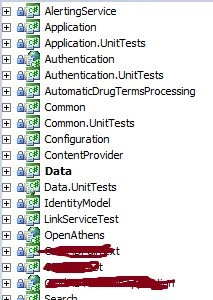
Figure 6: Search and Command
Build the specific project and directly copy the DLL and place it in IIS. Use the following procedure. For example I made some changes in the Search project.
Build the project and right-click on that project and select Open Folder in Windows Explorer.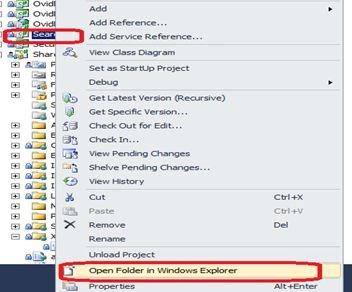
Figure 7: Open Folder
Copy the Searh.dll from the bin folder.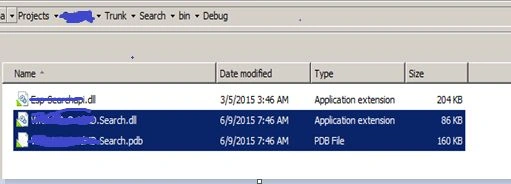
Figure 8: Bin Folder
Place the Search.dll directly into the xxxyyy site in IIS. Expand the xxxyy site the select the bin folder and explore it.
Figure 9: Search.dll
Then replace the Search.dll and Search.pdb.
SriramPosted Jul 3, 2015, 1:56 AM
Good...........
Santhakumar MunuswamyPosted Jun 12, 2015, 2:30 PM
Thanks for nice article :)
Sibeesh VenuPosted Jun 12, 2015, 1:45 AM
Good One.
Narasimha Reddy ChennupalliPosted Jun 11, 2015, 10:01 AM
Thanks All, Your appreciation gives me great encouragement.
Dominique CejaPosted Jun 11, 2015, 9:25 AM
Nice article. Thanks for sharing
NitinPosted Jun 11, 2015, 7:34 AM
good one
Khan Abrar AhmedPosted Jun 11, 2015, 7:04 AM
Nice artical, thanks for sharing the knowledge.