

The needs and requirements of many applications can change and evolve over time and managing these changes can often be difficult. This is one of the reasons that it’s important to be able to try and build modular applications that can easily separate all of the areas of your application and allow you to easily toggle them on or off for different client needs.
This article will provide an introduction to the areas for creating a very basic, modular ASP.NET MVC Application. The goal will be to allow you to separate all of the independent modules that might be present in your Application, using Areas as well as the ability to easily toggle these on and off, style them independently and more.
What are ASP.NET MVC Areas?
Areas can be thought of as modules within the context of MVC Applications. They provide a logical grouping of Controllers, Models, Views and any other folders or files that might be necessary for your module.
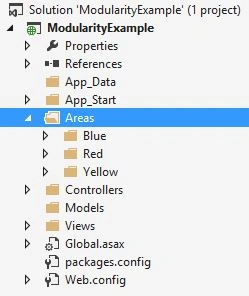
Areas themselves are housed within a top-level. Areas folder within your MVC Application and each individual area will function as its own self-contained module. Areas allow the developers to write more modular, maintainable code that by definition would be cleanly separated from the parent Application, other modules and areas.
Getting Started
In this example, we will construct a parent Application that will consist of three different modules, each with its own Controllers, Views, Routing and anything else that we desire.
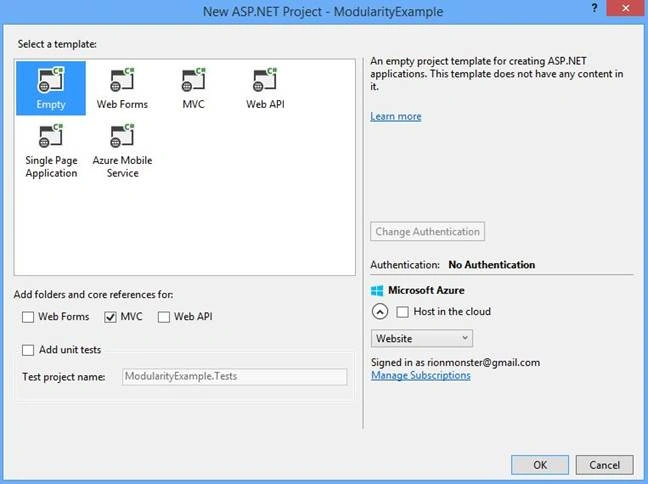
First, create a new ASP.NET Web Application project.

Ensure that you are creating an empty project for this example and including the appropriate references for MVC,
This Application will consist of a parent and base controller, where all the child modules live.
This will allow you to easily define your layout, any navigation to access your child modules and any CSS, JavaScript and other references that your Areas will rely on. You’ll want to create a new controller, which for the purposes of this example will be called ParentController,
- namespace ModularityExample.Controllers
- {
- public class ParentController : Controller
- {
- public ActionResult Index()
- {
- return View();
- }
- }
- }
- <!DOCTYPE html>
- <html>
- <head>
- <meta name="viewport" content="width=device-width" />
- <title>Base Parent Controller</title>
- </head>
- <body>
- <h1>Parent Content</h1>
- </body>
- </html>
Building your Modules / Areas
You’ll next want to create three separate modules within your example Application. Thankfully, the process of building these modules is incredibly easy and doesn’t take more than just a few seconds.
- Right-click on your project in the Solution Explorer.
- Choose the Add > Area… option that appears in the context menu.
- Type the name of the Area that you want to use.
That’s it! Visual Studio will take care of scaffolding out everything that you need, to get started. For the purposes of this example, I’ve chosen to create three different Areas for colors: Red, Blue and Yellow, shown below:
Let’s take a bit of time to figure out exactly what is contained within each of the areas that we created. As I mentioned previously, each of the Areas is going to resemble a tiny MVC project.
- Controllers
- Views
- Models
- An AreaRegistration File
All of these should be fairly familiar to anyone that has worked with MVC previously except for perhaps the last AreaRegistration file. These AreaRegistration files are going to be found within each MVC Area created and they handle wiring up routing calls to the Area itself, shown below:
- namespace ModularityExample.Areas.Blue
- {
- public class BlueAreaRegistration : AreaRegistration
- {
- // An override to indicate the name of the Area itself
- public override string AreaName
- {
- get
- {
- return "Blue";
- }
- }
- // A method to register the appropriate routes within
- // parent MVC Application
- public override void RegisterArea(AreaRegistrationContext context)
- {
- context.MapRoute(
- "Blue_default",
- "Blue/{controller}/{action}/{id}",
- new { action = "Index", id = UrlParameter.Optional }
- );
- }
- }
- }
- public class MvcApplication : System.Web.HttpApplication
- {
- protected void Application_Start()
- {
- // This RegisterAllAreas() method will trigger
- // the RegisterArea in each of your individual areas
- AreaRegistration.RegisterAllAreas();
- RouteConfig.RegisterRoutes(RouteTable.Routes);
- }
- }
For the sake of simplicity, we will model them similarly to our ParentController that was previously created. Just use the Add View option and let ASP.NET’s scaffolding take care of the rest,
- namespace ModularityExample.Areas.Blue.Controllers
- {
- public class BlueController : Controller
- {
- public ActionResult Index()
- {
- return View();
- }
- }
- }
This is not useful.Thus, let’s build a Layout and a Navigation area to help make these areas more defined. Within the Parent Application, create a Layout page called _Layout.cshtml under the Views > Shared directory and paste the following code into it:
- <!DOCTYPE html>
- <html>
- <head>
- <meta name="viewport" content="width=device-width" />
- <title>Modularity Testing</title>
- </head>
- <body>
- @Html.Partial("_Navigation")
- <div>
- @RenderBody()
- </div>
- </body>
- </html>
- <!-- Basic Styling (add into a master CSS file referenced in the Parent Layout later) -->
- <style type="text/css">
- nav.menu { width: 100%; background: #0071BC; }
- nav.menu a { display: inline-block; width: 100px; padding: 6px; text-align: center; color: #FFF; text-decoration: none; }
- nav.menu a:hover { background: #0093DE;}
- </style>
- <!-- Within the Navigation area, we will define our modules -->
- <nav class="menu">
- <a href="@Url.Action("Index","Blue", new { area = "Blue" })">Blue</a>
- <a href="@Url.Action("Index","Red", new { area = "Red" })">Red</a>
- <a href="@Url.Action("Index","Yellow", new { area = "Yellow" })">Yellow</a>
- </nav>
@{ Layout = "~/Views/Shared/_Layout.cshtml";}
Finally, copy this same _ViewStart.cshtml file into all of the View folders within your Application (including your areas). At this point, if you are following along, your solution should look as shown below:
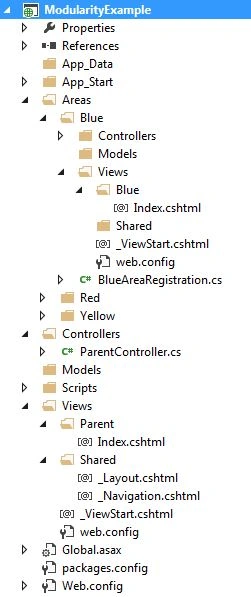
In the next section, we will look at adjusting the routing to place all of these modules below the Parent Controller.
Establishing Routing
Area routing can sometimes require a bit of thought, as you need to ensure that your routes are unique otherwise a later route may override a previously defined one and make navigating around a nightmare. In order to achieve the effect that we are looking for, we want our routes to all be housed under the Parent Application, as shown below:
- localhost/Parent This will function as a home page that will display all the individual modules available.
- localhost/Parent/Blue
- localhost/Parent/Red
- localhost/Parent/Yellow
Note If this isn’t the preferred routing you are looking for, you can skip this phase as it is optional.
In order to implement this, we are going to go into each of our Areas and adjusting the routes. Open the AreaRegistration file within each of your areas and make the following changes within the RegisterArea method, as shown below:
- public override void RegisterArea(AreaRegistrationContext context)
- {
- context.MapRoute(
- AreaName,
- String.Format("Parent/{0}/{{action}}/{{id}}",AreaName),
- new { controller = AreaName, action = "Index", id = UrlParameter.Optional }
- );
- }

If you run the project now, you will get the screenshot, shown below:
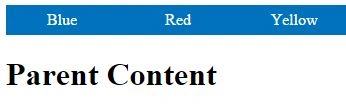
You can see the individual modules present in the menu. However, they aren’t dynamic… yet.
Hard-coded menu items are not too impressive. In the next section, we will define an approach to manage these modules, track those being used, and wrap up everything as expected.
Configuring Plug & Play
One of the reasons that you would want to adopt a modular approach like this might be the need to easily toggle the modules on and off for different clients. For the purposes of this example, we will do so, using the web.config (but you could easily use a database or any other data store).
Open the Global.asax.cs file and add the following section:
- public static class Application
- {
- // Define a static Dictionary indicating the available areas
- public static Dictionary<string, bool> ModulesEnabled = new Dictionary<string, bool>();
- }
Next, you’ll want to open your web.config file and add each of your modules in and indicate if they are enabled or disabled as seen below,
- <appSettings>
- <!-- Access-specific Configuration Settings -->
- <add key="Blue" value="true" />
- <add key="Red" value="true" />
- <add key="Yellow" value="true" />
- </appSettings>
Now, you actually need to read the values from your configuration file (or your preferred data source). To do this, you’ll return to the AreaRegistration.cs files for each of your Areas and add the following additional code within the RegisterArea method, shown below:
- public override void RegisterArea(AreaRegistrationContext context)
- {
- // Determine if it is enabled or not
- Application.ModulesEnabled.Add(AreaName, Convert.ToBoolean(ConfigurationManager.AppSettings[AreaName]));
- // Read from your configuration to determine if
- routes should be established
- if(Application.ModulesEnabled[AreaName])
- {
- context.MapRoute(
- AreaName,
- String.Format("Parent/{0}/{{action}}/{{id}}", AreaName),
- new { controller = AreaName, action = "Index", id = UrlParameter.Optional }
- );
- }
- }
- <nav class="menu">
- @if (Application.ModulesEnabled["Blue"])
- {
- <a href="@Url.Action("Index","Blue", new { area = "Blue" })">Blue</a>
- }
- @if (Application.ModulesEnabled["Red"])
- {
- <a href="@Url.Action("Index", "Red", new { area = "Red" })">Red</a>
- }
- @if (Application.ModulesEnabled["Yellow"])
- {
- <a href="@Url.Action("Index", "Yellow", new { area = "Yellow" })">Yellow</a>
- }
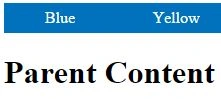
- </nav>
<add key="Red" value="false" />
which yields,
If you wanted to add a bit more flair to any one of your specific modules, you can add some CSS (via a link or inline) into the _ViewStart.cshtml file, within a module as seen below:
- @{ Layout = "~/Views/Shared/_Layout.cshtml";}
- <style type="text/css">
- /* Styles to override the layout (Yellow) */
- nav.menu { width: 100%; background: yellow; }
- nav.menu a { color: #000; }
- nav.menu a:hover { background: #FFF380; }
- </style>
What’s Next?
This post was obviously a way to implement the modularity within MVC Applications.I hope that it provided an introduction to ASP.NET MVC Areas and how they can be used within your Applications.
I’ll review a few other additions and configurations that you can make within an Application to further extend its flexibility (e.g. tracking the current location on the menu, applying aliases for the modules, module-based styles and more) within a series of follow up posts soon. If you wanted to get started, you can find this sample on GitHub at the following location,
Rijwan AnsariPosted Jan 27, 2021, 5:18 PM
Well explained ...
RajaPosted Jul 4, 2016, 12:41 AM
Great ....
Prasanna MuraliPosted Jul 3, 2016, 11:19 AM
Nice one
Vignesh ManiPosted Jul 2, 2016, 11:57 AM
Good one
kalu singh raoPosted Jul 1, 2016, 2:21 PM
Nice...