Every extra password is friction for your users and another risk for your security team. Single sign-on (SSO) fixes both: a person signs in once with their work account, and every connected app simply recognizes them.
In this guide, we connect a React single-page app and a .NET 10 Minimal API to Microsoft Entra ID. We use the current MSAL v5 libraries, which introduced a required step that older tutorials miss: the redirect bridge page.
By the end, you will have: Microsoft sign-in in React, silent SSO on page load, a protected .NET 10 API, and role-based access for admins.
How Single Sign-On Actually Works
SSO can feel like magic, but it comes from two separate mechanisms working together:
| Mechanism | Where it lives | What it does |
|---|
| Entra session cookie | The Microsoft sign-in domain | Lets other apps sign the user in without asking for credentials again |
| MSAL token cache | Your app's browser storage | Lets your app reuse and renew tokens without another redirect |
When a user signs in to your app, Entra ID sets its session cookie. When they open a second app connected to the same tenant, that app can use the cookie to get its own tokens without a password prompt. Each app still gets its own tokens. They share the session, not the tokens.
The Sign-In Flow
Browser apps can't keep a secret, so they use the authorization code flow with PKCE. MSAL creates a one-time secret for each sign-in, which means a stolen authorization code is useless on its own.
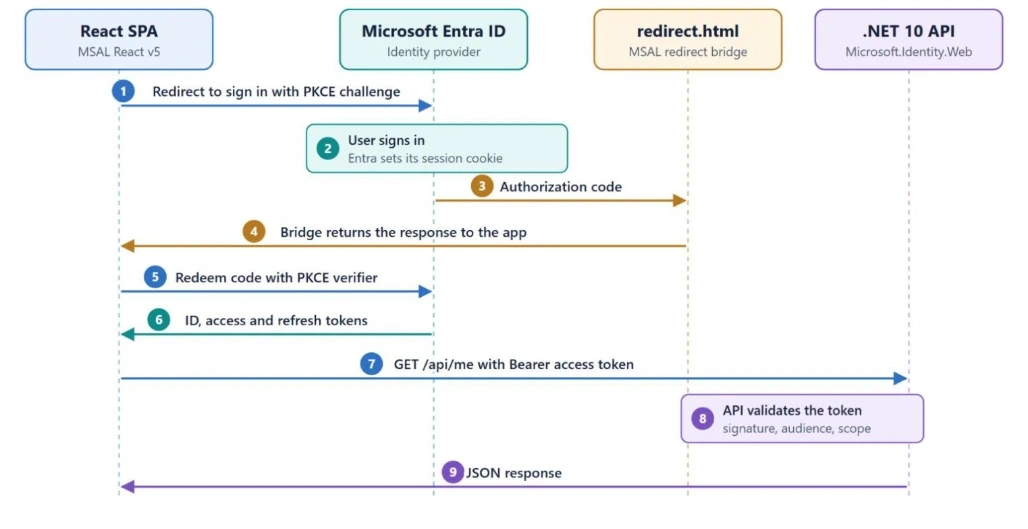
The important split is at steps 7 and 8. React only carries the access token. The API is what decides whether to trust it.
What's New in MSAL v5
If you are following an older tutorial, these are the changes that will catch you out:
- A redirect bridge page is required. Your
redirectUri must point to a dedicated page that passes the sign-in response back to your app.
- MSAL React needs React 19.2.1 or later. React 16, 17, and 18 are no longer supported in v5.
- There is no MSAL React v4. The package jumped from v3 to v5 to match the other MSAL libraries.
- Create React App is out. It doesn't support React 19, so Microsoft recommends moving to Vite.
logout() is gone. Use logoutRedirect() or logoutPopup().
Prerequisites
- .NET 10 SDK
- Node.js
- A Microsoft Entra tenant where you can register apps and assign roles
This guide was written with these package versions:
| Package | Version |
|---|
| Microsoft.Identity.Web | 4.18.0 |
| @azure/msal-browser | 5.28.0 |
| @azure/msal-react | 5.7.4 |
Step 1: Register the API
We need two app registrations: one for the API and one for React. This keeps each app's identity and permissions separate.
In the Microsoft Entra admin center, open App registrations and select New registration.
- Name it
OrderPortal API, choose Single tenant, and leave the redirect URI empty.
- Copy the Application (client) ID and Directory (tenant) ID.
- Open Expose an API and accept the suggested Application ID URI, such as
api://YOUR_API_CLIENT_ID.
- Add a scope named
access_as_user. Set Who can consent to Admins and users.
- Open App roles and create a role with the value
Admin and allowed member type Users/Groups.
Then assign the role: open Enterprise apps, select OrderPortal API, go to Users and groups, and assign yourself to Admin.
Step 2: Register the React App
- Create another registration named
OrderPortal Web.
- Under Redirect URI, choose Single-page application (SPA) and enter
http://localhost:3000/redirect.html.
- Open API permissions, select Add a permission, then My APIs, and add
access_as_user from OrderPortal API.
- Select Grant admin consent if your organization requires it.
Choose the SPA platform, not Web. The SPA platform enables the PKCE flow and cross-origin token requests. You also don't need a client secret, and you should never put one in React code.
Step 3: Protect the .NET 10 API
Create the project and add Microsoft.Identity.Web:
dotnet new web -n OrderPortal.Api
cd OrderPortal.Api
dotnet add package Microsoft.Identity.Web --version 4.18.0
Add this to appsettings.json. These IDs aren't secrets, but a real tenant's values still belong in environment-specific configuration.
"AzureAd": {
  "Instance": "https://login.microsoftonline.com/",
  "TenantId": "YOUR_TENANT_ID",
  "ClientId": "YOUR_API_CLIENT_ID"
},
"Spa": {
  "Origin": "http://localhost:3000"
}
Replace Program.cs:
using System.Security.Claims;
using Microsoft.AspNetCore.Authentication.JwtBearer;
using Microsoft.Identity.Web;

var builder = WebApplication.CreateBuilder(args);

builder.Services
    .AddAuthentication(JwtBearerDefaults.AuthenticationScheme)
    .AddMicrosoftIdentityWebApi(builder.Configuration.GetSection("AzureAd"));

builder.Services.AddAuthorizationBuilder()
    .AddPolicy("ApiUser", policy =>
    {
        policy.RequireScope("access_as_user");
    })
    .AddPolicy("ApiAdmin", policy =>
    {
        policy.RequireScope("access_as_user");
        policy.RequireRole("Admin");
    });

builder.Services.AddCors(options =>
{
    options.AddPolicy("Spa", policy =>
    {
        policy.WithOrigins(builder.Configuration["Spa:Origin"]!)
            .AllowAnyHeader()
            .AllowAnyMethod();
    });
});

var app = builder.Build();

app.UseCors("Spa");
app.UseAuthentication();
app.UseAuthorization();

app.MapGet("/api/me", (ClaimsPrincipal user) => Results.Ok(new
{
    Username = user.GetDisplayName(),
    ObjectId = user.GetObjectId(),
    TenantId = user.GetTenantId(),
    IsAdmin = user.IsInRole("Admin")
}))
.RequireAuthorization("ApiUser");

app.MapGet("/api/admin/report", () => Results.Ok(new
{
    Message = "Only admins can read this report."
}))
.RequireAuthorization("ApiAdmin");

app.Run();
Each piece has one job:
| Code | Purpose |
|---|
AddMicrosoftIdentityWebApi | Validates the token's signature, issuer, audience, and lifetime |
RequireScope | Confirms the app is allowed to call this API for the user |
RequireRole | Confirms the user has the Admin role |
UseCors | Lets the browser call the API from the React origin |
Scopes and roles answer different questions. A scope says what the app may do for the user. A role says what the user may do in your system. A secure endpoint often needs both.
Step 4: Create the React App
npm create vite@latest order-portal -- --template react
cd order-portal
npm install
npm install react@^19.2.1 react-dom@^19.2.1
npm install @azure/msal-browser@^5 @azure/msal-react@^5
Create .env.local in the project root:
VITE_ENTRA_CLIENT_ID=YOUR_SPA_CLIENT_ID
VITE_ENTRA_TENANT_ID=YOUR_TENANT_ID
VITE_API_SCOPE=api://YOUR_API_CLIENT_ID/access_as_user
VITE_API_URL=http://localhost:5080
Step 5: Add the Redirect Bridge
This is the step that matters most in v5. Microsoft Entra ID sends Cross-Origin-Opener-Policy headers, which can cut off communication between a sign-in window and your app. The bridge page receives the response and passes it back safely.
Create redirect.html next to index.html:
<!DOCTYPE html>
<html>
<head>
    <meta charset="UTF-8">
    <title>Redirect</title>
</head>
<body>
    <p>Processing authentication...</p>
    <script type="module">
        import { broadcastResponseToMainFrame } from "@azure/msal-browser/redirect-bridge";

        broadcastResponseToMainFrame().catch((error) => {
            console.error("Error broadcasting response:", error);
        });
    </script>
</body>
</html>
Tell Vite to build it as a second page in vite.config.js:
import { defineConfig } from "vite";
import react from "@vitejs/plugin-react";
import { resolve } from "path";

export default defineConfig({
  plugins: [react()],
  server: { port: 3000 },
  build: {
    rollupOptions: {
      input: {
        main: resolve(__dirname, "index.html"),
        redirect: resolve(__dirname, "redirect.html"),
      },
    },
  },
});
Step 6: Configure MSAL
Create src/authConfig.js:
const tenantId = import.meta.env.VITE_ENTRA_TENANT_ID;

export const msalConfig = {
  auth: {
    clientId: import.meta.env.VITE_ENTRA_CLIENT_ID,
    authority: `https://login.microsoftonline.com/${tenantId}`,
    redirectUri: `${window.location.origin}/redirect.html`,
  },
  cache: {
    cacheLocation: "sessionStorage",
  },
};

export const apiRequest = {
  scopes: [import.meta.env.VITE_API_SCOPE],
};
Update src/main.jsx. MSAL must finish initializing before any other MSAL call, so we wait for it before rendering:
import { StrictMode } from "react";
import { createRoot } from "react-dom/client";
import { PublicClientApplication } from "@azure/msal-browser";
import { MsalProvider } from "@azure/msal-react";
import App from "./App";
import { msalConfig } from "./authConfig";

const msalInstance = new PublicClientApplication(msalConfig);

msalInstance.initialize().then(() => {
  createRoot(document.getElementById("root")).render(
    <StrictMode>
      <MsalProvider instance={msalInstance}>
        <App />
      </MsalProvider>
    </StrictMode>
  );
});
Step 7: Add Silent SSO
Here is the part users notice. If they already signed in to another app, ssoSilent uses the Entra session to sign them in here with no prompt.
Create src/useSilentSso.js:
import { useEffect, useRef } from "react";
import { InteractionStatus } from "@azure/msal-browser";
import { useMsal } from "@azure/msal-react";
import { apiRequest } from "./authConfig";

export function useSilentSso() {
  const { instance, accounts, inProgress } = useMsal();
  const attempted = useRef(false);

  useEffect(() => {
    const isBusy = inProgress !== InteractionStatus.None;

    if (attempted.current || accounts.length > 0 || isBusy) {
      return;
    }

    attempted.current = true;

    instance.ssoSilent(apiRequest).catch(() => {
      // No usable session. The Sign in button stays on screen.
    });
  }, [instance, accounts, inProgress]);
}
The attempted flag makes sure this runs once. A failure here is normal, so we simply leave the sign-in button visible.
Silent SSO isn't guaranteed. It runs in a hidden iframe, and it can fail when a browser blocks third-party cookies. Always keep a visible sign-in button as the fallback.
Step 8: Call the API with a Fresh Token
Don't store access tokens yourself. Call acquireTokenSilent before each API request, and MSAL will use its cache or renew the token as needed.
Create src/useApi.js:
import { useCallback } from "react";
import { InteractionRequiredAuthError } from "@azure/msal-browser";
import { useMsal } from "@azure/msal-react";
import { apiRequest } from "./authConfig";

const apiUrl = import.meta.env.VITE_API_URL;

export function useApi() {
  const { instance, accounts } = useMsal();
  const account = accounts[0];

  return useCallback(
    async (path) => {
      let result;

      try {
        result = await instance.acquireTokenSilent({ ...apiRequest, account });
      } catch (error) {
        if (error instanceof InteractionRequiredAuthError) {
          await instance.acquireTokenRedirect({ ...apiRequest, account });
          return null;
        }

        throw error;
      }

      const response = await fetch(`${apiUrl}${path}`, {
        headers: { Authorization: `Bearer ${result.accessToken}` },
      });

      if (!response.ok) {
        throw new Error(`Request failed with status ${response.status}`);
      }

      return response.json();
    },
    [instance, account]
  );
}
Step 9: Build the UI
Replace src/App.jsx:
import { useState } from "react";
import {
  AuthenticatedTemplate,
  UnauthenticatedTemplate,
  useMsal,
} from "@azure/msal-react";
import { apiRequest } from "./authConfig";
import { useApi } from "./useApi";
import { useSilentSso } from "./useSilentSso";

export default function App() {
  const { instance, accounts } = useMsal();
  const callApi = useApi();
  const [result, setResult] = useState(null);
  const [error, setError] = useState("");

  useSilentSso();

  async function load(path) {
    setError("");
    setResult(null);

    try {
      setResult(await callApi(path));
    } catch (err) {
      setError(err.message);
    }
  }

  return (
    <main>
      <h1>Order Portal</h1>

      <UnauthenticatedTemplate>
        <button onClick={() => instance.loginRedirect(apiRequest)}>
          Sign in with Microsoft
        </button>
      </UnauthenticatedTemplate>

      <AuthenticatedTemplate>
        <p>Signed in as {accounts[0]?.username}</p>
        <button onClick={() => load("/api/me")}>My profile</button>
        <button onClick={() => load("/api/admin/report")}>Admin report</button>
        <button
          onClick={() =>
            instance.logoutRedirect({
              postLogoutRedirectUri: window.location.origin,
            })
          }
        >
          Sign out
        </button>
      </AuthenticatedTemplate>

      {error && <p role="alert">{error}</p>}
      {result && <pre>{JSON.stringify(result, null, 2)}</pre>}
    </main>
  );
}
Step 10: Try It
Start both apps in separate terminals:
# In OrderPortal.Api
dotnet run --urls http://localhost:5080

# In order-portal
npm run dev
Then run through this checklist at http://localhost:3000:
| Test | Expected result |
|---|
| Sign in with Microsoft | You return to the app, signed in |
| My profile | The API returns your details |
| Admin report, with the role | The report loads |
| Admin report, without the role | 403 Forbidden |
| Call the API with no token | 401 Unauthorized |
| Close the tab and reopen the app | Silent SSO signs you back in, if the browser allows it |
Role change not showing? Roles are stored in the access token. Sign out and sign in again to get a new one.
Common Errors and Fixes
| Symptom | Likely cause | Fix |
|---|
redirect_uri_mismatch | The URI doesn't match the registration | Match the path, protocol, and port exactly, including /redirect.html |
| Sign-in hangs on a popup or silent call | The bridge page isn't working | Confirm redirect.html loads and isn't served with COOP headers |
401 from the API | The token is for a different audience | Request your API's scope, not a Microsoft Graph scope, and don't send the ID token |
403 from the API | The scope or role is missing | Check the assignment, then sign in again |
| CORS error in the browser | The origin isn't allowed | Check Spa:Origin and keep UseCors before authentication |
interaction_in_progress | Two sign-in actions ran at once | Check inProgress before starting another interaction |
Where Should Tokens Be Stored?
MSAL gives you three cache options, and the choice is a trade-off between convenience and security:
| Location | Cleared when | Shared across tabs | Redirect flow |
|---|
sessionStorage (default) | Tab or window closes | No | Yes |
localStorage | Browser closes, unless the user chose to stay signed in | Yes | Yes |
memoryStorage | Page refreshes or navigates | No | No |
Use localStorage if you want users signed in across tabs of the same app. Either way, your main protection is preventing cross-site scripting (XSS), because a script running on your page could also request tokens.
Production Checklist
- Register your real HTTPS URLs, and remove localhost from production registrations.
- Enforce access in the API. Hiding a button in React is good UX, but it isn't security.
- Prefer app roles over group IDs. Roles travel with your app and need no tenant-specific mapping.
- Define a baseline role, such as
User, and handle tokens that contain no roles.
- Handle Conditional Access. A silent request can fail when policy requires user interaction, so keep the redirect fallback.
- Serve the bridge page without COOP headers, especially if you add security headers at your CDN or gateway.
- Request only the scopes you need, and split read and write scopes as your API grows.
Conclusion
A good SSO experience is almost invisible. Users open your app and they are simply in, while the API checks every request behind the scenes.
The setup comes down to a few clear decisions: use two app registrations, trust PKCE in the browser, add the MSAL v5 redirect bridge, and enforce scopes and roles in .NET. Get those right, and your apps can share one secure sign-in across your organization.


Join the conversation! Your thoughts help the community grow.