

In this article we will create a small Snapshot Tool.
Since we are familiar with many ideas behind this. Right here, in Windows 7 we already have the Snipping Tool to do your job. In the earlier versions of the OS, we were restricted to the use of the Print Screen Key.
For now, we are using some of the classes of the .NET framework to make it work.
So, by the end of this article you will have such a tool.
Background
Actually, we are not going to include any external library file. That means, we will use an existing .NET library.
So, add a namespace to your project.
In other words, using the System.Drawing.Imaging namespace.
And the rest will be handled in Procedure section.
Procedure
Step 1
Before starting, have a look at my Solution Explorer: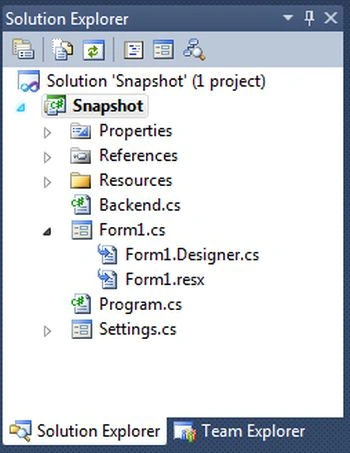
Here, I have two Forms (Form1 and Settings).
Form1: It is the main Form1 form that looks like:
And the Settings Form looks like:
In fact, Form1 will be the Main Form and the Settings Form will appear when the end-user clicks a small Folder Button (in Form1).
And there, we set the image’s destination.
And at last we need a standalone class file, in other words Backend.cs.
Step 2
In the main form (Form1), we have a small folder button.
In that Click event, we need to use this:
Since Settings is the Form’s name and with that object we are calling the Show() method.
Step 3
So, when the Setting Form is called, then what?
In that form we have two Buttons.
Right here, we will focus on the Browse Folder Dialog button as in the following:
Step 4
Next we code the Ok (Tick) Button.
Note: Backend is the Class name that we have shown in the Solution Explorer.
It has a single static property named destination that stores the string type.
Backend.cs
Since it is not mandatory, you can try various approaches to do this.
Back to the Setting Form.
There use the Close() method to close the current form after the click event.
So the focus will return to Form1.
Step 5
In Form1 (the main form), we have a Capture Button.
For a screenshot, I have defined a user-defined method in the project (named Screenshot() ) and the rest will be handled in the event.
And that method will return a Boolean type showing whether or not it is completed successfully.
So, what does this method do?
static bool Screenshot(string dest)
{
Try
{
//3 arguments
bitmapScreenshot = new Bitmap(Screen.PrimaryScreen.Bounds.Width,
Screen.PrimaryScreen.Bounds.Height, PixelFormat.Format64bppPArgb);
//Set Graphics Object
graphicsScreenshot = Graphics.FromImage(bitmapScreenshot);
//Now, take The Screenshot
graphicsScreenshot.CopyFromScreen(Screen.PrimaryScreen.Bounds.X,
Screen.PrimaryScreen.Bounds.Y, 0, 0, Screen.PrimaryScreen.Bounds.Size, CopyPixelOperation.SourceCopy);
//Save
bitmapScreenshot.Save(dest + "\\Capture.png", ImageFormat.Jpeg);
return true;
}
Catch
{
//Error
MessageBox.Show("Error Occured !!");
return false;
}
We used a Try-catch block to handle any exception.
And before declaring some references and constructor.
Now, we declare an object for a Bitmap.
In its constructor, we ed 3 arguments.
Those arguments are the actual width of the screen, then the height and Quality of Image.
In the next statement, we assign the bitmap image with the screenshot graphics. For that, we used the FromImage() method.
We then called the CopyFromScreen() method to capture the screen with its specified arguments.
Finally, we saved the image with its name and image format.
These are ed as an argument in the Save() method of the Bitmap.
Output
After clicking on the Capture Button, I got this on my Desktop (or your specified Destination Location):
Actually, it is my screenshot.
Conclusion
If you encounter any error then you can refer to the enclosed solution with it.
Specifically, if you encounter an error message then change the destination location. I suggest you change it to any location except C:\ drive, since the C:\ drive usually doesn’t allow you to write (or change) something there without administrator privileges.
arslan elahiPosted May 10, 2014, 11:50 AM
thank you for posting as much simple code... but there is a problem... it is currently capture only one screen.. i have multiple monitors and it is capturing only one. ... i want to make to as it should capture multiple monitors ... your help in this matter will be much appreciated....
Sam HobbsPosted Jan 21, 2014, 5:16 PM
Since you mentioned the history of tools such as this, note that tools such as this have existed for about as long as Windows has existed. Thank you however for showing how to do it ourselves using managed code.