

Introduction
In software engineering, the SOLID principles are essential for building maintainable, scalable, and flexible software systems. Introduced by Robert C. Martin, these five principles decisively guide developers in designing systems that are easier to understand, modify, and extend. This article will thoroughly explore the SOLID principles and demonstrate their implementation in C# with practical examples.
1. Single Responsibility Principle (SRP)
Definition: A class should have one reason to change and only one reason.
This principle ensures that each class has only one job or responsibility. It promotes the separation of concerns and avoids coupling multiple functionalities in a single class.
Example
Let's create a simple project in C# demonstrating the SRP with a detailed walkthrough.
Step 1. Create a New C# Console Project.
- Open Visual Studio (or Visual Studio Code).
- Select Create a new project.
- Choose Console App.
- Click Create.
Step 2. Please create a folder named "SRP" and add the "Employee" class under this folder.
This class will only be responsible for managing employee data.
- In Solution Explorer, right-click the project.
- Select Add > Class.
- Name the class Employee.cs.
- Add the following code to Employee.cs.
Step 3. Add the ReportPrinter Class.
Create a separate class responsible for printing the report, adhering to the SRP.
- Right-click the project.
- Select Add > Class.
- Name the class ReportPrinter.cs.
- Add the following code to ReportPrinter.cs.
This class has only one responsibility: printing the report. It takes an Employee object as input.
Step 4. Update the Main Program.
Now, we will use the Employee and ReportPrinter classes in the Program.cs file to see SRP in action.
- Open Program. cs.
- Replace the code with the following.
Step 5. Run the Project.
- Press F5 or click Start in Visual Studio.
- The console window will display.
Explanation
- Employee class: Responsible only for employee data (Name and Position).
- ReportPrinter class: Responsible only for generating the report.
2. Open/Closed Principle (OCP)
Definition: Software entities (classes, modules, functions, etc.) should be open for extension but closed for modification.
This principle encourages extending the functionality of a class without modifying its existing code, which is essential for maintaining code stability.
Example
Step 1. For the same project, create a folder named OCP. Under this folder, add the Shape Base Class (closed for modification).
We will create a base Shape class and make it open for extension by allowing new shapes to inherit from it.
- Select Add > Class.
- Name the class Shape.cs.
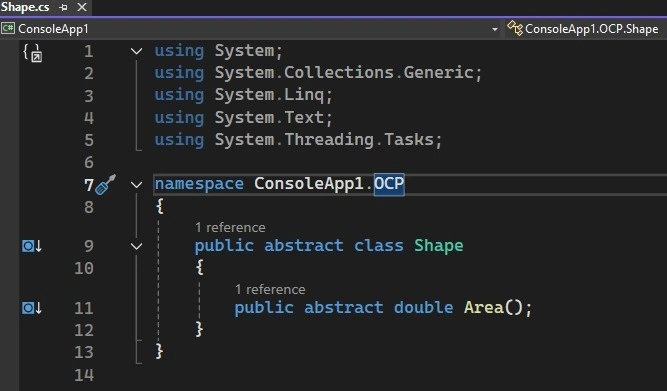
- Add the following code to Shape.cs.
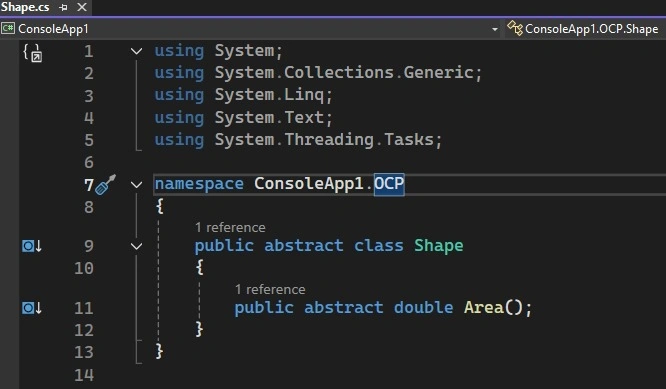
This base class is closed for modification but can be extended by creating new shape classes. Each shape will implement the Area method.
Step 2. Add the Rectangle Class (Extension).
We will now extend the Shape class by creating a Rectangle, the class that calculates the area of a rectangle.
- Select Add > Class.
- Name the class Rectangle.cs.
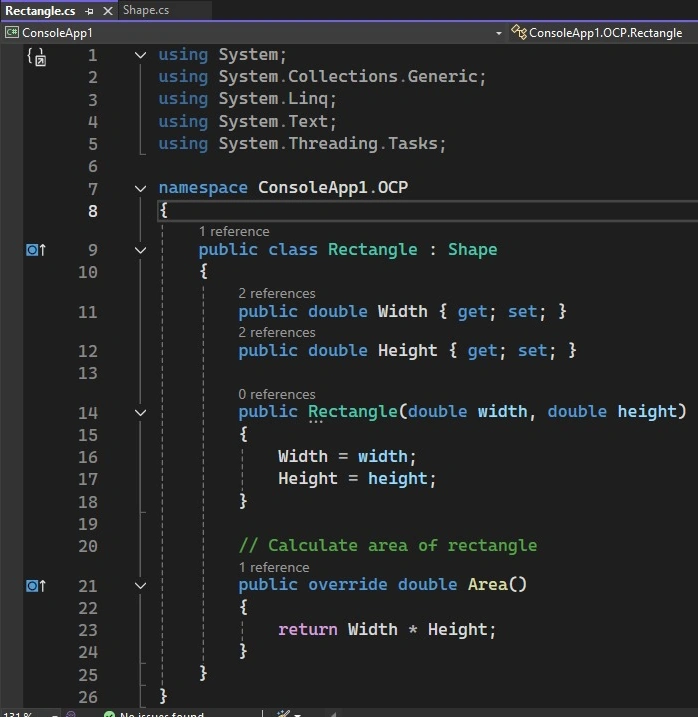
- Add the following code to Rectangle.cs.
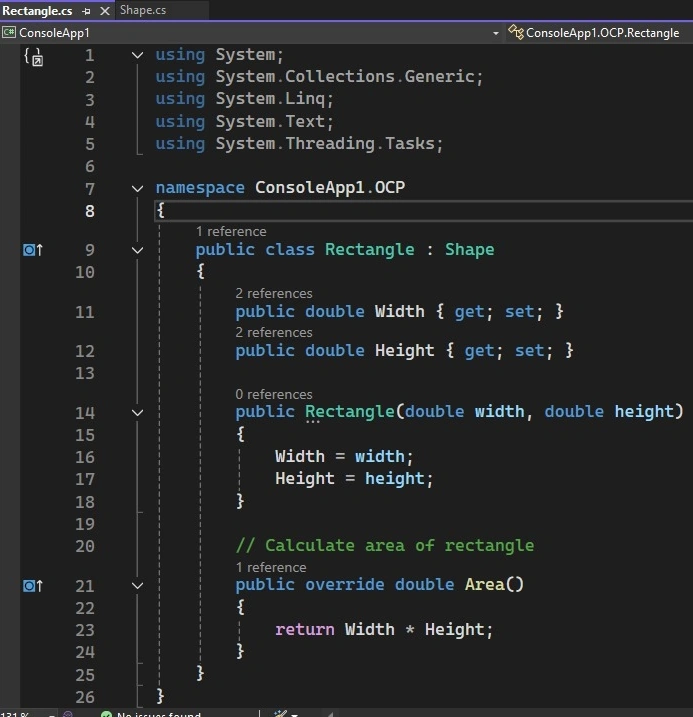
The Rectangle class extends the Shape class and implements the Area method.
Step 3. Add the Circle Class (Another Extension).
Similarly, we can extend the Shape class to handle a new shape: Circle.
- Select Add > Class.
- Name the class Circle.cs.
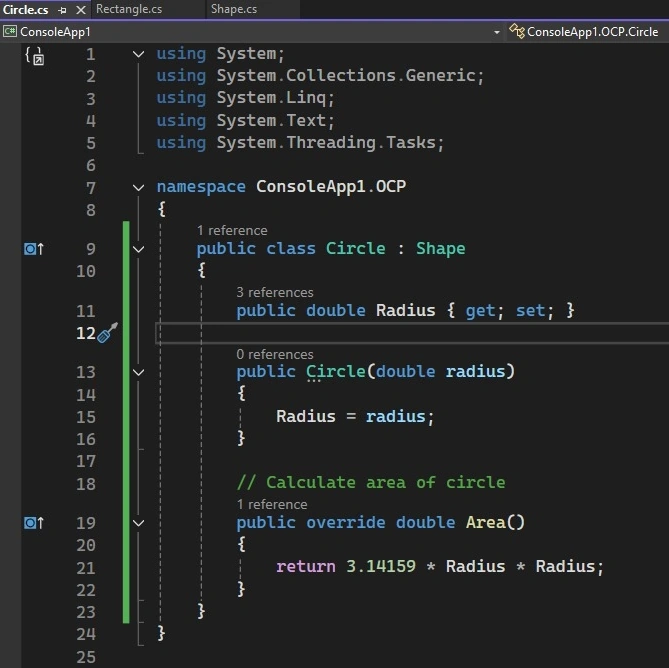
- Add the following code to Circle.cs.
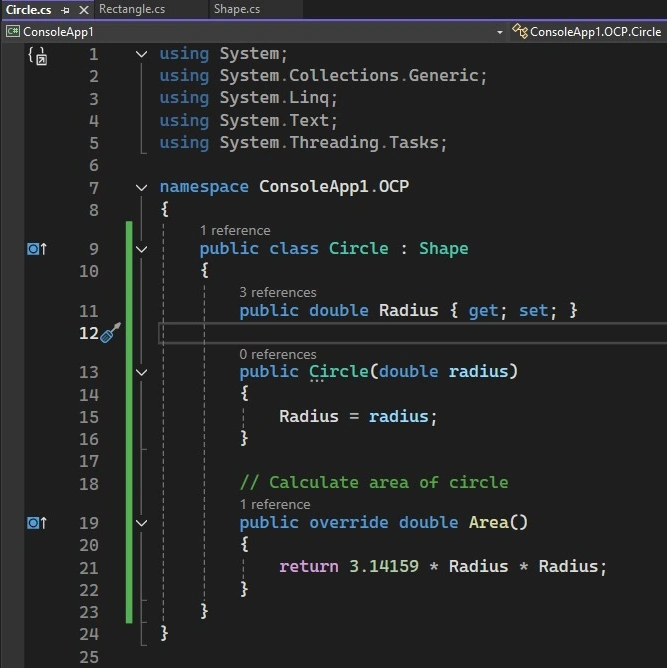
The Circle class extends the Shape class and implements the Area method.
Step 4. Update the Main Program.
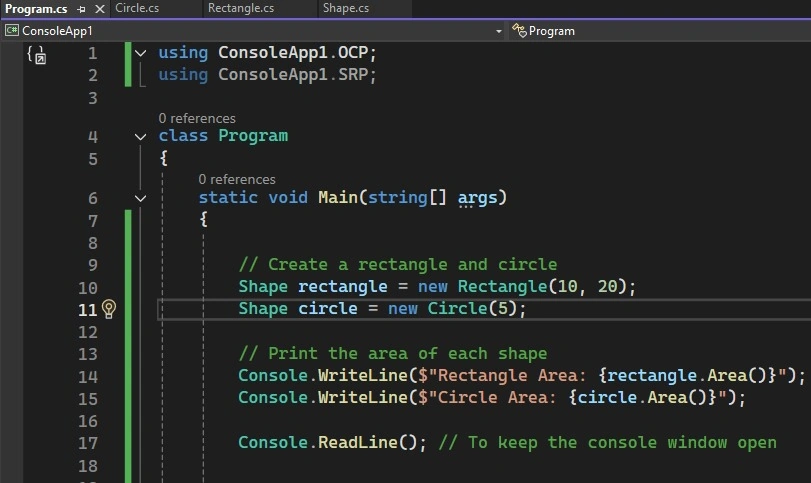
We will now create instances of different shapes and calculate their areas in the Program.cs file.
- Open Program.cs.
- Replace the code with the following.
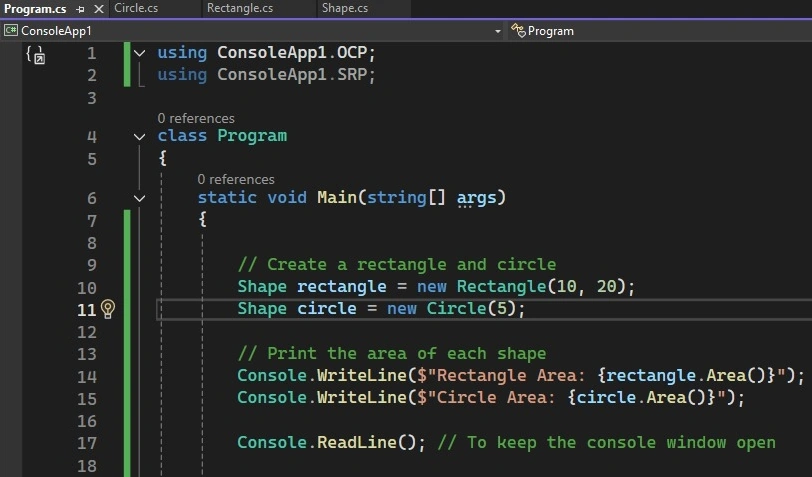
Step 5. Run the Project.
- Press F5 or click Start in Visual Studio.
- The console window will display.

Explanation
- The Shape class is open for extension, meaning we can add new shape types like Rectangles and Circles.
- The Shape class is closed for modification because we don’t need to modify the Shape class itself to add new shapes.
- To add a new shape, such as a Triangle, we simply create a new class that extends the Shape and implements the Area method.
3. Liskov Substitution Principle (LSP)
Definition: Subtypes must be substitutable for their base types without affecting the correctness of the program.
This principle ensures that derived classes should be able to replace their base classes without altering the expected behavior of the system.
Example
The Liskov Substitution Principle (LSP) states that objects of a superclass should be replaceable with objects of a subclass without affecting the correctness of the program. In other words, derived classes should be substitutable for their base classes.
In this step-by-step guide, we will create a project that follows LSP.
Step 1. Create the folder with the same project name "LSP". Under this folder, add the Bird Base class (superclass).
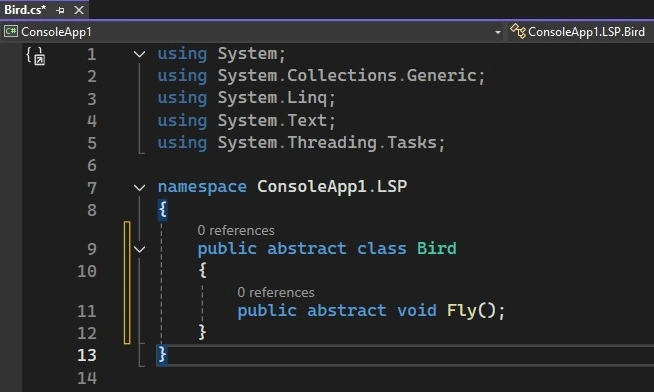
We’ll create a base Bird class that has a method for Fly. The key point with LSP is that derived classes should behave in a way consistent with their base class.
- Select Add > Class.
- Name the class Bird.cs.
- Add the following code to Bird.cs.
Step 2. Add the Sparrow Class (LSP Compliant).
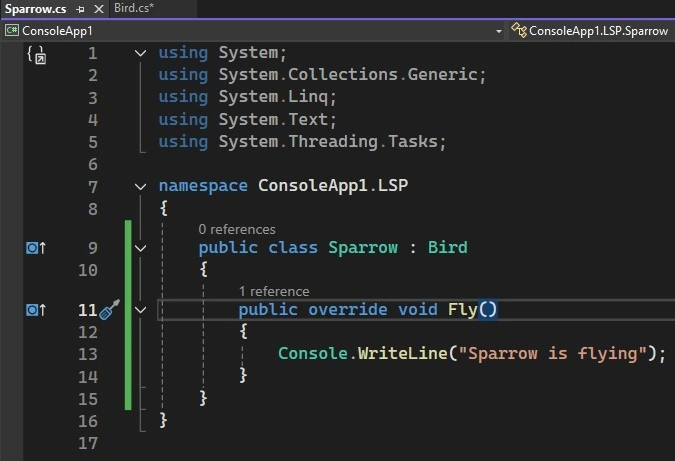
We’ll now add a Sparrow class that extends the Bird class and can fly, maintaining the behavior expected by the base class.
- Select Add > Class.
- Name the class Sparrow.cs.
- Add the following code to Sparrow.cs.
Step 3. Add the Penguin Class (LSP Violation Example).
We’ll now add a Penguin class that extends the Bird class but cannot fly. This would violate LSP because it does not adhere to the behavior expected by the base class, which assumes all birds can fly.
- Select Add > Class.
- Name the class Penguin.cs.
- Add the following code to Penguin.cs.
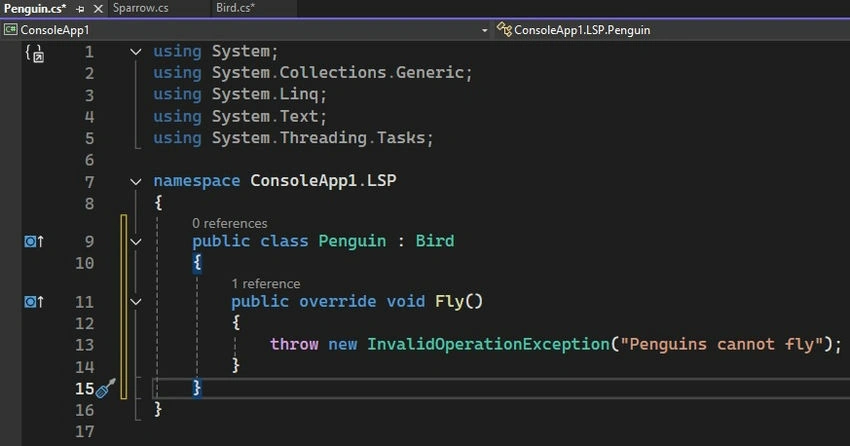
In this example, the Penguin class violates the LSP because it doesn’t adhere to the expected behavior of the Bird class (i.e., being able to fly).
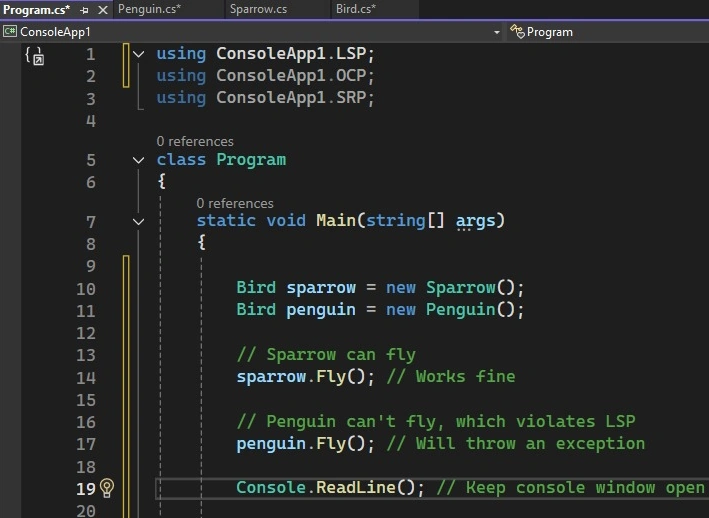
Step 4. Demonstrate LSP Violation in the Main Program
- Open Program.cs.
- Replace the code with the following.
Step 5. Run the Project.
- Press F5 or click Start in Visual Studio.
- The program will output:

This shows that the Penguin class violates the Liskov Substitution Principle, as it does not behave as expected when used as a Bird.
Step 6. Fix LSP Violation.
To comply with LSP, we should design our classes so that all subclasses of Bird can behave in a way that adheres to the behavior expected from the base class. One approach would be to introduce a different method or interface for non-flying birds.
Solution. Create a NonFlyingBird Class.
- Select Add > Class.
- Name the class NonFlyingBird.cs.
- Add the following code to NonFlyingBird.cs.
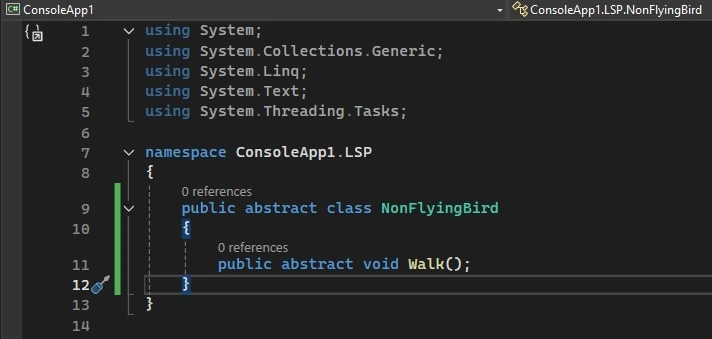
Now, the Penguin class will inherit from NonFlyingBird instead of Bird, adhering to LSP.
- Modify Penguin Class
- Open Penguin.cs.
- Replace the code with.
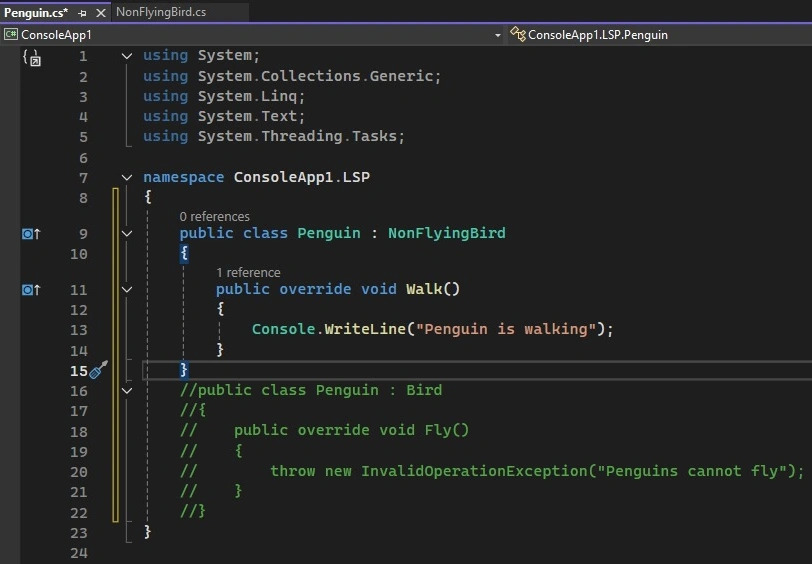
- Update Main Program
- Open Program.cs.
- Replace the code with.
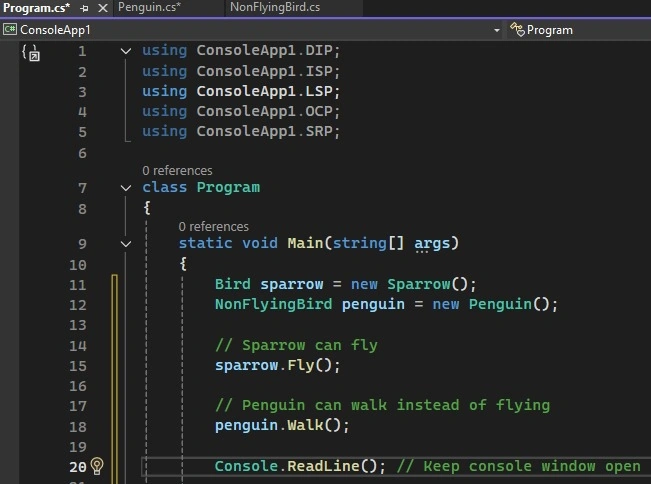
Step 7. Run the Project Again.
- Press F5 or click Start in Visual Studio.
- The console will display.

Key Takeaways
- Liskov Substitution Principle states that subclasses should be substitutable for their base classes without affecting the correctness of the program.
- The original design, which Penguin inherited from Bird, violated LSP because Penguin couldn’t fulfill the Fly behavior expected of all birds.
- By introducing a NonFlyingBird class, we adhered to LSP and provided a better design that avoids incorrect behavior.
4. Interface Segregation Principle (ISP)
Definition: Clients should not be forced to depend on interfaces they do not use.
ISP encourages creating smaller, more specific interfaces rather than a single, general-purpose interface. This prevents implementing classes from being burdened with unnecessary methods.
Example
Step 1. Add a folder named "ISP" in the same project. Under this folder, create a worker interface (which violates ISP).
We’ll start by creating a single interface that includes multiple responsibilities, such as working and eating. This will violate the Interface Segregation Principle because not all workers will need to implement all methods.
- Select Add > Class.
- Name the class IWorker.cs.
- Add the following code to IWorker.cs.
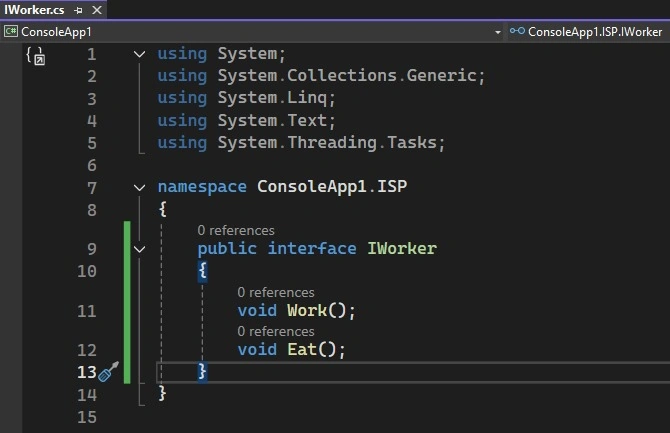
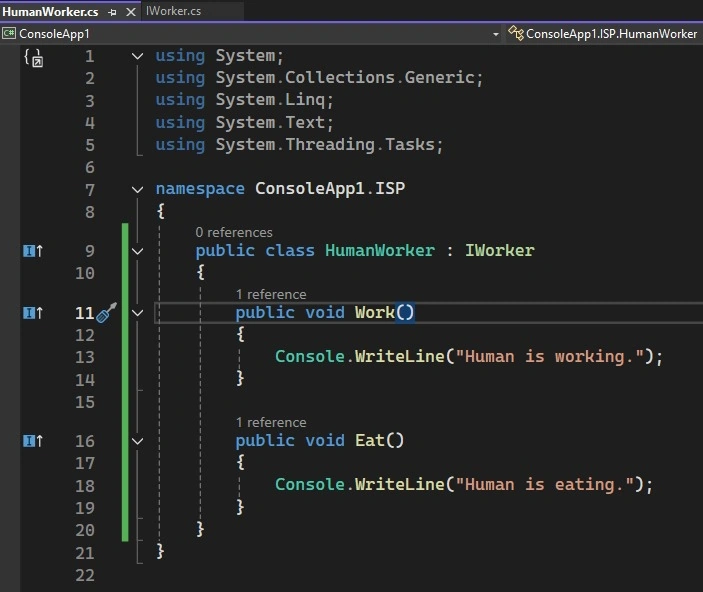
Step 2. Add Worker Classes (ISP Violation).
Now, we’ll create two classes: HumanWorker and RobotWorker. Both classes will implement the IWorker interface, but the RobotWorker will be forced to implement the Eat method, even though robots don't eat.
- Create HumanWorker.cs
- Select Add > Class.
- Name the class HumanWorker.cs.
- Add the following code to HumanWorker.cs.
- Create RobotWorker.cs
- Select Add > Class.
- Name the class RobotWorker.cs.
- Add the following code to RobotWorker.cs.
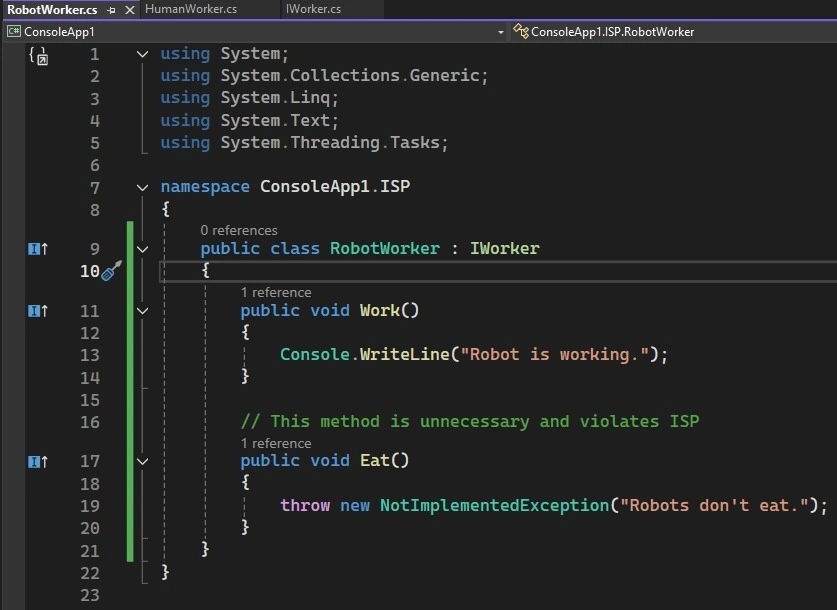
Here, the RobotWorker is forced to implement the Eat() method, which violates ISP because robots don’t need to eat.
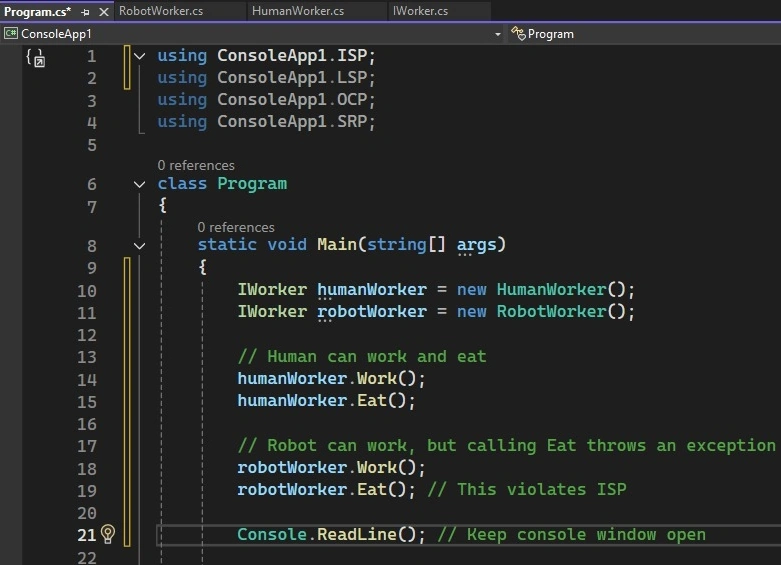
Step 3. Demonstrate ISP Violation in the Main Program.
- Open Program.cs.
- Replace the code with the following.
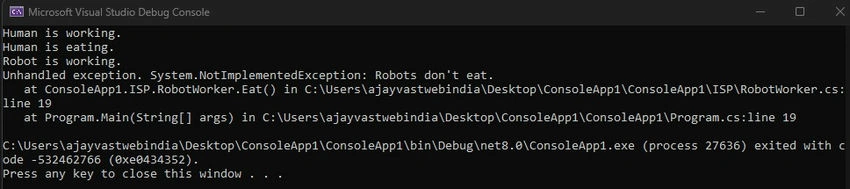
Step 4. Run the Project.
- Press F5 or click Start in Visual Studio.
- The output will show.
Step 5. Apply the Interface Segregation Principle (ISP).
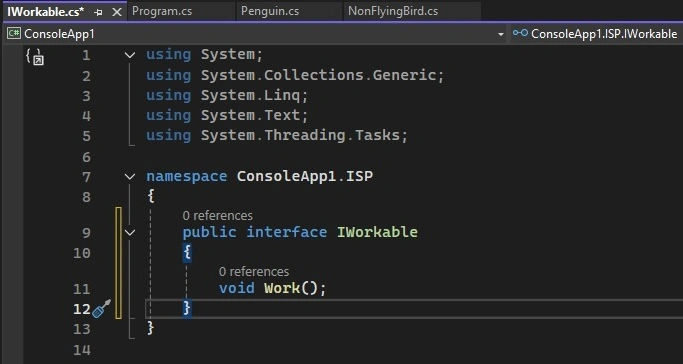
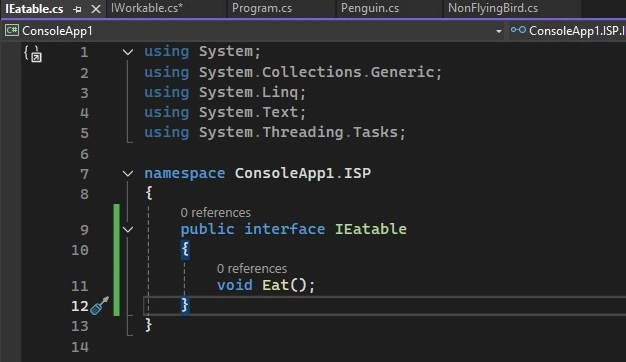
To fix this issue and apply ISP, we’ll split the IWorker interface into two more specific interfaces: IWorkable for working and IEatable for eating.
- Create IWorkable.cs
- Select Add > Class.
- Name the class IWorkable.cs.
- Add the following code to IWorkable.cs.
- Create IEatable.cs
- Select Add > Class.
- Name the class IEatable.cs.
- Add the following code to IEatable.cs.
Step 6. Modify the Worker Classes to Follow the ISP.
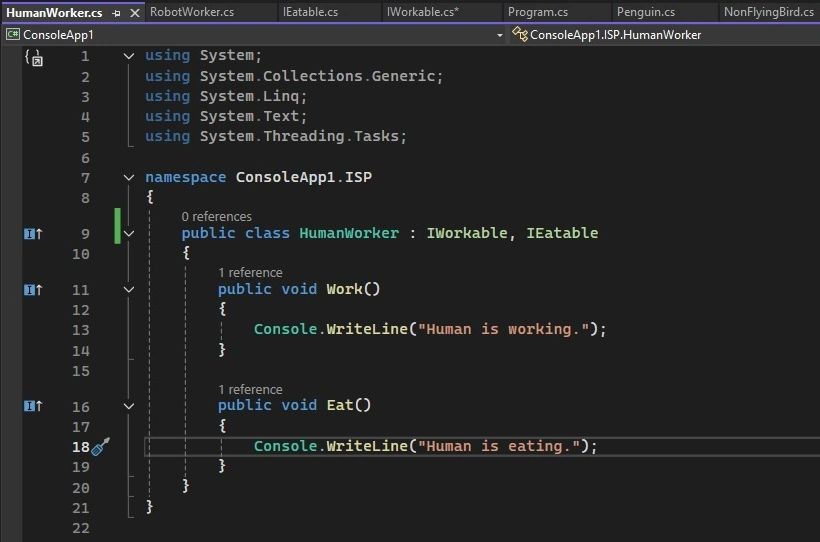
- Modify HumanWorker.cs
- Open HumanWorker.cs.
- Update the code to implement both IWorkable and IEatable.
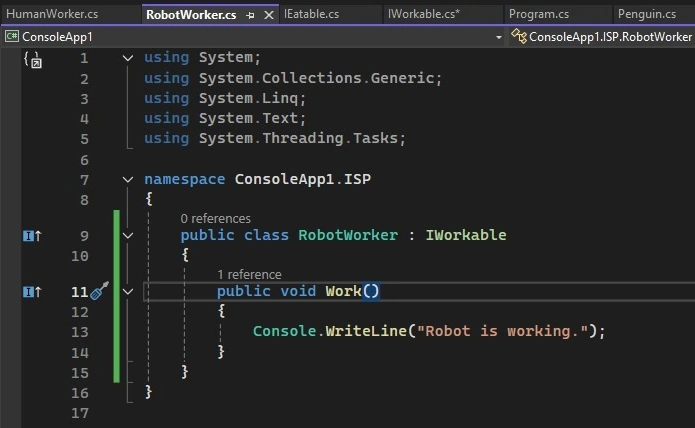
- Modify RobotWorker.cs
- Open RobotWorker.cs.
- Update the code to implement only IWorkable.
Step 7. Update the Main Program.
- Open Program.cs.
- Replace the code with.
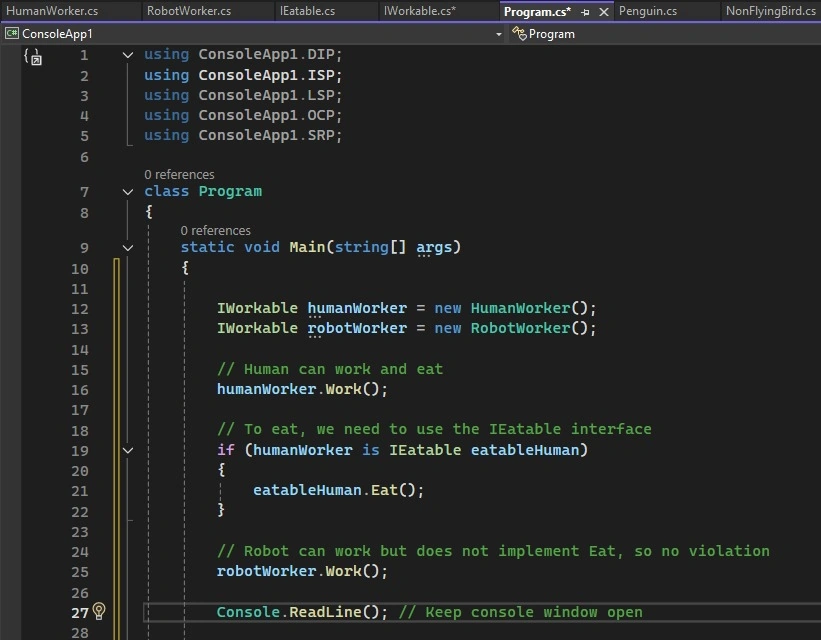
Step 8. Run the Project Again.
- Press F5 or click Start in Visual Studio.
- The console will now show.

Key Takeaways
- Interface Segregation Principle (ISP) ensures that clients should not be forced to depend on interfaces they do not use.
- Initially, the RobotWorker class violated ISP by being forced to implement a method (Eat()) it didn’t need.
- We split the original IWorker interface into two smaller, more specific interfaces (IWorkable and IEatable), and the design now adheres to ISP.
5. Dependency Inversion Principle (DIP)
Definition: High-level modules should not depend on low-level modules. Both should depend on abstractions. Abstractions should not depend on details. Details should depend on abstractions.
DIP encourages relying on abstractions (interfaces or abstract classes) rather than concrete implementations. This allows flexibility and decouples classes from specific implementations.
Example
Step 1. Under the same project, create a folder named DIP. Under this folder, add a low-level class (violating DIP).
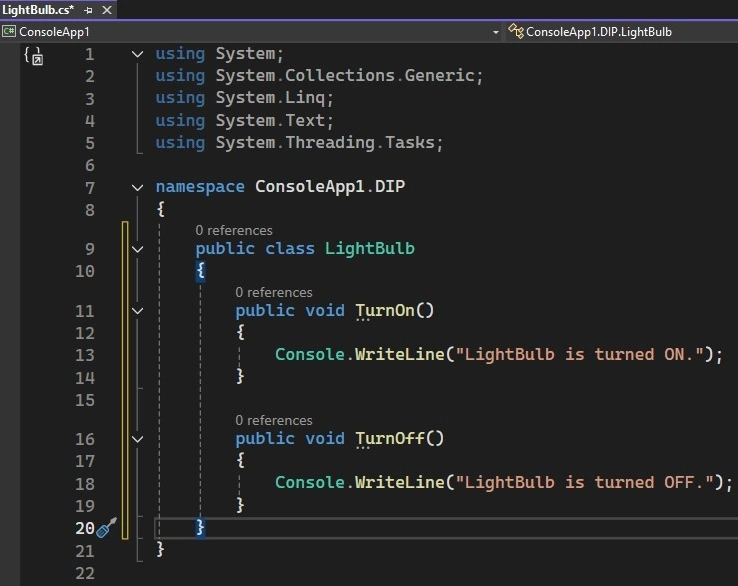
We’ll create a LightBulb class and a Switch class. Initially, the Switch class will directly depend on the LightBulb class, which violates the Dependency Inversion Principle because it creates a tight coupling between the two.
- Select Add > Class.
- Name the class LightBulb.cs.
- Add the following code to LightBulb.cs.
Step 2. Add the Switch Class (Violating DIP).
Now, we’ll create the Switch class, which directly depends on the LightBulb class. This creates tight coupling and violates DIP.
- Select Add > Class.
- Name the class Switch.cs.
- Add the following code to Switch.cs.
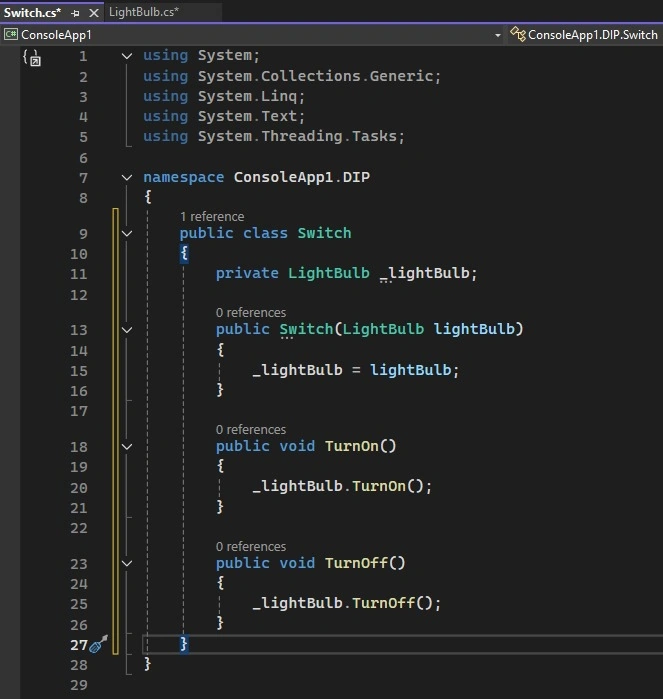
In this example, the Switch class is directly dependent on the concrete LightBulb class, making it hard to change or extend functionality later.
Step 3. Demonstrate DIP Violation in the Main Program.
- Open Program.cs.
- Replace the code with the following.
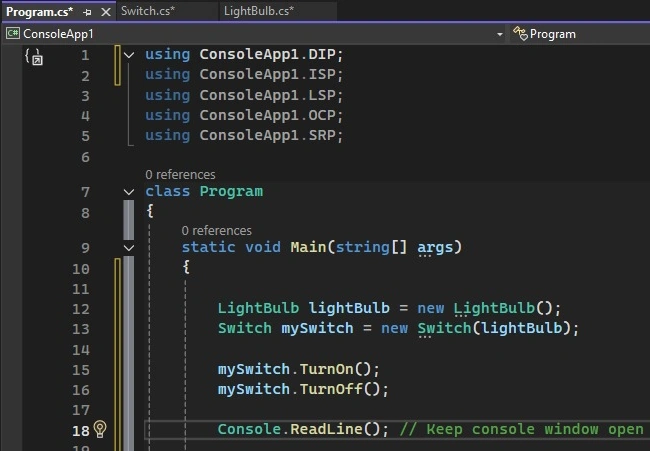
Step 4. Run the Project.
- Press F5 or click Start in Visual Studio.
- The output will show.

Step 5. Apply the Dependency Inversion Principle (DIP).
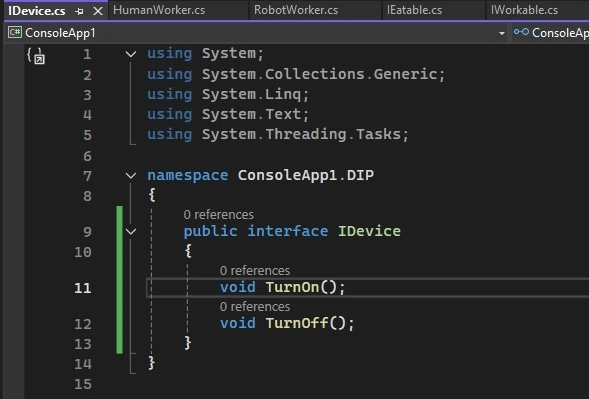
To apply DIP, we will introduce an abstraction (IDevice) and have both the Switch and LightBulb classes depend on this abstraction. This will decouple the Switch from the LightBulb, making the code more flexible and extensible.
Step 6. Create an IDevice Interface.
- Select Add > Class.
- Name the class IDevice.cs.
- Add the following code to IDevice.cs.
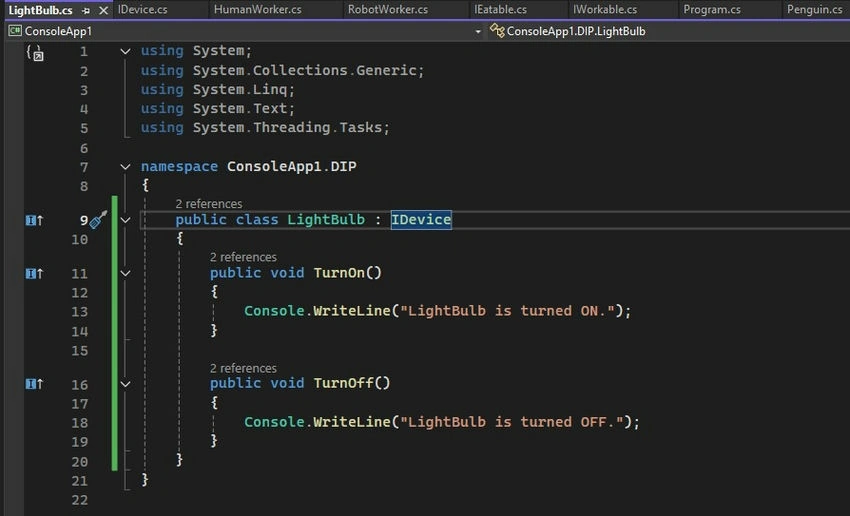
Step 7. Modify the LightBulb Class to Implement IDevice.
- Open LightBulb.cs.
- Modify the class to implement the IDevice interface.
Step 8. Modify the Switch Class to Depend on the IDevice Interface.
- Open Switch.cs.
- Modify the class to depend on the IDevice abstraction.
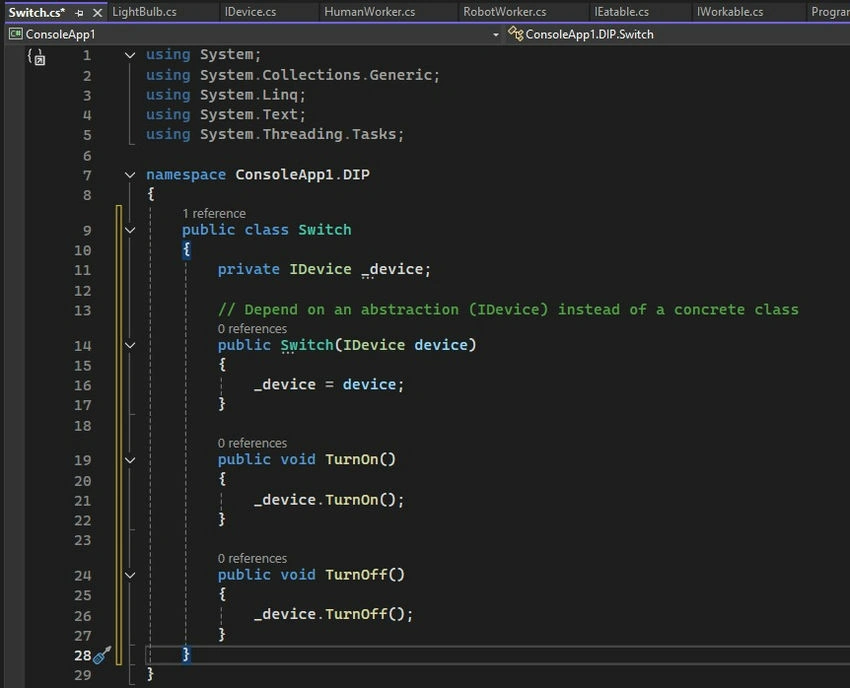
Now, the Switch class no longer depends on the concrete LightBulb class but rather on the IDevice interface. This makes the system more flexible and allows us to easily swap out different devices without modifying the Switch class.
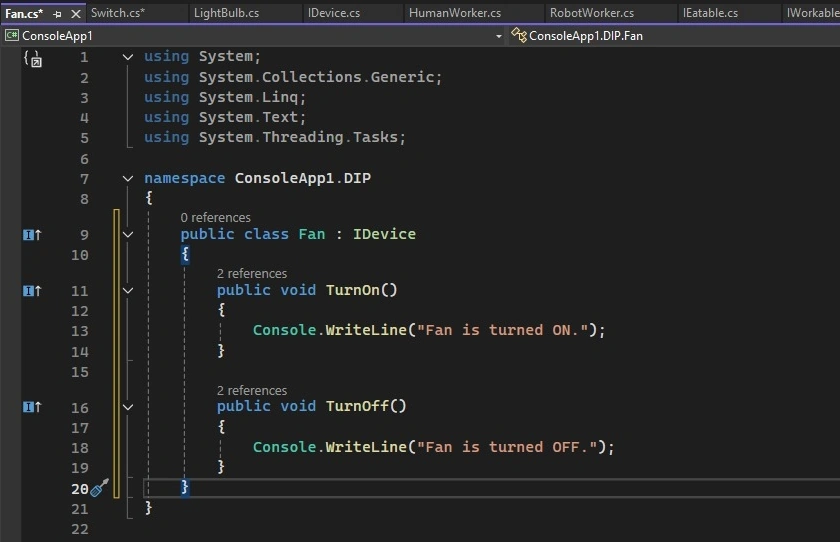
Step 9. Add Another Device (Optional Fan Example)
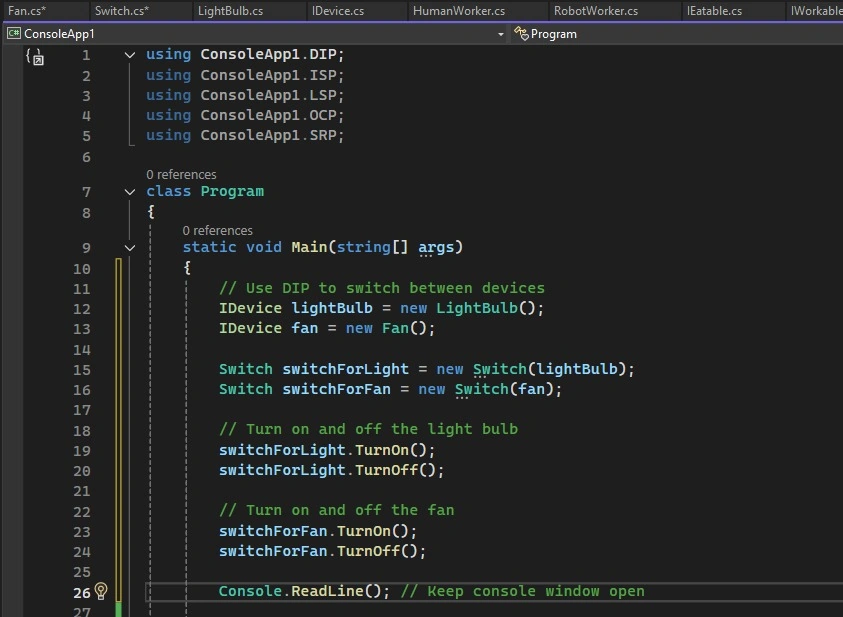
Let's create another class, Fan, which also implements the IDevice interface. This shows the benefit of applying DIP because the Switch class can work with any IDevice.
- Select Add > Class.
- Name the class Fan.cs.
- Add the following code to Fan.cs.
Step 10. Update the Main Program to Use DIP.
- Open Program.cs.
- Replace the code with the following.
Step 11. Run the Project Again.
- Press F5 or click Start in Visual Studio.
- The output will show.

Key Takeaways
- The dependency Inversion Principle ensures that high-level modules do not depend on low-level modules but rather on abstractions.
- Initially, the Switch class was tightly coupled to the LightBulb class, violating DIP.
- By introducing the IDevice interface, we decoupled the Switch from the LightBulb, allowing it to work with any device implementing IDevice.
Conclusion
Applying the SOLID principles in software engineering leads to cleaner, more maintainable, and flexible code. They foster better collaboration, reduce the risk of bugs, and make the system easier to extend and scale.
- SRP ensures that classes are focused and cohesive.
- OCP allows systems to evolve without modifying existing code.
- LSP guarantees that derived classes behave in ways that are consistent with the base class.
- ISP encourages specific, client-focused interfaces.
- DIP promotes the use of abstractions over concrete implementations.
Join the conversation! Your thoughts help the community grow.