

This is an important feature, where you can configure an authentication provider for the web application and configure it as per the requirement of your security organization.
How to configure?
Let’s open Central Admin of SharePoint on your machine. On your Windows desktop screen, click Start >> Administrative Tools >> SharePoint 2013 Central Administration.

- Run it as an administrator to have the elevated privileges.
- You will see the screenshot given below.

- Central Admin is configured under the categories given above.
- Click Security.

- Go To General Security.

- Click Specify authentication providers.
- You will see the screen given below.
Configure

You can see that currently we have a default zone that has claims based authentication as a membership provider name. Click Default with which you will be able to view and change the configuration.

- Web Application
Choose a Web Application, where you want to apply the authentication provider settings. - Zone
You can choose a zone for the Web. - Anonymous Access
Here, you can allow or disallow access for the anonymous users for the sites, which depends upon your organization’s policy. - Client Object Model Permission Requirement
Here, you can allow or disallow for the uses or the developers to use the remote interfaces to access the Server, using Client Object model. - Windows Authentication- You can enable or disable the windows authentication.
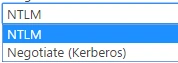
- Integrated Windows authentication- Here, you can choose between NTLM and Negotiate.
- Basic authentication- Here, you can choose to have basic authentication to store the credentials as a plain text.
- Form Based Authentication- You have an option to choose the forms based authentication and have an ASP.NET membership provider name or a role manager name to access, using the form based credentials.
- Trusted Identity Provider- You can also define a trust identity provider between you and the Servers.

- Sign in Page URL
You can choose to have default or a custom sign in page for all the authentications. - Client Integration
Here, you can enable or disable the client integration with your sites, which are based on the security model of your organization.
Once the configuration is done, click Save. Authentication provides settings, which will be a part of the user Services for all the sites of Central Administration.
In this article, we saw how to configure authentication provider settings in SharePoint 2013 Central Administration. There are more articles to come on Central Administration. Until then, keep reading and keep learning.
Join the conversation! Your thoughts help the community grow.