

Introduction
This article explains how to create a Spinner in Android. A Spinner is similar to a drop-down list. It provides a quick way to select a value from a list. It displays the currently selected value and touching the spinner gives a drop-down list from which we can choose the required value.
Step 1
"strings.xml" used in this project is:
- <resources>
- <string name="app_name">Spinner</string>
- <string name="action_settings">Settings</string>
- <string name="hello_world">Hello world!</string>
- <string name="choose_chocolate">Choose Chocolate</string>
- <string-array name="chocolate">
- <item>Crackles</item>
- <item>Fruit and Nut</item>
- <item>Dairy milk silk</item>
- </string-array>
- </resources>
Note that there are two ways to add items to a Spinner, one through the string array and the other programmatically. We will be using both techniques. The Chocolate Spinner will get its list as a string array and Ice Cream Spinner will get it's list programmatically.
Step 2
Open the "activity_main" layout file and add the following code to it:
- <?xml version="1.0" encoding="utf-8"?>
- <LinearLayout xmlns:android="http://schemas.android.com/apk/res/android"
- xmlns:tools="http://schemas.android.com/tools"
- android:layout_width="match_parent"
- android:layout_height="match_parent"
- android:paddingLeft="@dimen/activity_horizontal_margin"
- android:paddingRight="@dimen/activity_horizontal_margin"
- android:paddingTop="@dimen/activity_vertical_margin"
- android:paddingBottom="@dimen/activity_vertical_margin"
- tools:context=".MainActivity"
- android:orientation="vertical">
- <RelativeLayout
- android:layout_height="wrap_content"
- android:layout_width="fill_parent">
- <TextView
- android:text="Chocolate"
- android:id="@+id/txtChoco"
- android:layout_height="wrap_content"
- android:layout_width="wrap_content"
- android:layout_marginTop="20dp"
- android:textSize="30dp"/>
- <Spinner
- android:id="@+id/chocolate_spinner"
- android:layout_height="wrap_content"
- android:layout_width="fill_parent"
- android:entries="@array/chocolate"
- android:prompt="@string/choose_chocolate"
- android:layout_toRightOf="@+id/txtChoco"
- android:layout_marginLeft="10dp"
- android:layout_marginTop="15dp"/>
- </RelativeLayout>
- <RelativeLayout
- android:layout_height="wrap_content"
- android:layout_width="fill_parent"
- android:layout_marginTop="30dp">
- <TextView
- android:text="Ice Cream"
- android:id="@+id/txtIce"
- android:layout_height="wrap_content"
- android:layout_width="wrap_content"
- android:layout_marginTop="20dp"
- android:textSize="30dp"/>
- <Spinner
- android:id="@+id/ice_cream_spinner"
- android:layout_height="wrap_content"
- android:layout_width="fill_parent"
- android:layout_toRightOf="@+id/txtIce"
- android:layout_marginLeft="10dp"
- android:layout_marginTop="15dp"
- />
- </RelativeLayout>
- <Button
- android:layout_width="wrap_content"
- android:layout_height="wrap_content"
- android:text="Done"
- android:layout_marginLeft="130dp"
- android:layout_marginTop="100dp"
- android:id="@+id/done"/>
- </LinearLayout>
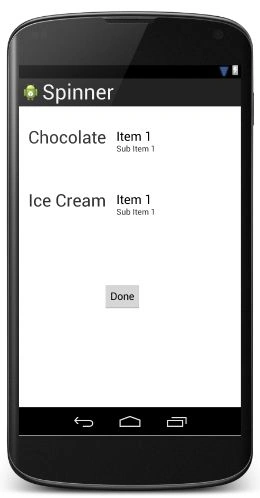
Note that a Spinner is added to create a Spinner in the layout. We have two Spinners here, one for chocolates and the other for Ice Creams.
The layout looks like:
Step 3
Create a new layout file.
Right-click on layout then select "New" -> "Layout Resource File". Name it "selected_layout".
This file layout shows the selected values of spinners in a button click.
Add the following code to it:
- <LinearLayout xmlns:android="http://schemas.android.com/apk/res/android"
- android:orientation="vertical"
- android:layout_width="match_parent"
- android:layout_height="match_parent"
- android:background="#ffd088" >
- <TextView android:id="@+id/display_choco"
- android:layout_height="wrap_content"
- android:layout_width="fill_parent"
- android:textSize="30dp"
- android:layout_marginTop="30dp"
- android:layout_marginLeft="30dp"/>
- <TextView android:id="@+id/display_ice"
- android:layout_height="wrap_content"
- android:layout_width="fill_parent"
- android:textSize="30dp"
- android:layout_marginTop="30dp"
- android:layout_marginLeft="30dp"/>
- </LinearLayout>
Step 4
Open "MainActivity" and add the following code to it:
- package com.chhavi.spinner;
- import android.content.Intent;
- import android.os.Bundle;
- import android.app.Activity;
- import android.view.Menu;
- import android.view.View;
- import android.widget.ArrayAdapter;
- import android.widget.Button;
- import android.widget.Spinner;
- import android.widget.TextView;
- import android.widget.Toast;
- import java.util.ArrayList;
- import java.util.List;
- public class MainActivity extends Activity {
- private Spinner choco, ice;
- private Button done;
- TextView choco_display, ice_display;
- @Override
- protected void onCreate(Bundle savedInstanceState) {
- super.onCreate(savedInstanceState);
- setContentView(R.layout.activity_main);
- addIceCream();
- choco = (Spinner) findViewById(R.id.chocolate_spinner);
- choco.setOnItemSelectedListener(new SelectingItem());
- done=(Button)findViewById(R.id.done);
- ice=(Spinner)findViewById(R.id.ice_cream_spinner);
- done.setOnClickListener(new View.OnClickListener() {
- @Override
- public void onClick(View v) {
- setContentView(R.layout.selected_layout);
- choco_display=(TextView)findViewById(R.id.display_choco);
- ice_display=(TextView)findViewById(R.id.display_ice);
- choco_display.setText("Chocolate: "+String.valueOf(choco.getSelectedItem()));
- ice_display.setText("Ice cream: "+String.valueOf(ice.getSelectedItem()));
- }
- });
- }
- public void addIceCream()
- {
- ice = (Spinner) findViewById(R.id.ice_cream_spinner);
- List<String> list = new ArrayList<String>();
- list.add("Vanilla");
- list.add("Fruit and Nut");
- list.add("Choco chips");
- ArrayAdapter<String> dataAdapter = new ArrayAdapter<String>(this,android.R.layout.simple_spinner_item, list);
- dataAdapter.setDropDownViewResource(android.R.layout.simple_spinner_dropdown_item);
- ice.setAdapter(dataAdapter);
- }
- @Override
- public boolean onCreateOptionsMenu(Menu menu) {
- // Inflate the menu; this adds items to the action bar if it is present.
- getMenuInflater().inflate(R.menu.main, menu);
- return true;
- }
- }
In the code above, the "addIceCream" method adds a list of items to the Spinner for Ice Cream. Note the two ways of adding values to the Spinner. The SpinnerObject.getSelectedItem method returns the item currently selected.
Step 5
Create a new Java class in the same package. Name it "SelectingItem" and add the following code to it:
- package com.chhavi.spinner;
- import android.view.View;
- import android.widget.AdapterView;
- import android.widget.Toast;
- public class SelectingItem implements AdapterView.OnItemSelectedListener {
- public void onItemSelected(AdapterView<?> parent, View view, int pos,long id) {
- Toast.makeText(parent.getContext(),
- "Selecting Item : " + parent.getItemAtPosition(pos).toString(), Toast.LENGTH_SHORT).show();
- }
- @Override
- public void onNothingSelected(AdapterView<?> arg0) {
- // TODO Auto-generated method stub
- }
- }
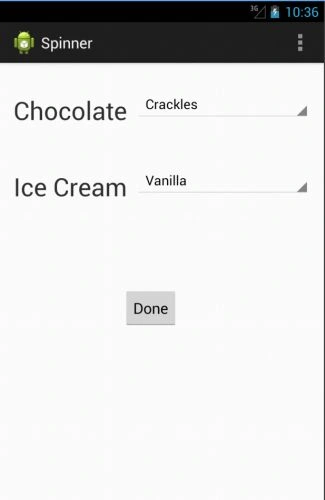
Output snapshots:
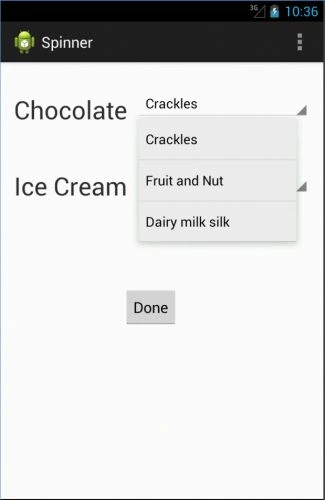
Clicking on the first spinner we will get it's drop-down list as:
Selecting one item from the list above:
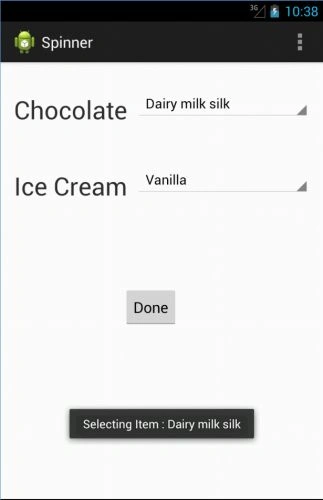
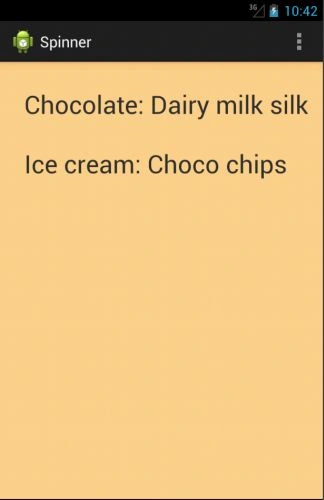
Similarly, selecting a value from the second list and clicking on done gives:
Thank you
BalamuruganPosted Sep 8, 2014, 6:58 AM
Your posting are wonderful. continue like this.
Anubhav ChaudharyPosted Jul 10, 2013, 11:06 PM
Nice and Yummy Article