

Introduction
Please go through the first part of the series at:
We continue learning using Sqlite. We saw in short the subjects of the previous article before continuing. That described the installation of the Sqlite engine, the test project creation, the installation of the available Sqlite-net on Nuget, how to create the database on the telephone Storage to the first application start, to end with the insertion, the modification and the cancellation of the data from the database. In this article we will see how to search for information in several tables. The current Sqlite version is 8.3.9. You find to this link, we will still base ourselves on the version 3.8.7.4, used in the previous article, we will see in the order:
- Creation Finddata screen
- Creation Result screen
- Creation Job class
- Creation RoleUser class
- Modification of the class Parametri_ricerca
- Insertion of the necessary namespace
- Implementation of the code in the class DatabaseManagement
- Modification Insert class
- Modification Update class
- Modification MainPage class
- Test application
- Conclusion
- Other resources
Creation Finddata screen
Before continuing, some clear advice is to read the first part to have what was executed. All the code of the example together with the project is available from this link. Returning to the project, place the slider on the folder "Screen", feel the mouse right and choose the command "add" and after "new element". In the next dialogue window, we search for the template "basic page", as shown in the following figure.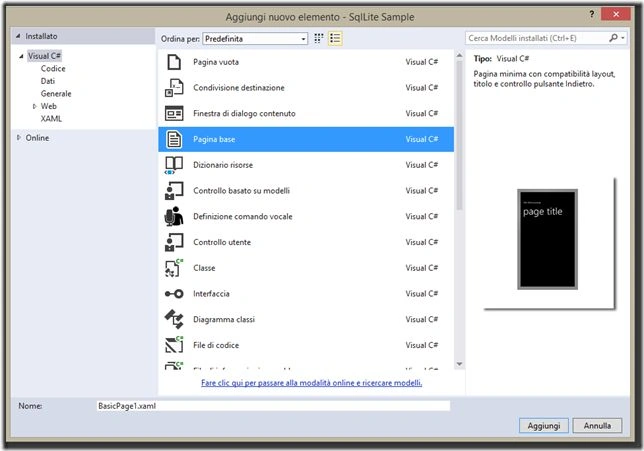
Rename the screen in Finddata and confirm with the button add. After the loading of the screen in the Visual Studio IDE, we modify the existing XAML code with this.
- <Page x:Class="SqlLite_Sample.Screen.Finddata" xmlns="http://schemas.microsoft.com/winfx/2006/xaml/presentation" xmlns:x="http://schemas.microsoft.com/winfx/2006/xaml" xmlns:local="using:SqlLite_Sample.Screen" xmlns:d="http://schemas.microsoft.com/expression/blend/2008" xmlns:mc="http://schemas.openxmlformats.org/markup-compatibility/2006" mc:Ignorable="d"Background="{ThemeResource ApplicationPageBackgroundThemeBrush}">
- <Grid x:Name="LayoutRoot">
- <Grid.ChildrenTransitions>
- <TransitionCollection>
- <EntranceThemeTransition/>
- </TransitionCollection>
- </Grid.ChildrenTransitions>
- <Grid.RowDefinitions>
- <RowDefinition Height="Auto"/>
- <RowDefinition Height="*"/>
- </Grid.RowDefinitions>
- <!-- Pannello del titolo -->
- <StackPanel Grid.Row="0" Margin="19,0,0,0">
- <TextBlock Text="Sqlite sample" Style="{ThemeResource TitleTextBlockStyle}" Margin="0,12,0,0"/>
- <TextBlock Text="Find data page" Margin="0,-6.5,0,26.5" Style="{ThemeResource HeaderTextBlockStyle}" CharacterSpacing="{ThemeResource PivotHeaderItemCharacterSpacing}"/>
- </StackPanel>
- <!--TODO: il contenuto deve essere inserito all'interno della seguente griglia-->
- <Grid Grid.Row="1" x:Name="ContentRoot" Margin="19,9.5,19,0">
- <Grid.RowDefinitions>
- <RowDefinition Height="Auto"/>
- <RowDefinition Height="Auto"/>
- <RowDefinition Height="Auto"/>
- </Grid.RowDefinitions>
- <StackPanel x:Name="splRadioButton" Grid.Row="0">
- <RadioButton x:Name="rbnName" IsChecked="True" Content="Name" Tapped="rbnName_Tapped"/>
- <RadioButton x:Name="rbnRole" IsChecked="False" Content="Role" Tapped="rbnName_Tapped"/>
- <RadioButton x:Name="rbnAge"IsChecked="False" Content="Age" Tapped="rbnName_Tapped"/>
- </StackPanel>
- <StackPanel Grid.Row="1">
- <TextBlock x:Name="tbkName" FontSize="20" Text="Find data" HorizontalAlignment="Center" VerticalAlignment="Center"/>
- <TextBox x:Name="tbxFindForName"/>
- </StackPanel>
- <Button Grid.Row="2" x:Name="btnFind" Content="Find" HorizontalAlignment="Center" Tapped="btnFind_Tapped"/>
- </Grid>
- </Grid>
- </Page>
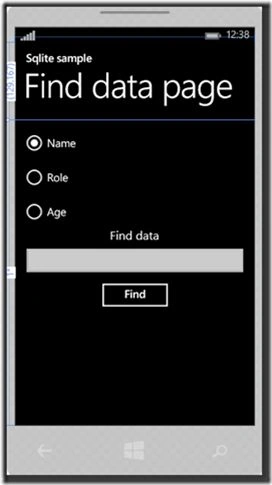
Image 1.2 The screen Find data page.
We have three Radio Button controls, depending on what was selected, that can execute a research typology. In our case for the name, role and age we will go to type in a term inside the TextBox control, placed under the given TextBlock Find data and at the end of the mediating Button Find insertion will start the research procedure depending on what we have chosen. With the F7 key, we go to the code editor and modify the builder of the class Finddata as follows:
- public Finddata()
- {
- this.InitializeComponent();
this.navigationHelper = new NavigationHelper(this);
this.navigationHelper.LoadState += this.NavigationHelper_LoadState;
this.navigationHelper.SaveState += this.NavigationHelper_SaveState; - foreach (var control in splRadioButton.Children.OfType<RadioButton>().Where(w => w.Content.Equals("Name")))
- {
- Parametri_ricerca.TypeSearch = control.Content.ToString();
- }
- }
- private async void btnFind_Tapped(object sender, TappedRoutedEventArgs e)
- {
- if (Validations.CheckTextBox(tbxFindForName).Equals(true))
- {
- var dialog = new MessageDialog("Inserisci un termine di ricerca!");
- await dialog.ShowAsync();
- if (Parametri_ricerca.TypeSearch.Equals(""))
- {
- var dialog1 = new MessageDialog("Inserisci un termine di ricerca!");
- await dialog1.ShowAsync();
- }
- }
- else { Parametri_ricerca.FindData = tbxFindForName.Text;
- Frame.Navigate(typeof(Result));
- }
- }
- private void rbnName_Tapped(object sender, TappedRoutedEventArgs e)
- {
- var radiobuttonTapped = sender as RadioButton;
- Parametri_ricerca.TypeSearch = radiobuttonTapped.Content.ToString();
- }
Finished this activity in the class Finddata can be responsible for creating the Result screen. In explores solutions, create the Result screen as we have done for Finddata and in the XAML file we replace the existing code with the following:
- <Page x:Class="SqlLite_Sample.Screen.Result"
- xmlns="http://schemas.microsoft.com/winfx/2006/xaml/presentation"
- xmlns:x="http://schemas.microsoft.com/winfx/2006/xaml"
- xmlns:local="using:SqlLite_Sample.Screen"
- xmlns:d="http://schemas.microsoft.com/expression/blend/2008"
- xmlns:mc="http://schemas.openxmlformats.org/markup-compatibility/2006"
- mc:Ignorable="d"
- Background="{ThemeResource ApplicationPageBackgroundThemeBrush}">
- <Grid x:Name="LayoutRoot">
- <Grid.ChildrenTransitions>
- <TransitionCollection>
- <EntranceThemeTransition/>
- </TransitionCollection>
- </Grid.ChildrenTransitions>
- <Grid.RowDefinitions>
- <RowDefinition Height="Auto"/>
- <RowDefinition Height="*"/>
- </Grid.RowDefinitions>
- <!-- Pannello del titolo -->
- <StackPanel Grid.Row="0" Margin="19,0,0,0">
- <TextBlock Text="Sqlite sample" Style="{ThemeResource TitleTextBlockStyle}" Margin="0,12,0,0"/>
- <TextBlock Text="Result" Margin="0,-6.5,0,26.5" Style="{ThemeResource HeaderTextBlockStyle}" CharacterSpacing=" {ThemeResource PivotHeaderItemCharacterSpacing}"/>
- </StackPanel>
- <!--TODO: il contenuto deve essere inserito all'interno della seguente griglia-->
- <Grid Grid.Row="1" x:Name="ContentRoot" Margin="19,9.5,19,0">
- <Grid.RowDefinitions>
- <RowDefinition Height="Auto"/>
- </Grid.RowDefinitions>
- <ListBox Grid.Row="0" x:Name="lstFindPerson">
- <ListBox.ItemTemplate>
- <DataTemplate>
- <StackPanel>
- <StackPanel Orientation="Horizontal">
- <TextBlock x:Name="tbkName" FontWeight="Bold"Text="Name"/>
- <TextBlock Width="30"/>
- <TextBlock x:Name="tbkRole" FontWeight="Bold" Text="Role"/>
- <TextBlock Width="30"/>
- <TextBlock x:Name="tbkAge" FontWeight="Bold" Text="Age"/>
- <TextBlock Height="50"/>
- </StackPanel>
- <StackPanel Orientation="Horizontal">
<TextBlock x:Name="tbkFindForName"Text="{Binding Name}"/> - <TextBlock Width="20"/>
- <TextBlockx:NameTextBlockx:Name="tbkFindForRole" Text="{Binding Role}"/>
- <TextBlock Width="20"/>
- <TextBlock x:Name="tbkFindForAge" Text="{Binding Age}"/>
- </StackPanel>
- </StackPanel>
- </DataTemplate>
- </ListBox.ItemTemplate>
- </ListBox>
- </Grid>
- </Grid>
- </Page>
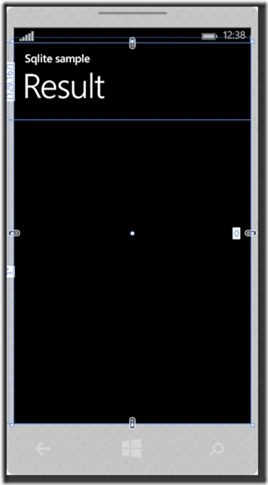
Image 1.3 The screen Result page.
What we have created is simply a ListBox control with inside two StackPanels. The first will have three TextBlock controls with static text, that is name, Role and age. In the second StackPanel, there are three TextBox controls with the Text property in binding to the Name properties, Role and Age of one RoleUser collection, that is the class that will be responsible for showing us the research result, also this class will create it during the article. Ended the graphic part, with the F7 key we go to the code editor, we modify the builder of the class Result as follows.
- public Result()
- {
- this.InitializeComponent();
- this.navigationHelper = new NavigationHelper(this);
- this.navigationHelper.LoadState += this.NavigationHelper_LoadState;
- this.navigationHelper.SaveState += this.NavigationHelper_SaveState;
- DatabaseManagement.FindForName(Parametri_ricerca.FindData, Parametri_ricerca.TypeSearch, lstFindPerson);
- }
- DatabaseManagement.FindForName(Parametri_ricerca.FindData, Parametri_ricerca.TypeSearch, lstFindPerson);
Creation class Job
After defining also the Result screen, he arrived the moment to create the classes necessary for the research function. We go back to the test project, we position the slider over the Classes folder, feel the mouse right and we choose the commands "add" and immediately later "class" and call her with the name Job. This class does not do anything else but adds a role for every user that we will need to be to insert in the created database to the first application start, by a new table that will have I sharpen the name of the class that we will create in this passage. To the created class, we go to replace the current C# code with this following.
- using SQLite;
- namespace SqlLite_Sample.Classes
- {
- class Job
- {
- [SQLite.PrimaryKey,AutoIncrement]
- public int Id { get; set; }
- [MaxLength(30)]
- public string Name { get; set; }
- [MaxLength(30)]
- public string Role { get; set; }
- [MaxLength(3)]
- public int Age { get; set; }
- }
- }
Creation class RoleUser
Create the last one of the two necessary classes with the same procedure that we have previously used always in the Classes folder, the difference that this time we will name her RoleUser. We go to replace the current C# code with the following.
- using SQLite;
- namespace SqlLite_Sample.Classes
- {
- class RoleUser
- {
- [MaxLength(30)]
- public string Name { get; set; }
- [MaxLength(30)]
- public string Role { get; set; }
- [MaxLength(3)]
- public int Age { get; set; }
- }
- }
Modification of the class Parametri_ricerca
We must now modify and insert a few properties in this class, since they will serve us during the article to manage update of the information about the user. With the slider positioned on the Classes folder we open the Parametri_ricerca.cs file and modify the existing C# code with the following.
- namespace SqlLite_Sample.Classes
- {
- public static class Parametri_ricerca
- {
- public static string FindData { get; set; }
- public static string TypeSearch { get; set; }
- public static string NewName { get; set; }
- public static string NewSurName { get; set; }
- public static int NewAge { get; set; }
- }
- }
Before modifying the C# code of the class DataBaseManagement, we must insert in the classes' job and RoleUser the following Namespace.
using SqlLite_Sample.Classes;
This is necessary for being able to do use of the class Parametri_ricerca, positioned inside the Classes folder.
Implementation of the code in the class DatabaseManagement
We now go to modify the C# code of the class DatabaseManagement. We will go to modify the Insert, Delete and UpdateData methods so as to manage also the new table that will be created to the first start, in other words the table job. In explores solutions double click with the mouse on the DatabaseManagement file and modify the CreateDatabase method as follows.
- public static async void CreateDatabase()
- {
- await ConnectionDb().CreateTableAsync<Employee>();
- await ConnectionDb().CreateTableAsync<Job>();
- }
- public async static void InsertData(string _name, string _surname, int _age, string _role)
- {
- var newemployee = new Employee
- {
- Name = _name,
- SurName = _surname,
- Age = _age,
- };
- var newjob = new Job
- {
- Name = newemployee.Name,
- Role = _role,
- Age = newemployee.Age,
- };
- await ConnectionDb().InsertAsync(newemployee);
- await ConnectionDb().InsertAsync(newjob);
- }
- public async static void DeleteData(string _name)
- {
- var deleteemployee = await ConnectionDb().Table<Employee>().Where(w => w.Name.Equals(_name)).FirstOrDefaultAsync();
- deleteemployee.Name = _name;
- await ConnectionDb().DeleteAsync(deleteemployee);
- var deleterole = await ConnectionDb().Table<Job>().Where(w => w.Id.Equals(deleteemployee.Id)).FirstOrDefaultAsync();
- await ConnectionDb().DeleteAsync(deleterole);
- }
- var deleterole = await ConnectionDb().Table<Job>().Where(w => w.Id.Equals(deleteemployee.Id)).FirstOrDefaultAsync();
- await ConnectionDb().DeleteAsync(deleterole);
- public async static void UpdateData(string _name, string _newname, string _surname, string _newsurname, int _age, int _newage, string _newrole)
- {
- var updateemployee = await ConnectionDb().Table<Employee().Where(w => w.Name.Equals(_name) && w.SurName.Equals(_surname) && w.Age.Equals(_age)).FirstOrDefaultAsync();
- updateemployee.Name = _newname;
- updateemployee.SurName = _newsurname;
- updateemployee.Age = _newage;
- await ConnectionDb().UpdateAsync(updateemployee);
- var updaterole = await ConnectionDb().Table<Job>().Where(w=> w.Id.Equals(updateemployee.Id)).FirstOrDefaultAsync();
- updaterole.Name = updateemployee.Name;
- updaterole.Age = updateemployee.Age;
- updaterole.Role = _newrole;
- await ConnectionDb().UpdateAsync(updaterole);
- }
- public async static void FindForName(string _name, string _typesearch, ListBox _box)
- {
- var employee = new List<Employee>();
- var job = new List<Job>();
- var roleuser = new List<RoleUser>();
- var queryName = ConnectionDb().Table<Employee>();
- var resultName = await queryName.ToListAsync();
- var queryJob = ConnectionDb().Table<Job>();
- var resultjob = await queryJob.ToListAsync();
- foreach (var findperson in resultName)
- {
- employee.Add(new Employee { Name = findperson.Name, SurName = findperson.SurName, Age = findperson.Age });
- }
- foreach (var findjob in resultjob)
- {
- job.Add(new Job { Name = findjob.Name, Role = findjob.Role, Age = findjob.Age });
- }
- switch (_typesearch)
- {
- case "Name":
- var resultForName = employee .Join(job, newname => newname.Id, newjob => newjob.Id, (newname, newjob) => new { newjob.Name, newjob.Role, newjob.Age }).Where(w => w.Name.Equals(_name)) .Distinct();
- foreach (var newjob in resultForName)
- {
- roleuser.Add(new RoleUser { Name = newjob.Name, Role = newjob.Role, Age = newjob.Age });
- }
- break;
- case "Role":
- var resultForRole = employee .Join(job, newname => newname.Id, newjob => newjob.Id, (newname, newjob) => new { newjob.Name, newjob.Role, newjob.Age }).Where(w => w.Role.Equals(_name)) .Distinct();
- foreach (var newjob in resultForRole)
- {
- roleuser.Add(new RoleUser { Name = newjob.Name, Role = newjob.Role, Age = newjob.Age });
- }
- break;
- case "Age":
- var resultAge = employee .Join(job, newname => newname.Id, newjob => newjob.Id, (newname, newjob) =>new { newjob.Name, newjob.Role, newjob.Age }).Where(w => w.Age.Equals(int.Parse(_name))) .Distinct();
- foreach (var newjob in resultAge)
- {
- roleuser.Add(new RoleUser { Name = newjob.Name, Role = newjob.Role, Age = newjob.Age });
- }
- break;
- }
- _box.ItemsSource = roleuser;
- }
- var employee = new List<Employee>();var job = new List<Job>();var roleuser = new List<RoleUser>();
- var queryName = ConnectionDb().Table<Employee>();var queryJob = ConnectionDb().Table<Job>();
- var resultName = await queryName.ToListAsync(); var resultjob = await queryJob.ToListAsync();
- foreach (var findperson in resultName)
- {
- ` employee.Add(new Employee { Name = findperson.Name, SurName = findperson.SurName, Age = findperson.Age });
- }
- foreach (var findjob in resultjob)
- {
- job.Add(new Job { Name = findjob.Name, Role = findjob.Role, Age = findjob.Age });
- }
- switch (_typesearch)
- {
- case "Name":
- var resultForName = employee .Join(job, newname => newname.Id, newjob => newjob.Id, (newname, newjob) => new { newjob.Name, newjob.Role, newjob.Age }).Where(w => w.Name.Equals(_name)) .Distinct();
- foreach (var newjob in resultForName)
- {
- roleuser.Add(new RoleUser { Name = newjob.Name, Role = newjob.Role, Age = newjob.Age });
- }
- break;
- case "Role":
- var resultForRole = employee .Join(job, newname => newname.Id, newjob => newjob.Id, (newname, newjob) => new { newjob.Name, newjob.Rol e, newjob.Age }).Where(w => w.Role.Equals(_name)) .Distinct();
- foreach (var newjob in resultForRole)
- {
- roleuser.Add(new RoleUser { Name = newjob.Name, Role = newjob.Role, Age = newjob.Age });
- }
- break;
- case "Age":
- var resultAge = employee .Join(job, newname => newname.Id, newjob => newjob.Id, (newname, newjob) => new { newjob.Name, newjob.Role, newjob.Age }).Where(w => w.Age.Equals(int.Parse(_name))) .Distinct();
- foreach (var newjob in resultAge)
- {
- roleuser.Add(new RoleUser { Name = newjob.Name, Role = newjob.Role, Age = newjob.Age });
- }
- break;
- }
_box.ItemsSource = roleuser;
Modification Insert class
Have finished the modifications in the class DatabaseManagement, must still execute some precautions in screens of Insert, Update and MainPage will see thing in detail. Leave from the class Insert, will add a TextBox control where we have the possibility of inserting a role for every new user whom we insert in the table Job in the Database people.db. We go back to our project, position the slider on the Screen folder and do click double with the mouse on the Insert.xaml file. Opened the file replace the existing XAML code with this.
- <Page x:Class="SqlLite_Sample.Screen.Insert"
- xmlns="http://schemas.microsoft.com/winfx/2006/xaml/presentation"
- xmlns:x="http://schemas.microsoft.com/winfx/2006/xaml" xmlns:local="using:SqlLite_Sample.Screen"
- xmlns:d="http://schemas.microsoft.com/expression/blend/2008"
- xmlns:mc="http://schemas.openxmlformats.org/markup-compatibility/2006"
- mc:Ignorable="d" Background="{ThemeResource ApplicationPageBackgroundThemeBrush}">
- <Grid x:Name="LayoutRoot">
- <Grid.ChildrenTransitions>
- <TransitionCollection>
- <EntranceThemeTransition/>
- </TransitionCollection>
- </Grid.ChildrenTransitions>
- <Grid.RowDefinitions>
- <RowDefinition Height="Auto"/>
- <RowDefinition Height="*"/>
- </Grid.RowDefinitions>
- <!-- Pannello del titolo -->
- <StackPanel Grid.Row="0" Margin="19,0,0,0">
- <TextBlock Text="Sqlite sample" Style="{ThemeResource TitleTextBlockStyle}" Margin="0,12,0,0"/>
- <TextBlock Text="Insert page" Margin="0,-6.5,0,26.5" Style="{ThemeResource HeaderTextBlockStyle}" CharacterSpacing="{ThemeResource PivotHeaderItemCharacterSpacing}"/>
- </StackPanel>
- <!--TODO: il contenuto deve essere inserito all'interno della seguente griglia-->
- <Grid Grid.Row="1" x:Name="ContentRoot" Margin="19,9.5,19,0">
- <Grid.RowDefinitions>
- <RowDefinition Height="Auto"/>
- <RowDefinition Height="Auto"/>
- </Grid.RowDefinitions>
- <Grid Grid.Row="0">
- <Grid.RowDefinitions>
- <RowDefinition Height="Auto"/>
- <RowDefinition Height="Auto"/>
- <RowDefinition Height="Auto"/>
- <RowDefinition Height="Auto"/>
- <RowDefinition Height="Auto"/>
- </Grid.RowDefinitions>
- <Grid.ColumnDefinitions>
- <ColumnDefinition Width="Auto"/>
- <ColumnDefinition Width="*"/>
- </Grid.ColumnDefinitions>
- <TextBlock Grid.Column="0" Grid.Row="0" x:Name="tbkName" FontSize="25" Text="Name"VerticalAlignment="Center" />
- <TextBlock Grid.Column="0" Grid.Row="1" x:Name="tbkSurname" FontSize="25" Text="Surname" VerticalAlignment="Center" /> <TextBlock Grid.Column="0" Grid.Row="2" x:Name="tbkAge" FontSize="25" Text="Age" VerticalAlignment="Center" /> <TextBlock Grid.Column="0" Grid.Row="3" x:Name="tbkRole" FontSize="25"Text="Role" VerticalAlignment="Center" /> <TextBox Grid.Column="1" Grid.Row="0" x:Name="tbxName"/>
- <TextBox Grid.Column="1" Grid.Row="1" x:Name="tbxSurname" />
- <TextBox Grid.Column="1" Grid.Row="2" x:Name="tbxAge" InputScope="Number" />
- <TextBox Grid.Column="1" Grid.Row="3" x:Name="tbxRole" />
- </Grid>
- <Grid Grid.Row="1">
- <Grid.RowDefinitions>
- <RowDefinition Height="20"/>
- <RowDefinition Height="Auto"/>
- </Grid.RowDefinitions>
- <Button Grid.Row="1 x:Name="btnInsert" Content="Insert" HorizontalAlignment="Center" Tapped="btnInsert_Tapped" />
- </Grid>
- </Grid>
- </Grid></Page>

Image 1.4 The screen Insert page.
Ended the graphic part, I feel F7 to access the code editor and we modify the Tapped event of Button Insert as follows.
- private async void btnInsert_Tapped(object sender, Windows.UI.Xaml.Input.TappedRoutedEventArgs e)
- {
- if(Validations.CheckTextBox(tbxName,tbxSurname,tbxAge).Equals(true))
- {
- var dialog = new MessageDialog("Valorizzare tutti i campi");
- await dialog.ShowAsync();
- }
- else
- {
- DatabaseManagement.InsertData(tbxName.Text, tbxSurname.Text, int.Parse(tbxAge.Text),tbxRole.Text);
- }
- }
- DatabaseManagement.InsertData(tbxName.Text, tbxSurname.Text, int.Parse(tbxAge.Text),tbxRole.Text);
Modification class Update
Like the class Insert, also the class Update needs a few modifications and I date from the fact that in the previous article it was possible to modify only the name of the user, we will provide the possibility of modifying the surname, the age and inserting also a new role. Always with the slider positioned on the Screen folder, open the Update.xaml file and we go to modify the existing XAML code with this.
- <Pagex:Class="SqlLite_Sample.Screen.Update"
- xmlns="http://schemas.microsoft.com/winfx/2006/xaml/presentation"
- xmlns:x="http://schemas.microsoft.com/winfx/2006/xaml"
- xmlns:local="using:SqlLite_Sample.Screen"
- xmlns:d="http://schemas.microsoft.com/expression/blend/2008"
- xmlns:mc="http://schemas.openxmlformats.org/markup-compatibility/2006"
- mc:Ignorable="d"
- Background="{ThemeResource ApplicationPageBackgroundThemeBrush}">
- <Grid x:Name="LayoutRoot">
- <Grid.ChildrenTransitions>
- <TransitionCollection>
- <EntranceThemeTransition/>
- </TransitionCollection>
- </Grid.ChildrenTransitions>
- <Grid.RowDefinitions>
- <RowDefinition Height="Auto"/>
- <RowDefinition Height="*"/>
- </Grid.RowDefinitions>
- <!-- Pannello del titolo -->
- <StackPanel Grid.Row="0" Margin="19,0,0,0">
- <TextBlock Text="Sqlite sample" Style="{ThemeResource TitleTextBlockStyle}" Margin="0,12,0,0"/>
- <TextBlock Text="Update page" Margin="0,-6.5,0,26.5" Style="{ThemeResource HeaderTextBlockStyle}" CharacterSpacing="{ThemeResource PivotHeaderItemCharacterSpacing}"/>
- </StackPanel>
- <!--TODO: il contenuto deve essere inserito all'interno della seguente griglia-->
- <Grid Grid.Row="1" x:Name="ContentRoot" Margin="19,9.5,19,0">
- <Grid.RowDefinitions>
- <RowDefinition Height="Auto"/>
- <RowDefinition Height="Auto"/>
- <RowDefinition Height="Auto"/>
- <RowDefinition Height="Auto"/>
- <RowDefinition Height="Auto"/>
- <RowDefinition Height="Auto"/>
- <RowDefinition Height="Auto"/>
- </Grid.RowDefinitions>
- <ListBox Grid.Row="0" x:Name="lstUpdatePerson" SelectionChanged="lstUpdatePerson_SelectionChanged">
- <ListBox.ItemTemplate>
- <DataTemplate>
- <StackPanel>
- <StackPanel Orientation="Horizontal">
- <TextBlock x:Name="tbkName" FontWeight="Bold" Text="Name"/>
- <TextBlock Width="30"/>
- <TextBlock x:Name="tbkSurname" FontWeight="Bold" Text="Surname"/>
- <TextBlock Width="30"/>
- <TextBlock x:Name="tbkAge" FontWeight="Bold" Text="Age"/>
- <TextBlock Height="50"/>
- </StackPanel>
- <StackPanel Orientation="Horizontal">
- <TextBlock x:Name="tbkFindForName" Text="{Binding Name}"/>
- <TextBlock Width="20"/>
- <TextBlock x:Name="tbkFindForSurName" Text="{Binding SurName}"/>
- <TextBlock Width="20"/>
- <TextBlock x:Name="tbkFindForAge" Text="{Binding Age}"/>
- </StackPanel>
- </StackPanel>
- </DataTemplate>
- </ListBox.ItemTemplate>
- </ListBox>
- <TextBlock Grid.Row="3" x:Name="tbkNewData" Text="New data" HorizontalAlignment="Center"/>
- <StackPanel Grid.Row="4" x:Name="splNewData"> <StackPanel x:Name="splNewName" Orientation="Horizontal">
- <TextBlock Text="Name" VerticalAlignment="Center"/>
- <TextBlock Width="30"/>
- <TextBox x:Name="tbxNewName" Width="Auto"/>
- </StackPanel>
- <StackPanel x:Name="splNewSurName" Orientation="Horizontal">
- <TextBlock Text="SurName" VerticalAlignment="Center"/>
- <TextBlock Width="15"/>
- <TextBox x:Name="tbxNewSurName" Width="Auto"/>
- </StackPanel>
- <StackPanel x:Name="splNewAge" Orientation="Horizontal">
- <TextBlock Text="Age" VerticalAlignment="Center"/>
- <TextBlock Width="40"/>
- <TextBox x:Name="tbxNewAge" Width="Auto" InputScope="Number"/>
- </StackPanel>
- <StackPanel x:Name="splNewRole" Orientation="Horizontal">
- <TextBlock Text="Role" VerticalAlignment="Center"/>
- <TextBlock Width="40"/>
- <TextBox x:Name="tbxNewRole" Width="Auto"/>
- </StackPanel>
- </StackPanel>
- <Button Grid.Row="6" x:Name="btnUpdatePerson" Content="Update" Tapped="btnUpdatePerson_Tapped"/>
- </Grid>
- </Grid>
- </Page>
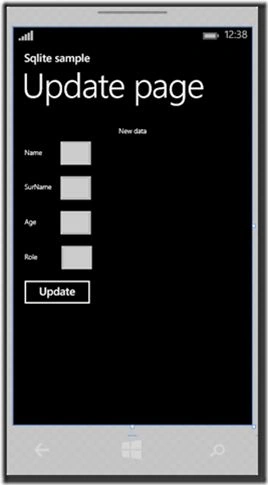
Image 1.5 The new screen Update page.
We now modify also the C# code part, feel F7 to access the editor and go to replace all the content of the Tapped events of button btnUpdatePerson e and SelectionChanged of the ListBox lstUpdatePerson control.
- private async void btnUpdatePerson_Tapped(object sender, TappedRoutedEventArgs e)
- {
- await Validations.MessageConfirmDeleteoUpdatePerson("Vuoi aggiornare i dati?");
- if (Validations.result.Equals(true))
- {
- if (Validations.CheckTextBox(tbxNewName, tbxNewSurName, tbxNewAge).Equals(true))
- { var dialog = new MessageDialog("Valorizzare tutti i campi");
- await dialog.ShowAsync();
- }
- else
- {
- DatabaseManagement.UpdateData(Parametri_ricerca.NewName,tbxNewName.Text,
- Parametri_ricerca.NewSurName,tbxNewSurName.Text,Parametri_ricerca.NewAge,
- int.Parse(tbxNewAge.Text),tbxNewRole.Text);
- }
- }
- }
- DatabaseManagement.UpdateData(Parametri_ricerca.NewName,tbxNewName.Text, Parametri_ricerca.NewSurName,tbxNewSurName.Text,Parametri_ricerca.NewAge,
- int.Parse(tbxNewAge.Text),tbxNewRole.Text);
- private void lstUpdatePerson_SelectionChanged(object sender, SelectionChangedEventArgs e)
- {
- Parametri_ricerca.NewName = ((Employee)(lstUpdatePerson.SelectedValue)).Name;
- Parametri_ricerca.NewSurName = ((Employee)(lstUpdatePerson.SelectedValue)).SurName;
- Parametri_ricerca.NewAge = ((Employee)(lstUpdatePerson.SelectedValue)).Age;
- tbxNewName.Text = ((Employee)(lstUpdatePerson.SelectedValue)).Name;
- tbxNewSurName.Text = ((Employee)(lstUpdatePerson.SelectedValue)).SurName;
- tbxNewAge.Text = ((Employee)(lstUpdatePerson.SelectedValue)).Age.ToString();
- }
- Parametri_ricerca.NewSurName = ((Employee)(lstUpdatePerson.SelectedValue)).SurName;
- Parametri_ricerca.NewAge = ((Employee)(lstUpdatePerson.SelectedValue)).Age;
- tbxNewSurName.Text = ((Employee)(lstUpdatePerson.SelectedValue)).SurName;
- tbxNewAge.Text = ((Employee)(lstUpdatePerson.SelectedValue)).Age.ToString();
Finishes modification to be executed, the initial application screen, add such a button to be able to access the Finddata screen created previously. We modify the XAML code how he follows.
- <Page x:Class="SqlLite_Sample.MainPage"
- xmlns="http://schemas.microsoft.com/winfx/2006/xaml/presentation"
- xmlns:x="http://schemas.microsoft.com/winfx/2006/xaml"
- xmlns:local="using:SqlLite_Sample"
- xmlns:d="http://schemas.microsoft.com/expression/blend/2008"
- xmlns:mc="http://schemas.openxmlformats.org/markup-compatibility/2006"
- mc:Ignorable="d"
- Background="{ThemeResource ApplicationPageBackgroundThemeBrush}">
- <Grid x:Name="LayoutRoot">
- <Grid.ChildrenTransitions>
- <TransitionCollection>
- <EntranceThemeTransition/>
- </TransitionCollection>
- </Grid.ChildrenTransitions>
- <Grid.RowDefinitions>
- <RowDefinition Height="Auto"/>
- <RowDefinition Height="*"/>
- </Grid.RowDefinitions>
- <!-- Pannello del titolo -->
- <StackPanel Grid.Row="0" Margin="19,0,0,0">
- <TextBlock Text="Sqlite sample" Style="{ThemeResource TitleTextBlockStyle}" Margin="0,12,0,0"/>
- <TextBlock Text="Main page" Margin="0,-6.5,0,26.5" Style="{ThemeResource HeaderTextBlockStyle}" CharacterSpacing="{ThemeResource PivotHeaderItemCharacterSpacing}"/>
- </StackPanel>
- <!--TODO: il contenuto deve essere inserito all'interno della seguente griglia-->
- <Grid Grid.Row="1" x:Name="ContentRoot" Margin="19,9.5,19,0">
- <StackPanel>
- <Button x:Name="btnInsertSample" Content="Insert sample page" Tapped="btnInsertSample_Tapped" Width="300"/> <Button x:Name="btnUpdateSample" Content="Update sample page" Tapped="btnUpdateSample_Tapped" Width="300"/> <Button x:Name="btnDeleteSample" Content="Delete sample page" Tapped="btnDeleteSample_Tapped" Width="300"/>
- <Button x:Name="btnFindSample" Content="Find sample page" Tapped="btnFindSample_Tapped" Width="300"/>
- </StackPanel>
- </Grid>
- </Grid>
- </Page>
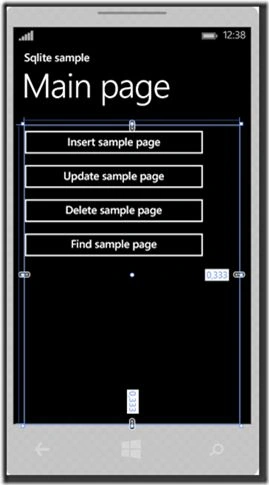
Image 1.6 The modified Main page screen.
Ended the modification to the graphic part, we can proceed with adding the tapped event of the new button Find sample page. I feel F7, entered the code editor we add the code following at once under the event tapped btnDeleteSample_Tapped.
- private void btnFindSample_Tapped(object sender, TappedRoutedEventArgs e){ Frame.Navigate(typeof(Finddata));}

Image 1.7 The Insert page screen with the first inserted user.
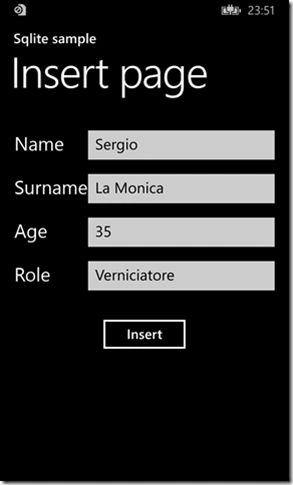
Image 1.8 The Insert page screen with the second inserted user.
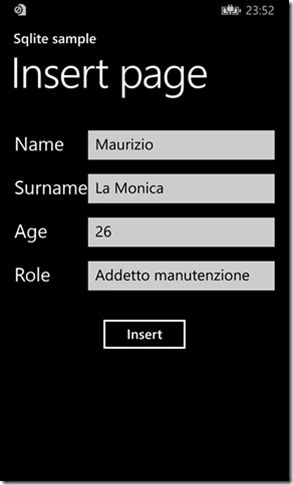
Image 1.9 The Insert page screen with third inserted user.
I have inserted these three users in sequence and their information has been memorized inside the tables Employee and Job inside the database people.db. Ended the data input, we go back to the main screen and do a tap on button Find sample page. When we are in the research screen, will see that for pre-defined setting the research is selected for name. We leave so the settings and type in inside the TextBox control the name of a user whom we have inserted previously. Ended the insertion, we do a tap on button Find and if it is found the correspondence when we will be look in the Result screen we will be the information on the user whom we have chosen for the research, we will differently not show anything. I will insert the name "Carmelo", and this and the result of the research.
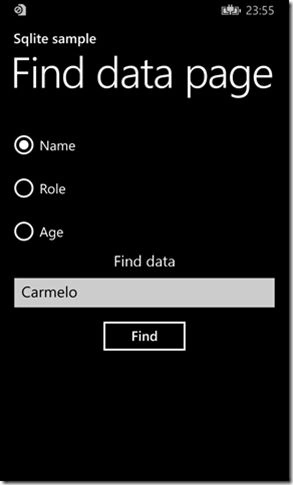
Image 1.10 The Find screen dates page with the research for name.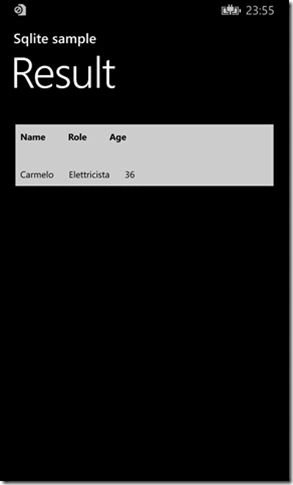
Image 1.11 The executed research for name Result screen.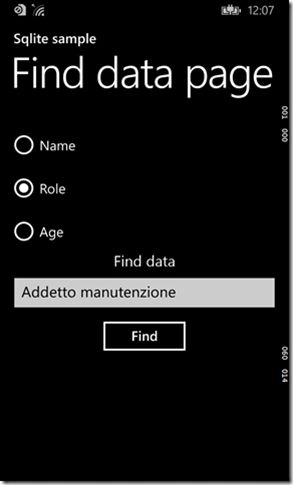
Image 1.12 The Find screen dates page with the research for role.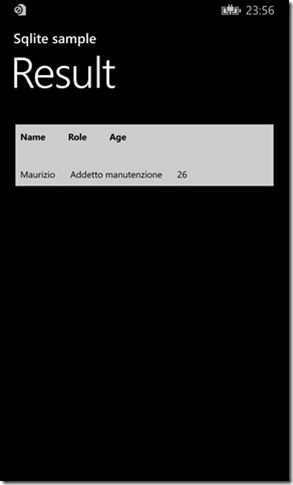
Image 1.13 The executed research for role Result screen.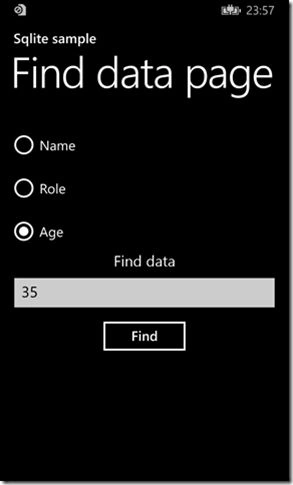
Image 1.14 The Find screen dates page with the research for age.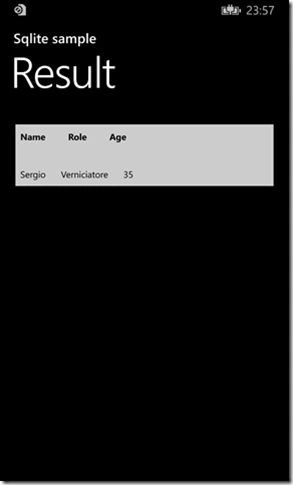
Image 1.15 The research for executed age Result screen.
All the possible research combinations have been tried, for name, role and age, with the results that we were expecting in the result screen, everything by the FindForName method that we have inserted in the class DatabaseManagement. There is still a functionality to be tried, that is update of the information that we have inserted. We turn in the main screen and do a tap Update sample page, entered the screen we will show all the information on the users in the ListBox control. We do a tap on an item and TextBox will be increased the value submitting except for that of the duty as visible in the following figures.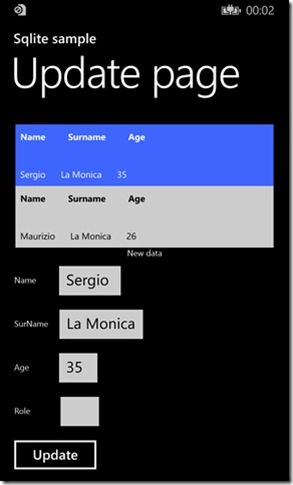
Image 1.16 The Update page screen after the selection of an item on the ListBox control.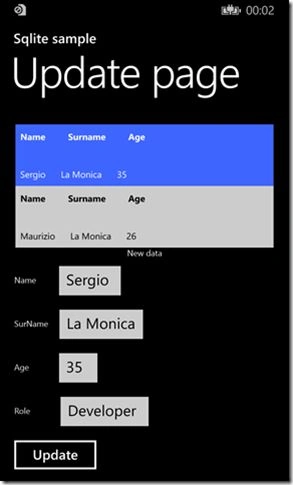
Image 1.17 The Update page screen after the modification of the role with Developer value.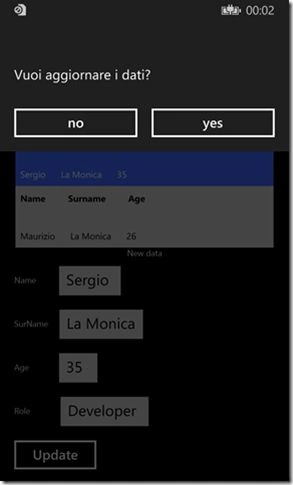
Image 1.18 The Update page screen with a MessageDialog of data updating confirmation.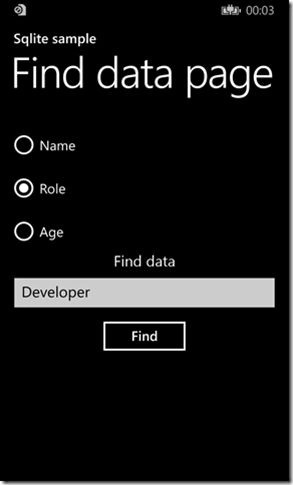
Image 1.19 The Find screen dates page with the selection of research set up for role.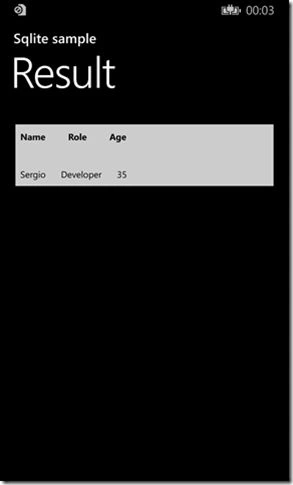
Image 1.20 The finished research Result screen.
And been modified the role from Verniciatore To Developer and have executed a piece of research later specifying in the TextBox control of the Find screen he dates page the term "Developer", and in the Result screen we show the information based on the wished search criteria.
Conclusion
In this second part, we have modified the project of the first article depending on demands, inserted a new FindForName called method in the class DatabaseManagement, created two new screens, that is Finddata page and Result page, created two classes Job and RoleUser, the first to be able to save all what that regards the user's role, the second to show the research results, finally have seen as execute a piece of research inside the tables in a Sqlite Database moving however in content of the tables in two collections, since how I previously dictate the Sqlite-net does not support all the Linq Extension method and relationships among tables. In the next article will see as is possible insert, remove and bring up to date several data simultaneously, exploiting some of the methods than the bookshop SqliteNet places at disposal of us developers.
Carmelo La MonicaPosted Apr 27, 2015, 4:20 PM
Thanks to all !
Karthik Muthu KaruppanPosted Apr 27, 2015, 10:43 AM
Nice
Sibeesh VenuPosted Apr 27, 2015, 9:04 AM
Good one
DhanasekarPosted Apr 27, 2015, 2:12 AM
Good one
Santhakumar MunuswamyPosted Apr 26, 2015, 11:42 PM
Thanks for nice article
NitinPosted Apr 26, 2015, 12:59 PM
good one
Sourabh SomaniPosted Apr 26, 2015, 5:52 AM
Wow nice article