

This article explains how to store HTML form data to Microsoft Excel using a VBScript.
Step 1
- Start the Excel application.
- Create Header label text for each column as in the following diagram.
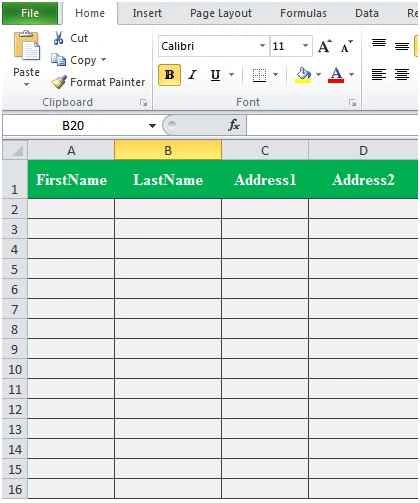
Figure 1: Data Column Header
- Save the Workbook with file extension “xlsx”.
- Open Notepad.
- Add the following code.
- <! DOCTYPE html>
- <Html>
- <Head>
- <script language="vbscript" type="text/vbscript">
- Sub Sample ()
- Dim iRow
- Set objExcel = CreateObject ("Excel. Application")
- Set objWorkbook = objExcel.Workbooks.Open ("C:\Users\Karthikeyan.K\Desktop\Book1.xlsx")
- objExcel.Application.Visible = True
- ObjWorkbook.Windows (1).Visible = True
- Set XlSheet =objWorkbook.Sheets (1)
- XlSheet.Activate
- iRow = 1
- With objExcel
- Do while .Cells (iRow, 1).value <> ""
- .Cells (iRow, 1).activate
- iRow = iRow + 1
- Loop
- .Cells (iRow, 1).value=Document.GetElementsByName ("fname") (0).Value
- .Cells (iRow, 2).value=Document.GetElementsByName ("lname") (0).Value
- .Cells (iRow, 3).value=Document.GetElementsByName ("Add1") (0).Value
- .Cells (iRow, 4).value=Document.GetElementsByName ("Add2") (0).Value
- MsgBox "Data Added Successfully”, vbinformation
- Document.GetElementsByName ("fname") (0).Value=""
- Document.GetElementsByName ("lname") (0).Value=""
- Document.GetElementsByName ("Add1") (0).Value=""
- Document.GetElementsByName ("Add2") (0).Value=""
- End With
- ObjWorkbook. Save
- ObjWorkbook. Close
- Set objWorkbook = Nothing
- Set objExcel = Nothing
- End Sub
- </script>
- <style type="text/css">
- fieldset {
- border: #00cc00 2px solid;
- padding: 10px;
- color: green;
- </style>
- <body
- <form>
- <fieldset>
- <legend>Csharpcorner</legend>
- <center>
- <img src="C:\Users\Karthikeyan.K\Desktop\Add-Male-User.png" alt="Mountain View"><br>
- First name:<br>
- <input type="text" name="fname" Value=""><br>
- Last name :< br>
- <input type="text" name="lname" Value=""><br>
- Address1 :< br>
- <input type="text" name="Add1" Value=""><br>
- Address2 :< br>
- <input type="text" name="Add2" Value=""><br>
- <br>
- <input type="button" onclick="Sample()" value="Submit" /><br>
- </center>
- </fieldset>
- <form>
- </body>
- </html>
- Save the file with the extension “.htm”.
Step 2
Follow the procedure to turn on or turn off VBScript in your Internet Explorer:
- Choose Internet Options from the Tools menu.
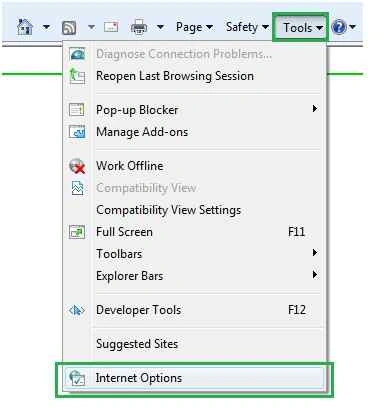
Figure 2
- Select the Security tab from the dialog box.
- Click the Custom Level button.
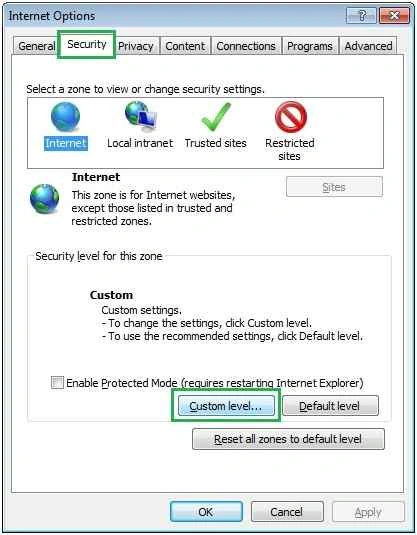
Figure 3
- Scroll down until you find the Scripting option.
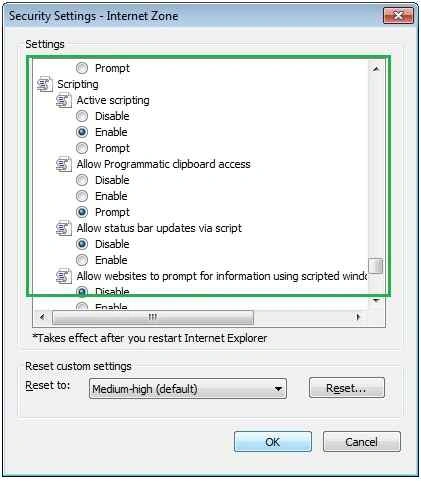
Figure 4
- Select the Enable radio button under Active scripting.
- Finally click OK and get out.
Output
- Open the HTML document.
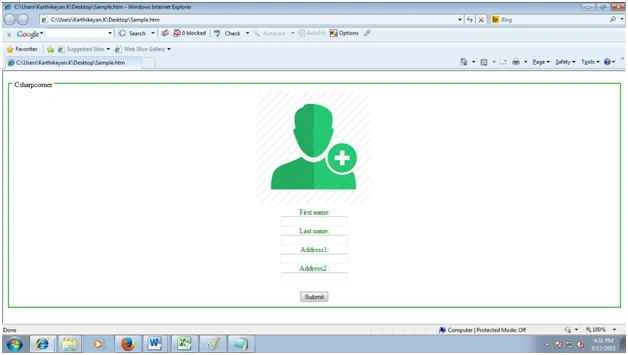
Figure 5: User Input Form
- Enter the data then press the Submit button.
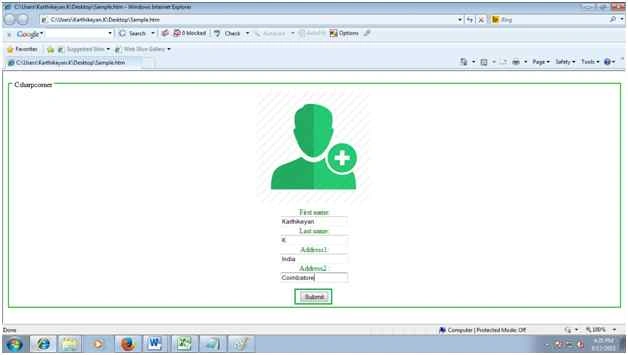
Figure 6: User input data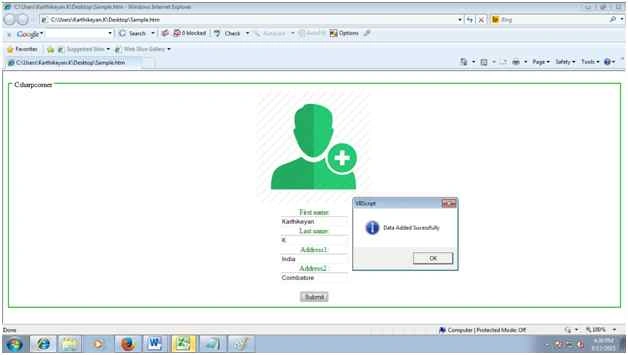
Figure 7: Data added successfully
- Open the Workbook to check sheet1's data.
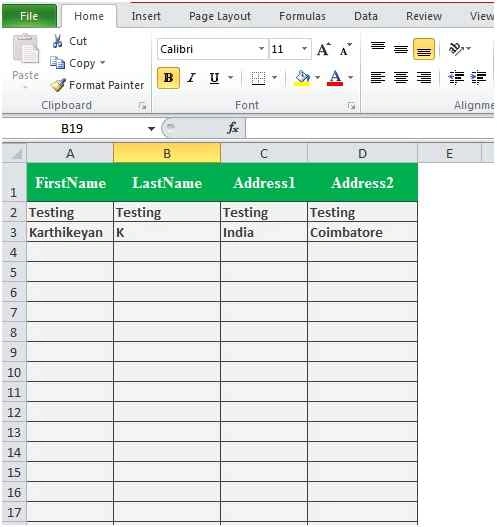
Figure 8: User data sheet
Conclusion
Thanks for reading! I hope you liked this article. Please provide your valuable suggestions.
anil giriPosted Jul 22, 2022, 10:33 AM
All cheaters
Suresh ShrestPosted May 13, 2022, 11:52 AM
HELLO I TRY BUT NOT WORKING .CAN YOU HELP THAT THINGS
Refund ShoppingPosted May 18, 2021, 3:50 PM
Fake code bro
Senzokuhle DlomoPosted Oct 23, 2019, 7:26 AM
It doesn't work, and i think you did that deliberately, bcs you never respond to anyone
kamagoni kranthiPosted Jul 17, 2019, 11:54 PM
Its not working
Mit VermaPosted Jun 14, 2019, 1:24 PM
I know at onClick is not properly defined...
Mit VermaPosted Jun 14, 2019, 1:22 PM
Not working bro it says - Try.html:56 Uncaught ReferenceError: Sample is not defined at HTMLInputElement.onclick (Try.html:56) onclick @ Try.html:56
RAMESH CHAUDHARIPosted Mar 16, 2019, 6:34 AM
Not Working Bro....
SonuPosted Jan 21, 2019, 6:27 AM
HI Karthik, This code is not working. Please help me
SonuPosted Jan 21, 2019, 6:27 AM
I am not able to save the data entered. have followed your steps ditto. however on clicking the save button nothing happens. please help.
Indira DasPosted Nov 17, 2018, 1:36 AM
I am not able to save the data entered. have followed your steps ditto. however on clicking the save button nothing happens. please help.
Stephen PodgórskiPosted Aug 17, 2018, 9:05 PM
Hi mate, I noticed in your code that you forgot to add a closing '>' on the opening Body tag, that might cause some issues for some browsers
Hardeep SinghPosted Aug 1, 2018, 8:57 AM
Hi karthikeyan, I am chartered accountant by profession having little learning attitude in programming. I need guidance on your above article. As I have taken all the steps given by you but still not successful. I hope you will help me I you get this message.
Simon SimsPosted Jun 28, 2018, 8:07 AM
Hi karthikeyan, I have used your coding for the basis of a more in-depth form which includes radio buttons and checkboxes but the only thing i can get to work is the one text field. None of the check boxes or radio buttons are working. Just wondered if you could advise please??? King Regards
yaswanth saiPosted May 30, 2018, 4:07 AM
This is not working is there any changes made to run this if any send to my gmail
Leo DsPosted Aug 24, 2017, 3:12 PM
Security permissions must be altered to allow saving to a local folder. If you are running this file directly from your machine consider renaming it to .HTA and look at HTML Applications on msdn.com.
ABDUL AZIZPosted Jun 10, 2017, 5:06 AM
Not workiNo, showing "error on page""
Kiran KumarPosted Feb 9, 2017, 5:46 AM
No working :( Please recheck and post!
Muhammed AsifPosted Jan 21, 2017, 1:34 AM
Not working.Please do recheck your code
Nimish GuptaPosted Dec 20, 2016, 7:54 AM
Not working for me, let me know how to make this work
Nagendra kovvadaPosted Dec 4, 2016, 2:00 PM
Hiii..Sir..This was not working..please help or please mail me the working code to [email protected]
Prem KumarPosted Jun 13, 2016, 3:24 AM
I need a vb script code to read date from excel sheet and write it to html. Could you help me in this?
Prem KumarPosted Jun 13, 2016, 3:23 AM
Hi Karthi,
SakthiIsaiBharathi SamundeeswariPosted May 26, 2016, 1:04 PM
Nice One Sir. I really need your help on my project. can we discuss offline ?
Najihah NasimPosted May 4, 2016, 10:28 PM
i do try this but it does not work in my chrome, firefox, ie. can someone help me? why it is happen? i really need to connect html form with excel. thanks in advance.
Baskar DPosted Feb 1, 2016, 10:29 AM
Hi Karthi. But its wont work in Chrome. Ant tips
Gopi ChandPosted Oct 13, 2015, 11:25 AM
Very helpful
nitin sonkhlaPosted Oct 11, 2015, 5:53 PM
Hey, thanks for the efforts. I tried to replicate but it dint work. i even downloaded the sample and tried but that dint work either. would you please check and let me know if it actully works.
Karthikeyan KPosted Aug 18, 2015, 11:26 PM
Thank you Santhakumar sir
Santhakumar MunuswamyPosted Aug 18, 2015, 2:28 PM
Good one
Karthikeyan KPosted Aug 18, 2015, 8:26 AM
Thank you Sibeesh sir
Sibeesh VenuPosted Aug 18, 2015, 8:15 AM
Nice Share
Karthikeyan KPosted Aug 18, 2015, 7:33 AM
Thank you Sandeep sir
Sandeep KumarPosted Aug 18, 2015, 7:31 AM
NIce article sir :)
Karthikeyan KPosted Aug 18, 2015, 5:41 AM
Thank you Gopi sir
Gopi ChandPosted Aug 18, 2015, 5:30 AM
Nice work
Karthikeyan KPosted Aug 18, 2015, 3:28 AM
Thank you Rakesh sir...
RakeshPosted Aug 18, 2015, 3:19 AM
Good work
Karthikeyan KPosted Aug 18, 2015, 3:10 AM
Thank you Gowtham sir
Gowtham KPosted Aug 18, 2015, 3:06 AM
Nice one
Karthikeyan KPosted Aug 18, 2015, 2:51 AM
Thank you Nilesh Jadav sir...
Nilesh JadavPosted Aug 18, 2015, 2:38 AM
Great Post sir
Karthikeyan KPosted Aug 18, 2015, 2:13 AM
Thank you Keyur Patel sir
Karthikeyan KPosted Aug 18, 2015, 2:13 AM
Thank you Vaikesh sir
Keyur PatelPosted Aug 18, 2015, 2:08 AM
Good One
Vaikesh K PPosted Aug 18, 2015, 1:52 AM
Good share
Karthikeyan KPosted Aug 18, 2015, 1:37 AM
Thank you Mohammed sir...
Karthikeyan KPosted Aug 18, 2015, 1:37 AM
Thank you Rajeesh sir...
Karthikeyan KPosted Aug 18, 2015, 1:37 AM
Thank you Vinodh sir..
Vinodh NarayananPosted Aug 18, 2015, 1:08 AM
nice one
Rajeesh MenothPosted Aug 18, 2015, 12:35 AM
Nice Share
Mohammed IbrahimPosted Aug 18, 2015, 12:28 AM
nice