

Introduction
Today, I am going to show you how to create a notification component, like jQuery toastr in Angular.
Prerequisites
Basic knowledge of Angular components, Services module, and TypeScript.
I will create a custom component for toastr notification. I'll show you how to use that component in your app. I have assumed that you have the basic knowledge of Angular and you have already created an Angular app. Here, I'll show how to create a component in your existing app.
Step 1
Create a folder named toastr-notification in your app's component folder. We will create all the components and services in this folder only.
Step 2
Create a TypeScript file with name 'toastr-notification.model.ts' in the newly created folder in the first step. And, write the code as below in the file. This file is used to create a simple model class to use in the next step.
- export class Notification {
- type: NotificationType;
- message: string;
- }
- export enum NotificationType {
- Success,
- Error,
- Info,
- Warning
- }
Step 3
Create a TypeScript file with the name 'toastr-notification.service.ts' in the toastr-notification folder and into it, paste the code shown below. This file will create the injectable service to show the notification.
Here, we have created the injectable service with observable method which will get the message and its type to show in notification.
- import { Injectable } from '@angular/core';
- import { Router, NavigationStart } from '@angular/router';
- import { Observable, Subject } from 'rxjs';
- import { Notification, NotificationType } from './toastr-notification.model';
- @Injectable()
- export class NotificationService {
- public subject = new Subject<Notification>();
- public keepAfterRouteChange = true;
- constructor(public router: Router) {
- // clear alert messages on route change unless 'keepAfterRouteChange' flag is true
- router.events.subscribe(event => {
- if (event instanceof NavigationStart) {
- if (this.keepAfterRouteChange) {
- // only keep for a single route change
- this.keepAfterRouteChange = false;
- } else {
- // clear alert messages
- this.clear();
- }
- }
- });
- }
- getAlert(): Observable<any> {
- return this.subject.asObservable();
- }
- success(message: string, keepAfterRouteChange = false) {
- this.showNotification(NotificationType.Success, message, keepAfterRouteChange);
- }
- error(message: string, keepAfterRouteChange = false) {
- this.showNotification(NotificationType.Error, message, keepAfterRouteChange);
- }
- info(message: string, keepAfterRouteChange = false) {
- this.showNotification(NotificationType.Info, message, keepAfterRouteChange);
- }
- warn(message: string, keepAfterRouteChange = false) {
- this.showNotification(NotificationType.Warning, message, keepAfterRouteChange);
- }
- showNotification(type: NotificationType, message: string, keepAfterRouteChange = false) {
- this.keepAfterRouteChange = keepAfterRouteChange;
- this.subject.next(<Notification>{ type: type, message: message });
- }
- clear() {
- this.subject.next();
- }
- }
Step 4
Create another TypeScript file with the name 'toastr-notification.component.ts' manually or you can also create a component using Angular CLI and paste the below code in that file. Here, we have created the Notification component and injected the Notification service created in the second step.
- import { Component, OnInit } from '@angular/core';
- import { Notification, NotificationType } from "./toastr-notification.model";
- import { NotificationService } from "./toastr-notification.service";
- @Component({
- selector: 'toastr-notification',
- templateUrl: 'toastr-notification.component.html',
- styleUrls: ['./toastr-notification.component.css']
- })
- export class NotificationComponent {
- notifications: Notification[] = [];
- constructor(public _notificationService: NotificationService) { }
- ngOnInit() {
- this._notificationService.getAlert().subscribe((alert: Notification) => {
- this.notifications = [];
- if (!alert) {
- this.notifications = [];
- return;
- }
- this.notifications.push(alert);
- setTimeout(() => {
- this.notifications = this.notifications.filter(x => x !== alert);
- }, 4000);
- });
- }
- removeNotification(notification: Notification) {
- this.notifications = this.notifications.filter(x => x !== notification);
- }
- /**Set css class for Alert -- Called from alert component**/
- cssClass(notification: Notification) {
- if (!notification) {
- return;
- }
- switch (notification.type) {
- case NotificationType.Success:
- return 'toast-success';
- case NotificationType.Error:
- return 'toast-error';
- case NotificationType.Info:
- return 'toast-info';
- case NotificationType.Warning:
- return 'toast-warning';
- }
- }
- }
Step 5
Create an HTML file with the name 'toastr-notification.component.html' and paste the below code. Here, we have created the template of our component.
- <div id="toast-container" class="toast-top-right" *ngFor="let item of notifications">
- <div class="toast {{cssClass(item) }}" aria-live="polite" style="display: block;">
- <button type="button" class="toast-close-button" role="button" (click)="removeNotification(item)">×</button>
- <div class="toast-message">
- {{item.message}}
- </div>
- </div>
- </div>
Step 6
Now, we will write some CSS to decorate our component. Create a file named 'toastr-notification.component.css' and paste the below code into it.
- .toast-title {
- font-weight: bold;
- }
- .toast-message {
- word-wrap: break-word;
- }
- .toast-message a,
- .toast-message label {
- color: #FFFFFF;
- }
- .toast-message a:hover {
- color: #CCCCCC;
- text-decoration: none;
- }
- .toast-close-button {
- position: relative;
- right: -0.3em;
- top: -0.3em;
- float: right;
- font-size: 20px;
- font-weight: bold;
- color: #FFFFFF;
- -webkit-text-shadow: 0 1px 0 #ffffff;
- text-shadow: 0 1px 0 #ffffff;
- opacity: 0.8;
- }
- .toast-close-button:hover,
- .toast-close-button:focus {
- color: #000000;
- text-decoration: none;
- cursor: pointer;
- opacity: 0.4;
- }
- /*Additional properties for button version
- iOS requires the button element instead of an anchor tag.
- If you want the anchor version, it requires `href="#"`.*/
- button.toast-close-button {
- padding: 0;
- cursor: pointer;
- background: transparent;
- border: 0;
- -webkit-appearance: none;
- }
- .toast-top-center {
- top: 0;
- right: 0;
- width: 100%;
- }
- .toast-bottom-center {
- bottom: 0;
- right: 0;
- width: 100%;
- }
- .toast-top-full-width {
- top: 0;
- right: 0;
- width: 100%;
- }
- .toast-bottom-full-width {
- bottom: 0;
- right: 0;
- width: 100%;
- }
- .toast-top-left {
- top: 12px;
- left: 12px;
- }
- .toast-top-right {
- top: 12px;
- right: 12px;
- }
- .toast-bottom-right {
- right: 12px;
- bottom: 12px;
- }
- .toast-bottom-left {
- bottom: 12px;
- left: 12px;
- }
- #toast-container {
- pointer-events: none;
- position: fixed;
- z-index: 99999;
- }
- #toast-container * {
- -moz-box-sizing: border-box;
- -webkit-box-sizing: border-box;
- box-sizing: border-box;
- }
- #toast-container > div {
- position: relative;
- overflow: hidden;
- margin: 0 0 6px;
- padding: 15px 15px 15px 50px;
- width: 300px;
- -moz-border-radius: 3px 3px 3px 3px;
- -webkit-border-radius: 3px 3px 3px 3px;
- border-radius: 3px 3px 3px 3px;
- background-position: 15px center;
- background-repeat: no-repeat;
- -moz-box-shadow: 0 0 12px #999999;
- -webkit-box-shadow: 0 0 12px #999999;
- box-shadow: 0 0 12px #999999;
- color: #FFFFFF;
- opacity: 0.8;
- }
- #toast-container > div.toast-custom {
- padding: 15px;
- color: #030303;
- }
- #toast-container > div.toast-custom .toast-close-button {
- color: #999999 !important;
- }
- #toast-container > :hover {
- -moz-box-shadow: 0 0 12px #000000;
- -webkit-box-shadow: 0 0 12px #000000;
- box-shadow: 0 0 12px #000000;
- opacity: 1;
- cursor: pointer;
- }
- #toast-container > .toast-info {
- background-image: url("data:image/png;base64,iVBORw0KGgoAAAANSUhEUgAAABgAAAAYCAYAAADgdz34AAAAAXNSR0IArs4c6QAAAARnQU1BAACxjwv8YQUAAAAJcEhZcwAADsMAAA7DAcdvqGQAAAGwSURBVEhLtZa9SgNBEMc9sUxxRcoUKSzSWIhXpFMhhYWFhaBg4yPYiWCXZxBLERsLRS3EQkEfwCKdjWJAwSKCgoKCcudv4O5YLrt7EzgXhiU3/4+b2ckmwVjJSpKkQ6wAi4gwhT+z3wRBcEz0yjSseUTrcRyfsHsXmD0AmbHOC9Ii8VImnuXBPglHpQ5wwSVM7sNnTG7Za4JwDdCjxyAiH3nyA2mtaTJufiDZ5dCaqlItILh1NHatfN5skvjx9Z38m69CgzuXmZgVrPIGE763Jx9qKsRozWYw6xOHdER+nn2KkO+Bb+UV5CBN6WC6QtBgbRVozrahAbmm6HtUsgtPC19tFdxXZYBOfkbmFJ1VaHA1VAHjd0pp70oTZzvR+EVrx2Ygfdsq6eu55BHYR8hlcki+n+kERUFG8BrA0BwjeAv2M8WLQBtcy+SD6fNsmnB3AlBLrgTtVW1c2QN4bVWLATaIS60J2Du5y1TiJgjSBvFVZgTmwCU+dAZFoPxGEEs8nyHC9Bwe2GvEJv2WXZb0vjdyFT4Cxk3e/kIqlOGoVLwwPevpYHT+00T+hWwXDf4AJAOUqWcDhbwAAAAASUVORK5CYII=") !important;
- }
- #toast-container > .toast-error {
- background-image: url("data:image/png;base64,iVBORw0KGgoAAAANSUhEUgAAABgAAAAYCAYAAADgdz34AAAAAXNSR0IArs4c6QAAAARnQU1BAACxjwv8YQUAAAAJcEhZcwAADsMAAA7DAcdvqGQAAAHOSURBVEhLrZa/SgNBEMZzh0WKCClSCKaIYOED+AAKeQQLG8HWztLCImBrYadgIdY+gIKNYkBFSwu7CAoqCgkkoGBI/E28PdbLZmeDLgzZzcx83/zZ2SSXC1j9fr+I1Hq93g2yxH4iwM1vkoBWAdxCmpzTxfkN2RcyZNaHFIkSo10+8kgxkXIURV5HGxTmFuc75B2RfQkpxHG8aAgaAFa0tAHqYFfQ7Iwe2yhODk8+J4C7yAoRTWI3w/4klGRgR4lO7Rpn9+gvMyWp+uxFh8+H+ARlgN1nJuJuQAYvNkEnwGFck18Er4q3egEc/oO+mhLdKgRyhdNFiacC0rlOCbhNVz4H9FnAYgDBvU3QIioZlJFLJtsoHYRDfiZoUyIxqCtRpVlANq0EU4dApjrtgezPFad5S19Wgjkc0hNVnuF4HjVA6C7QrSIbylB+oZe3aHgBsqlNqKYH48jXyJKMuAbiyVJ8KzaB3eRc0pg9VwQ4niFryI68qiOi3AbjwdsfnAtk0bCjTLJKr6mrD9g8iq/S/B81hguOMlQTnVyG40wAcjnmgsCNESDrjme7wfftP4P7SP4N3CJZdvzoNyGq2c/HWOXJGsvVg+RA/k2MC/wN6I2YA2Pt8GkAAAAASUVORK5CYII=") !important;
- }
- #toast-container > .toast-success {
- background-image: url("data:image/png;base64,iVBORw0KGgoAAAANSUhEUgAAABgAAAAYCAYAAADgdz34AAAAAXNSR0IArs4c6QAAAARnQU1BAACxjwv8YQUAAAAJcEhZcwAADsMAAA7DAcdvqGQAAADsSURBVEhLY2AYBfQMgf///3P8+/evAIgvA/FsIF+BavYDDWMBGroaSMMBiE8VC7AZDrIFaMFnii3AZTjUgsUUWUDA8OdAH6iQbQEhw4HyGsPEcKBXBIC4ARhex4G4BsjmweU1soIFaGg/WtoFZRIZdEvIMhxkCCjXIVsATV6gFGACs4Rsw0EGgIIH3QJYJgHSARQZDrWAB+jawzgs+Q2UO49D7jnRSRGoEFRILcdmEMWGI0cm0JJ2QpYA1RDvcmzJEWhABhD/pqrL0S0CWuABKgnRki9lLseS7g2AlqwHWQSKH4oKLrILpRGhEQCw2LiRUIa4lwAAAABJRU5ErkJggg==") !important;
- }
- #toast-container > .toast-warning {
- background-image: url("data:image/png;base64,iVBORw0KGgoAAAANSUhEUgAAABgAAAAYCAYAAADgdz34AAAAAXNSR0IArs4c6QAAAARnQU1BAACxjwv8YQUAAAAJcEhZcwAADsMAAA7DAcdvqGQAAAGYSURBVEhL5ZSvTsNQFMbXZGICMYGYmJhAQIJAICYQPAACiSDB8AiICQQJT4CqQEwgJvYASAQCiZiYmJhAIBATCARJy+9rTsldd8sKu1M0+dLb057v6/lbq/2rK0mS/TRNj9cWNAKPYIJII7gIxCcQ51cvqID+GIEX8ASG4B1bK5gIZFeQfoJdEXOfgX4QAQg7kH2A65yQ87lyxb27sggkAzAuFhbbg1K2kgCkB1bVwyIR9m2L7PRPIhDUIXgGtyKw575yz3lTNs6X4JXnjV+LKM/m3MydnTbtOKIjtz6VhCBq4vSm3ncdrD2lk0VgUXSVKjVDJXJzijW1RQdsU7F77He8u68koNZTz8Oz5yGa6J3H3lZ0xYgXBK2QymlWWA+RWnYhskLBv2vmE+hBMCtbA7KX5drWyRT/2JsqZ2IvfB9Y4bWDNMFbJRFmC9E74SoS0CqulwjkC0+5bpcV1CZ8NMej4pjy0U+doDQsGyo1hzVJttIjhQ7GnBtRFN1UarUlH8F3xict+HY07rEzoUGPlWcjRFRr4/gChZgc3ZL2d8oAAAAASUVORK5CYII=") !important;
- }
- #toast-container.toast-top-center > div,
- #toast-container.toast-bottom-center > div {
- width: 300px;
- margin: auto;
- }
- #toast-container.toast-top-full-width > div,
- #toast-container.toast-bottom-full-width > div {
- width: 96%;
- margin: auto;
- }
- .toast {
- background-color: #FFFFFF;
- pointer-events: auto;
- }
- .toast-success {
- background-color: #51A351;
- }
- .toast-error {
- background-color: #BD362F;
- }
- .toast-info {
- background-color: #2F96B4;
- }
- .toast-warning {
- background-color: #F89406;
- }
- .toast-progress {
- position: absolute;
- left: 0;
- bottom: 0;
- height: 4px;
- background-color: #000000;
- opacity: 0.4;
- }
- /*Responsive Design*/
- @media all and (max-width: 240px) {
- #toast-container > div {
- padding: 8px 8px 8px 50px;
- width: 11em;
- }
- #toast-container .toast-close-button {
- right: -0.2em;
- top: -0.2em;
- }
- }
- @media all and (min-width: 241px) and (max-width: 480px) {
- #toast-container > div {
- padding: 8px 8px 8px 50px;
- width: 18em;
- }
- #toast-container .toast-close-button {
- right: -0.2em;
- top: -0.2em;
- }
- }
- @media all and (min-width: 481px) and (max-width: 768px) {
- #toast-container > div {
- padding: 15px 15px 15px 50px;
- width: 25em;
- }
- }
Step 7
Our Toastr Notification component is almost ready. Now, we will create a module and will declare this component in that module. So, we can declare this module in any other module where we want to use this component or in 'app.module.ts' file.
- import { NgModule } from '@angular/core';
- import { BrowserModule } from '@angular/platform-browser';
- import { NotificationComponent} from './toastr-notification.component';
- import {NotificationService} from './toastr-notification.service';
- @NgModule({
- declarations: [
- NotificationComponent
- ],
- imports:[
- BrowserModule
- ],
- exports: [
- NotificationComponent
- ],providers:[
- NotificationService
- ]
- })
- export class NotificationModule
- {
- }
Step 8
Our Component is ready now. Let's import the module file created in the above step into our app.module.ts file.
Now, we can use our Notification component in any of the other components. To use this component in another component, we need to follow the following steps.
To use the component, we have to import the NotificationModule from 'toastr.notification.module.ts' file in app.module.ts.
Note
You can import NotificationModule in any module you want to use.
You can import NotificationModule in any module you want to use.
Step 9
Let's assume we are using this component in another component. To use the above-created component, we have to inject the service created above in the constructor of this component. See line no. 03 and 11 in the code below.
- import { Component } from '@angular/core';
- import { NotificationService } from '../shared/component/toastr-notifications/toastr-notification.service';
- @Component({
- selector: 'app-counter-component',
- templateUrl: './counter.component.html'
- })
- export class CounterComponent {
- constructor(private _notificationservice:NotificationService){
- }
- public showSuccessNotification(){
- this._notificationservice.success("This is the success message");
- }
- public showErrorNotification(){
- this._notificationservice.error("This is the error message");
- }
- }
Write a tag of toastr notification in your HTML file of the component where you want to use the notification.
- <toastr-notification></toastr-notification>
- <button (click)="showSuccessNotification()">Success Message</button>
- <button (click)="showErrorNotification()">Error Message</button>
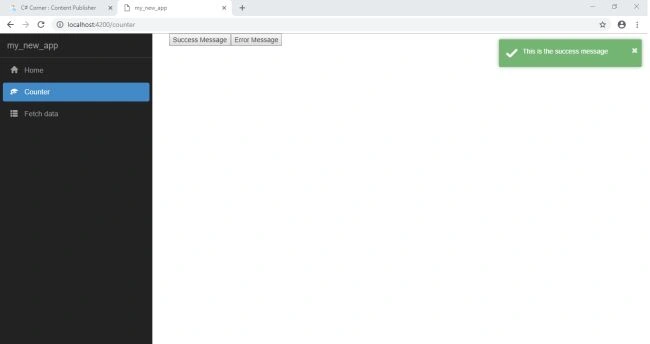
Now, run the app and click the button. You will see the notification as shown in the images below.
Image 1
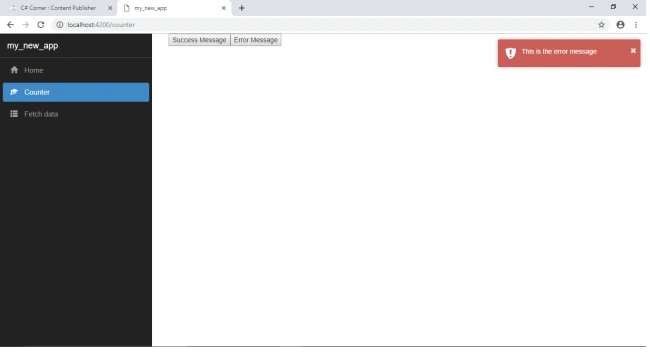
Image 2
Join the conversation! Your thoughts help the community grow.