

Introduction
In my recent MEAN stack project, I wanted to notify the end-user based on events. While researching further on this, I came across toastr.js. This library, I found to be very simple and easy to use. Importantly in today’s world of responsive sites, these notification are also responsive.
How to use toaster in short?
- Add a reference to toastr.js from CDN or from the downloaded package.
- Add a link to toastr.css and toaster-responsive.css to the HTML page.
- In JavaScript, to generate toaster notification use below command,
- While displaying these notifications, the toaster library provides us various options e.g. Toastr Type as Success, Warning, Info, Error, etc. And positions can also be decided in a simplistic manner. You can refer to detailed toaster options at toastr.js.
- Refer to the following section for the demonstration of toaster types and positions.
- Create HTML page, toastrsample.html, and copy-paste below code to it.
- <!DOCTYPE html>
- <html>
- <head>
- <meta http-equiv="content-type" content="text/html; charset=UTF-8">
- <script type="text/javascript" src="https://cdnjs.cloudflare.com/ajax/libs/jquery/2.1.4/jquery.min.js">
- </script>
- <scripttype="text/javascript" src="http://codeseven.github.com/toastr/toastr.js">
- </script>
- <link rel="stylesheet" type="text/css" href="http://codeseven.github.com/toastr/toastr.css">
- <link rel="stylesheet" type="text/css" href="http://codeseven.github.com/toastr/toastr-responsive.css">
- <script type="text/javascript" src="toastrsample.js">
- </script>
- <link rel="stylesheet" type="text/css" href="toastrsample.css">
- <title>How to Use Toastr</title>
- </head>
- <body>
- <h2>
- How to Use Toastr Notifications</h2>
- <div class="control-group" id="toastrTypeGroup">
- <div class="controls">
- <label>
- Toast Type</label>
- <label class="radio">
- <input type="radio" name="toasts" value="success" checked/>Success
- </label>
- <label class="radio">
- <input type="radio" name="toasts" value="info" />Info
- </label>
- <label class="radio">
- <input type="radio" name="toasts" value="warning" />Warning
- </label>
- <label class="radio">
- <input type="radio" name="toasts" value="error" />Error
- </label>
- </div>
- </div>
- <br/>
- <div class="control-group" id="toastrPositionGroup">
- <div class="controls">
- <label>
- Position</label>
- <label class="radio">
- <input type="radio" name="positions" value="toast-top-right" checked/>Top Right
- </label>
- <label class="radio">
- <input type="radio" name="positions" value="toast-bottom-right" />Bottom Right
- </label>
- <label class="radio">
- <input type="radio" name="positions" value="toast-bottom-left" />Bottom Left
- </label>
- <label class="radio">
- <input type="radio" name="positions" value="toast-top-left" />Top Left
- </label>
- <label class="radio">
- <input type="radio" name="positions" value="toast-top-full-width" />Top Full Width
- </label>
- <label class="radio">
- <input type="radio" name="positions" value="toast-bottom-full-width" />Bottom Full Width
- </label>
- <label class="radio">
- <input type="radio" name="positions" value="toast-top-center" />Top Center
- </label>
- <label class="radio">
- <input type="radio" name="positions" value="toast-bottom-center" />Bottom Center
- </label>
- </div>
- </div>
- <br/>
- <button type="button" class="btn" id="showtoast">
- Show Toastr Notification</button>
- </body>
- </html>
- Create JavaScript file (toastrsample.js) and add the following code,
- $(function()
- {
- $('#showtoast').click(function()
- {
- toastr.options =
- {
- "debug": false,
- "positionClass": $("#toastrPositionGroup input:radio:checked").val(),
- "onclick": null,
- "fadeIn": 300,
- "fadeOut": 100,
- "timeOut": 3000,
- "extendedTimeOut": 1000
- }
- var d = Date();
- toastr[$("#toastrTypeGroup input:radio:checked").val()](d, "Current Day & Time");
- });
- });
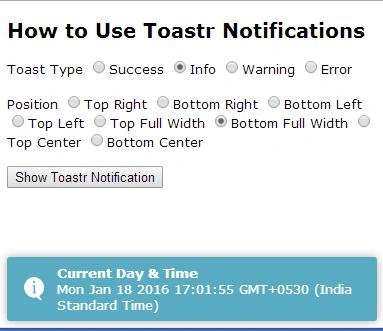
- Create Stylesheet file (toastrsample.css) and add the following code,After running the code and on click of button ‘Show Toastr Notification’, you should see toaster notifications appearing based on Toastr Type and Position you choose.
- body
- {
- font - family: Verdana;
- font - size: small;
- }
Refer the following screenshot for the same,
Rakesh ChopadaPosted Jul 19, 2022, 5:06 AM
It is not working
Kailash BhakuniPosted Oct 20, 2018, 2:52 AM
Thanks for this article. How can I implement toaster from back end (C#) if required. Please advise.
Asfend YarPosted Mar 14, 2016, 11:53 AM
good
Kumaresh RajalingamPosted Jan 19, 2016, 10:55 PM
Nice one
Santhakumar MunuswamyPosted Jan 19, 2016, 3:20 PM
Thanks for sharing
Vipul MalhotraPosted Jan 19, 2016, 8:49 AM
nice article
Shubham KumarPosted Jan 18, 2016, 11:45 PM
ohh nice one
Humayun Kabir MamunPosted Jan 18, 2016, 10:44 PM
Nice...
Pankaj Kumar ChoudharyPosted Jan 18, 2016, 10:31 PM
Useful information........ Thanks for Share.....