

Introduction
In this article you will how to create a TreeView Control in ASP.NET and how to use the properties of a TreeView Control.
TreeView Control
The TreeView Web control is useful to display hierarchical data in a tree structure. A TreeView is a collection of TreeNode objects.
The contents of the TreeView control can be specified directly in the control or bound to,
- XML file
- web.sitemap file
- Database table
Now, I am explaining how to create a TreeView control in ASP.NET with the contents for the TreeView control specified directly in the control and by using various properties how to apply formating to the TreeView control.
Procedure to create a TreeView Control in ASP.NET
Step 1
Open Microsoft Visual Studio then select "File" -> "New" -> "Project..." (Ctrl+Shift+N).

Step 2
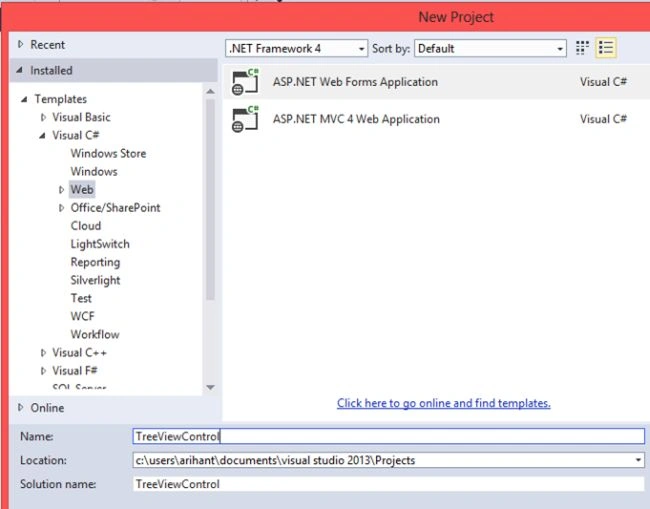
Add an ASP.NET Web Forms Application and give it the name TreeViewControl.
Step 3
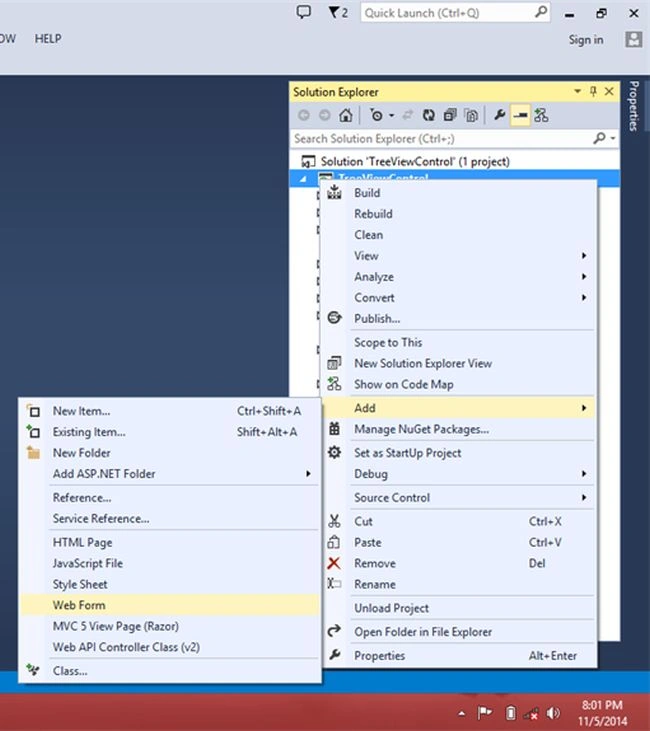
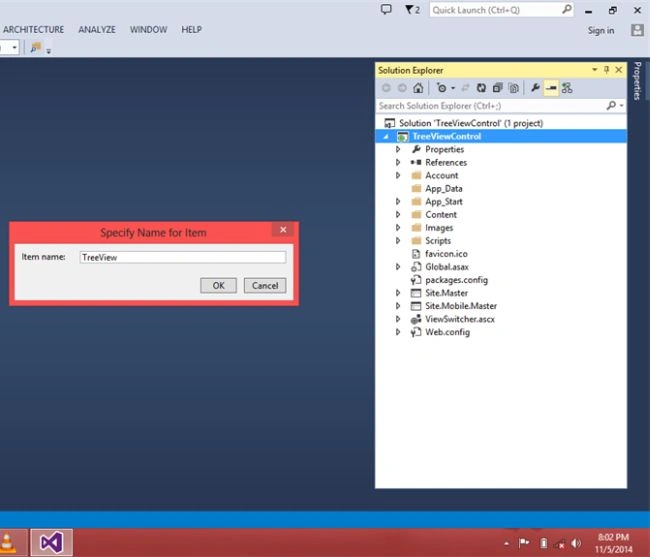
Open Solution Explorer then add a Webform and give it a name such as "TreeView.aspx".
Step 4
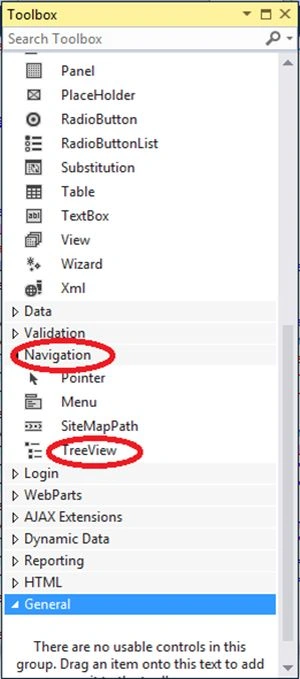
Now drag and drop a TreeViewControl from the ToolBox.
And after adding a TreeView you will see the following code:
- <%@ Page Language="C#" AutoEventWireup="true" CodeBehind="TreeView.aspx.cs" Inherits="TreeViewControl.TreeView" %>
- <!DOCTYPE html>
- <html xmlns="http://www.w3.org/1999/xhtml">
- <head runat="server">
- <title></title>
- </head>
- <body>
- <form id="form1" runat="server">
- <div style="font-family: Arial">
- <asp:TreeView runat="server" ID="TreeView1">
- </asp:TreeView>
- </div>
- </form>
- </body>
- </html>
Step 5
Write the following code inside the <Nodes></Nodes> element and create Nodes of the TreeView in the "TreeView.aspx" page as in the following:
- <%@ Page Language="C#" AutoEventWireup="true" CodeBehind="TreeView.aspx.cs" Inherits="TreeViewControl.TreeView" %>
- <!DOCTYPE html>
- <html xmlns="http://www.w3.org/1999/xhtml">
- <head runat="server">
- <title></title>
- </head>
- <body>
- <form id="form1" runat="server">
- <div style="font-family: Arial">
- <asp:TreeView runat="server" ID="TreeView1">
- <Nodes>
- <asp:TreeNode Text="Home" NavigateUrl="~/Home.aspx" Target="_blank"/>
- <asp:TreeNode Text="Employee" NavigateUrl="~/Employee.aspx" Target="_blank">
- <asp:TreeNode Text="Upload Resume" NavigateUrl="~/Upload_Resume.aspx" Target="_blank" />
- <asp:TreeNode Text="Edit Resume" NavigateUrl="~/Edit_Resume.aspx" Target="_blank" />
- <asp:TreeNode Text="View Resume" NavigateUrl="~/View_Resume.aspx" Target="_blank" />
- </asp:TreeNode>
- <asp:TreeNode Text="Employer" NavigateUrl="~/Employer.aspx" Target="_blank">
- <asp:TreeNode Text="Upload Job" NavigateUrl="~/Upload_Job.aspx" Target="_blank" />
- <asp:TreeNode Text="Edit Job" NavigateUrl="~/Edit_Job.aspx" Target="_blank" />
- <asp:TreeNode Text="View Job" NavigateUrl="~/View_Job.aspx" Target="_blank" />
- </asp:TreeNode>
- <asp:TreeNode Text="Admin" NavigateUrl="~/Admin.aspx" Target="_blank">
- <asp:TreeNode Text="Add User" NavigateUrl="~/Add_User.aspx" Target="_blank" />
- <asp:TreeNode Text="Edit User" NavigateUrl="~/Edit_Use.aspx" Target="_blank" />
- <asp:TreeNode Text="View User" NavigateUrl="~/View_User.aspx" Target="_blank" />
- </asp:TreeNode>
- </Nodes>
- </asp:TreeView>
- </div>
- </form>
- </body>
- </html>

Now we can expand and colapse the TreeView like the following image.
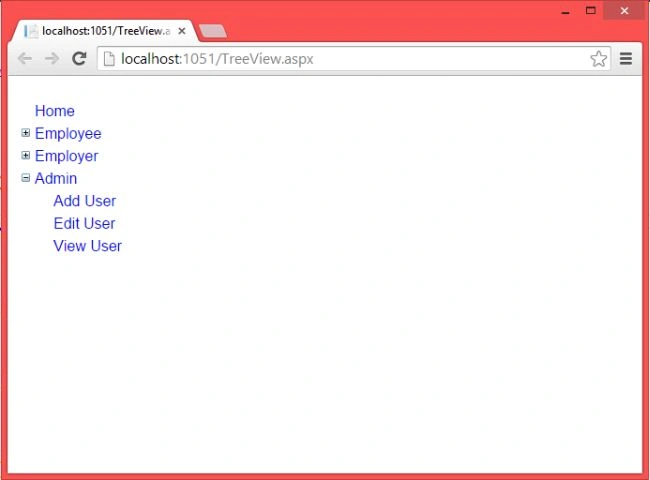
Now before going further we add one new webform and specify the name as "Home.aspx" for the Home link of the TreeView.


Write the following code for the Home Page at Home.aspx.
- <%@ Page Language="C#" AutoEventWireup="true" CodeBehind="Home.aspx.cs" Inherits="TreeViewControl.Home" %>
- <!DOCTYPE html>
- <html xmlns="http://www.w3.org/1999/xhtml">
- <head runat="server">
- <title></title>
- </head>
- <body>
- <form id="form1" runat="server">
- <div>
- <asp:Label ID="HomePage" runat="server" Text="Wellcome To Home Page" BackColor="Yellow" ForeColor="#000099"></asp:Label>
- </div>
- </form>
- </body>
- </html>
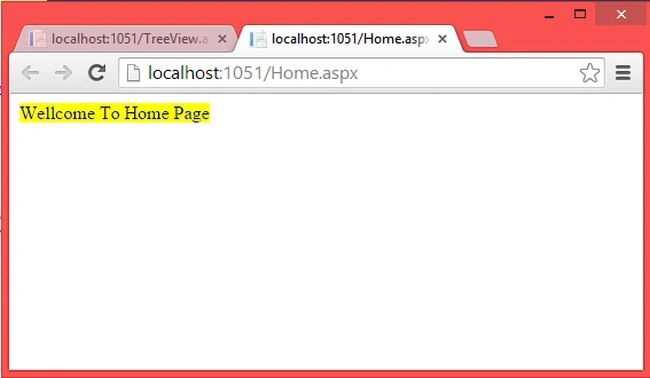
Now you can see that the TreeNode object has several attributes.
- <asp:TreeNode Text="Home" NavigateUrl="~/Home.aspx" Target="_blank"/>
Now notice that we have specified the Text attribute to display TreeView text.
The NavigateUrl attribute is the page to which you will navigate to when you click on the link on the TreeView.
We specified the Target attribute by which, when we click on the Home link, it is opening the Home Page but in a new window it is possible because we are using the Target attribute.
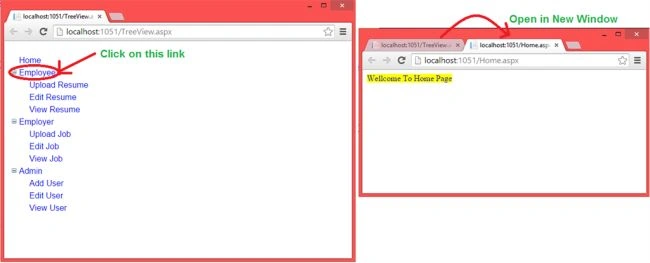
So finally we added content to the TreeView Control directly inside the control itself.
Now again use the following procedure and create more pages for Employee, Employer and Admin.
Step 1
Add a Webform and give it a name such as Employee:
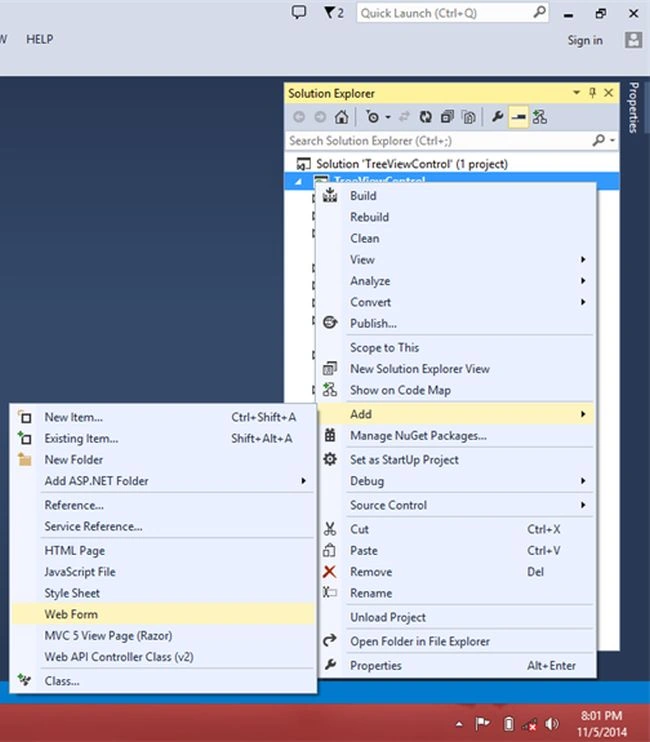

Step 2
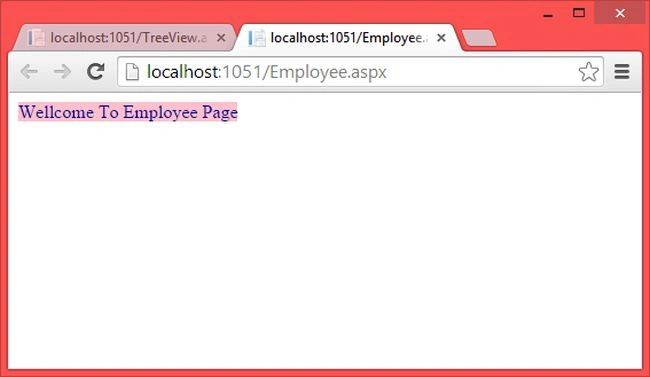
Now write the following code and see the output when clicking on the Employee link on the TreeView.
- <%@ Page Language="C#" AutoEventWireup="true" CodeBehind="Employee.aspx.cs" Inherits="TreeViewControl.Employee" %>
- <!DOCTYPE html>
- <html xmlns="http://www.w3.org/1999/xhtml">
- <head runat="server">
- <title></title>
- </head>
- <body>
- <form id="form1" runat="server">
- <div>
- <asp:Label ID="EmployeePage" runat="server" Text="Wellcome To Employee Page" BackColor="Pink" ForeColor="#000099"></asp:Label>
- </div>
- </form>
- </body>
- </html>
Step 3
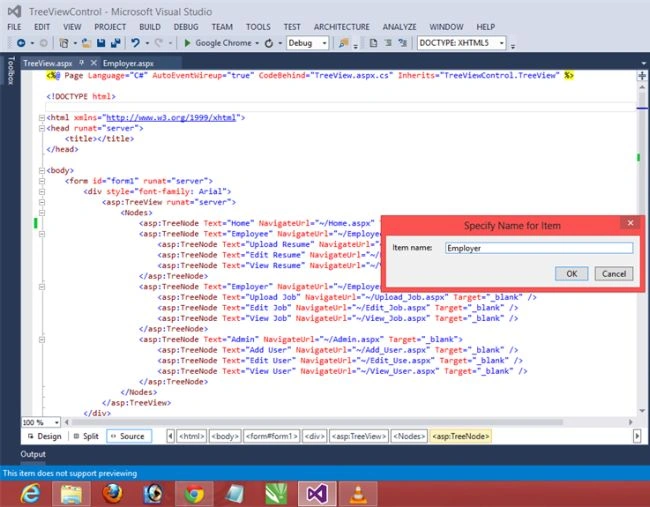
Add a Webform and give it a name such as Employer as in the following:

Step 4
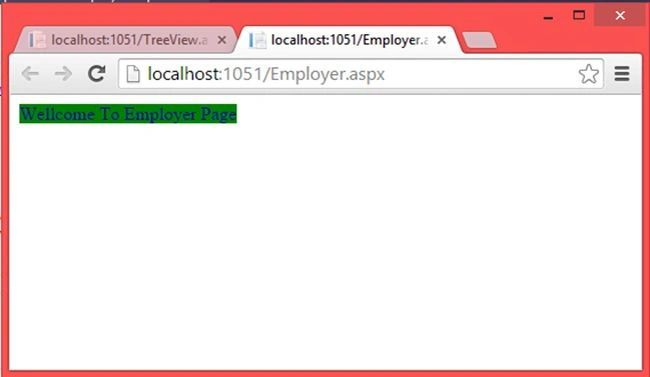
Now write the following code and see the output when the Employer link of the TreeView is clicked.
- <%@ Page Language="C#" AutoEventWireup="true" CodeBehind="Employer.aspx.cs" Inherits="TreeViewControl.Employer" %>
- <!DOCTYPE html>
- <html xmlns="http://www.w3.org/1999/xhtml">
- <head runat="server">
- <title></title>
- </head>
- <body>
- <form id="form1" runat="server">
- <div>
- <asp:Label ID="EmployerPage" runat="server" Text="Wellcome To Employer Page" BackColor="Green" ForeColor="#000099"></asp:Label>
- </div>
- </form>
- </body>
Step 5
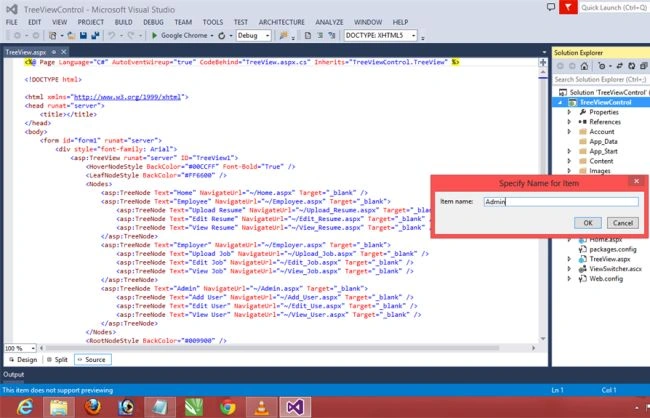
Add a Webform and give it a name such as Admin.

Step 6
Now write the following code and see the output when the Admin link of the TreeView is clicked.
- <%@ Page Language="C#" AutoEventWireup="true" CodeBehind="Admin.aspx.cs" Inherits="TreeViewControl.Admin" %>
- <!DOCTYPE html>
- <html xmlns="http://www.w3.org/1999/xhtml">
- <head runat="server">
- <title></title>
- </head>
- <body>
- <form id="form1" runat="server">
- <div>
- <asp:Label ID="AdminPage" runat="server" Text="Wellcome To Admin Page" ForeColor="#000099" BackColor="#00CCFF"></asp:Label>
- </div>
- </form>
- </body>
- </html>
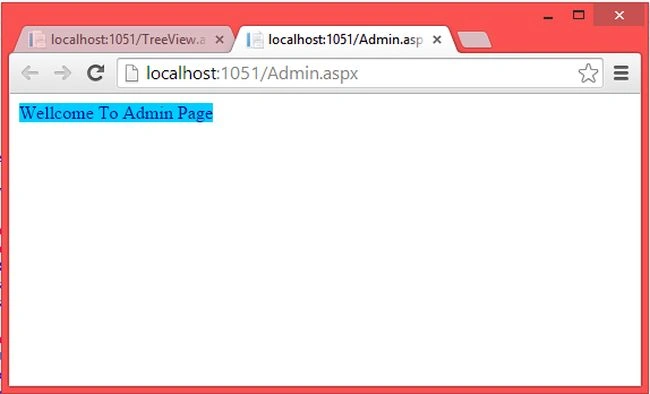
Similarly we can create all the pages that we are using in the TreeView link.
To configure the look and feel of the TreeView control, the following styles can be used.
- HoverNodeStyle
- LeafNodeStyle
- RootNodeStyle
- SelectedNodeStyle and so on.
Now we will see how to apply these styles for the TreeView.
Here we want that when we mouseover on links of the TreeView the background color of the nodes will change and the font will also change to bold.
Step 1
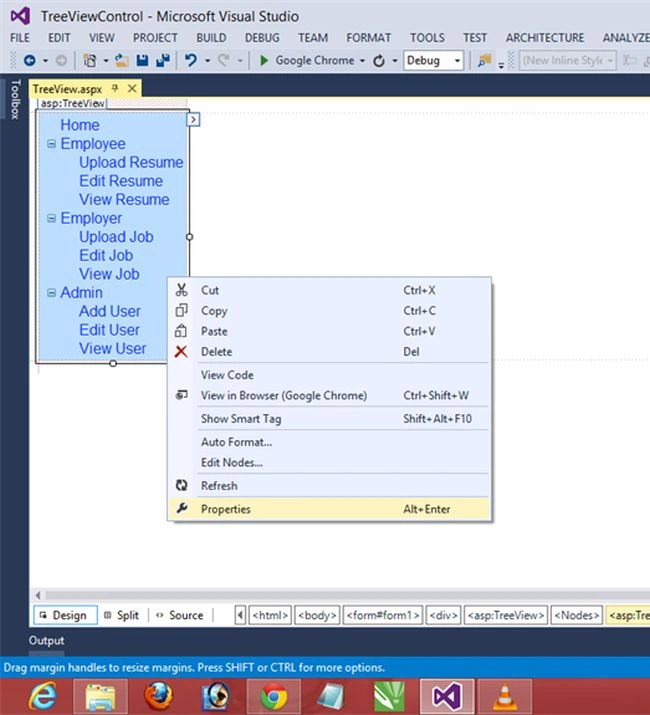
Go to the design part of the Webform then in the Open properties of the TreeView set the following properties.
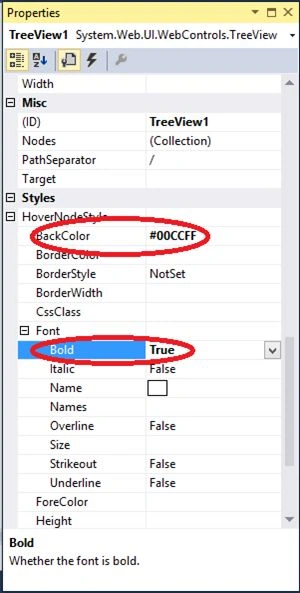
Now see the output:

Step 2
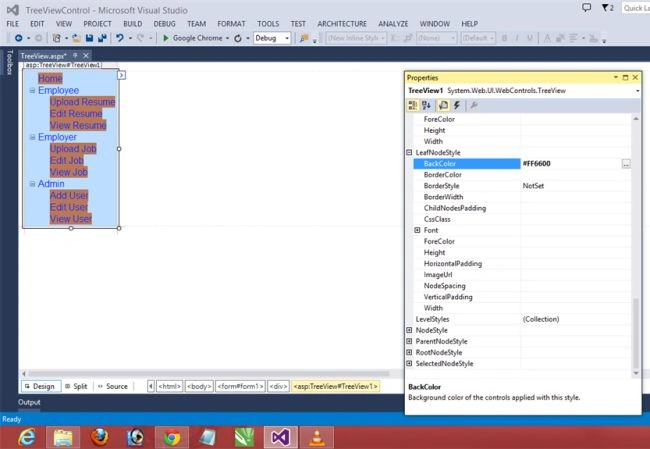
Now we want to apply LeafNodeStyle, LeafNodes are that have no childrens.
So go to the properties and set the background color to Orange of LeafNodes.
Step 3
Now we want to apply a RootNodeStyle. On the properties window specify the background color Green of RootNodes and after running the project see the following output of the TreeView.
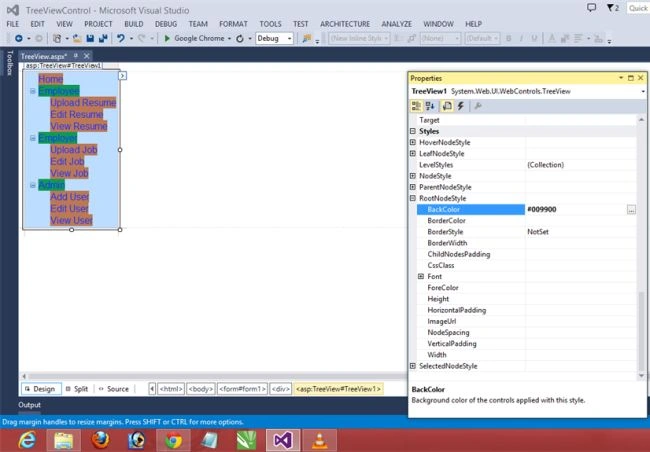

Now after applying the styles of the TreeView the final code will be,
- <%@ Page Language="C#" AutoEventWireup="true" CodeBehind="TreeView.aspx.cs" Inherits="TreeViewControl.TreeView" %>
- <!DOCTYPE html>
- <html xmlns="http://www.w3.org/1999/xhtml">
- <head runat="server">
- <title></title>
- </head>
- <body>
- <form id="form1" runat="server">
- <div style="font-family: Arial">
- <asp:TreeView runat="server" ID="TreeView1">
- <HoverNodeStyle BackColor="#00CCFF" Font-Bold="True" />
- <LeafNodeStyle BackColor="#FF6600" />
- <Nodes>
- <asp:TreeNode Text="Home" NavigateUrl="~/Home.aspx" Target="_blank" />
- <asp:TreeNode Text="Employee" NavigateUrl="~/Employee.aspx" Target="_blank">
- <asp:TreeNode Text="Upload Resume" NavigateUrl="~/Upload_Resume.aspx" Target="_blank" />
- <asp:TreeNode Text="Edit Resume" NavigateUrl="~/Edit_Resume.aspx" Target="_blank" />
- <asp:TreeNode Text="View Resume" NavigateUrl="~/View_Resume.aspx" Target="_blank" />
- </asp:TreeNode>
- <asp:TreeNode Text="Employer" NavigateUrl="~/Employer.aspx" Target="_blank">
- <asp:TreeNode Text="Upload Job" NavigateUrl="~/Upload_Job.aspx" Target="_blank" />
- <asp:TreeNode Text="Edit Job" NavigateUrl="~/Edit_Job.aspx" Target="_blank" />
- <asp:TreeNode Text="View Job" NavigateUrl="~/View_Job.aspx" Target="_blank" />
- </asp:TreeNode>
- <asp:TreeNode Text="Admin" NavigateUrl="~/Admin.aspx" Target="_blank">
- <asp:TreeNode Text="Add User" NavigateUrl="~/Add_User.aspx" Target="_blank" />
- <asp:TreeNode Text="Edit User" NavigateUrl="~/Edit_Use.aspx" Target="_blank" />
- <asp:TreeNode Text="View User" NavigateUrl="~/View_User.aspx" Target="_blank" />
- </asp:TreeNode>
- </Nodes>
- <RootNodeStyle BackColor="#009900" />
- </asp:TreeView>
- </div>
- </form>
- </body>
Output of the final TreeView,
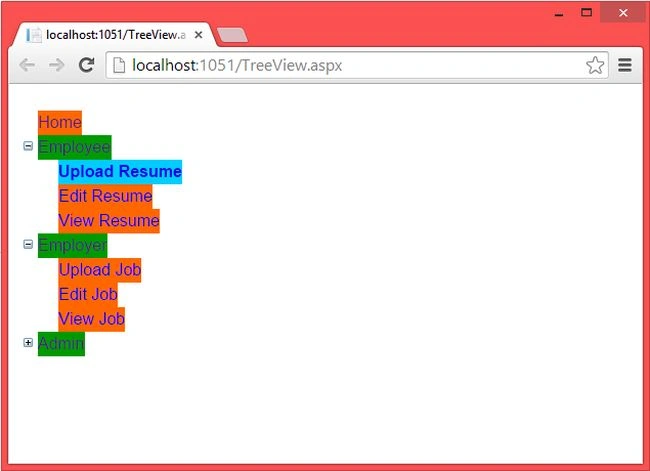
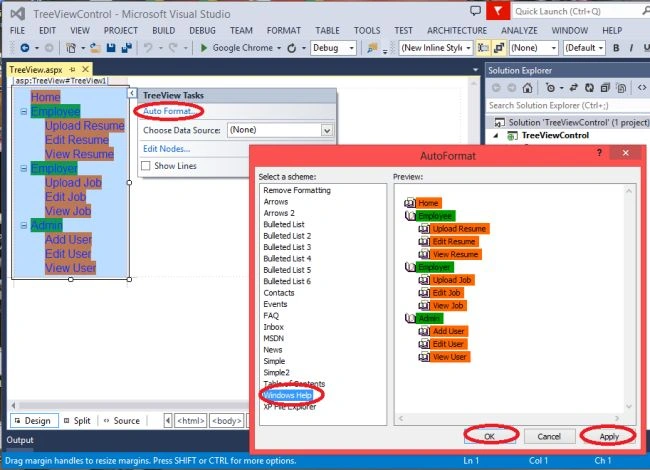
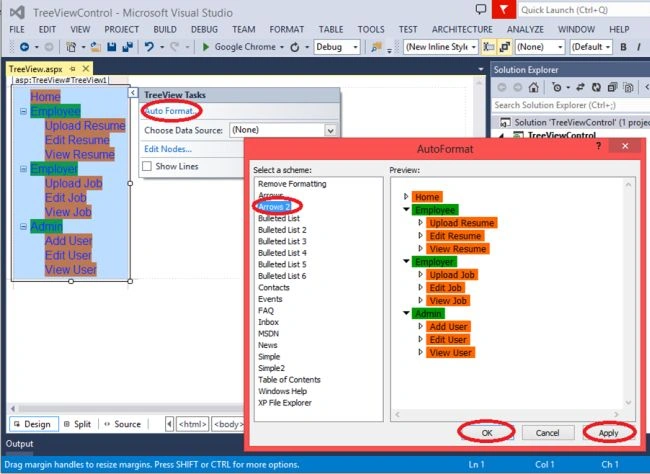
Now If we want to apply formatting to a TreeView then we can use the Autoformate property and apply various formatting.
Step 1
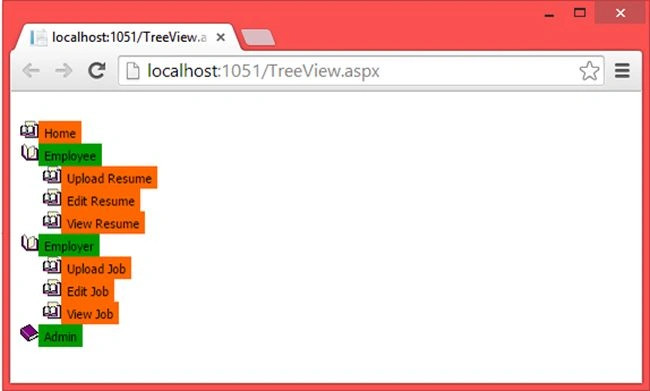
Use the Autoformate Property and apply a Windows Help format and see the output.
Step 2
Use the Autoformate Property and apply the Arrows2 format and see the output.

This is about the TreeView control in ASP.NET.
Naod AgerePosted Sep 6, 2018, 11:54 PM
Great! but I have two issues: how to render the web pages in the same page while using a master page, I don't want a new tab to be opened. And even if I used the SelectedNodeStyle property it is not selecting it. Wait your response. Thanks in advance.
Devendra KumarPosted Apr 9, 2016, 4:47 AM
nice
Sr KarthigaPosted Mar 8, 2016, 11:12 AM
good one
Sr KarthigaPosted Mar 8, 2016, 11:11 AM
nice explanation
Kumaresh RajalingamPosted Mar 6, 2016, 8:34 PM
good one
Kumaresh RajalingamPosted Mar 6, 2016, 8:34 PM
Nice explanation
rohit sharmaPosted Nov 4, 2015, 2:04 AM
Good Job, very clear and understandable post.. keep writing
MalathiPosted May 5, 2015, 4:39 AM
Please let me know how to access the selected node of a treeview control in external javascript function, so that I want to DeSelect while closing the child page which is loaded in an IFrame. Thanks in advance.
Manish Kumar ChoudharyPosted Nov 26, 2014, 6:31 AM
Nice One..