

Requirements
- Arduino UNO R3 or any other versions.
- Arduino IDE.
- Visual Studio of any version.
- LED light.
- Open the Arduino IDE if already installed or download and install it from this link.
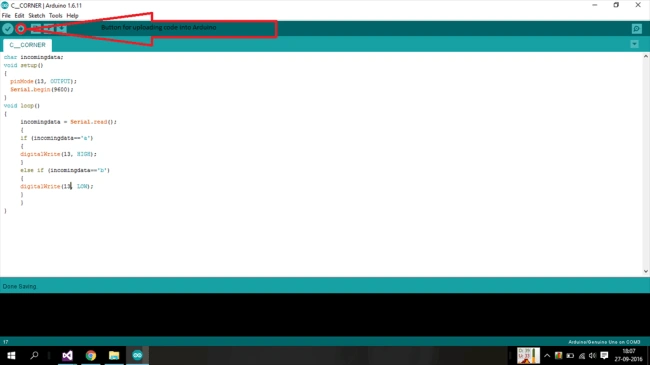
- Now, open the IDE and enter the following code in it.
- char incomingdata;
- void setup() {
- pinMode(13, OUTPUT);
- Serial.begin(9600);
- }
- void loop() {
- incomingdata = Serial.read(); {
- if (incomingdata == 'a') {
- digitalWrite(13, HIGH);
- } else if (incomingdata == 'b') {
- digitalWrite(13, LOW);
- }
- }
- }
- Save this sketch in any location and then verify the code.
- Now connect your Arduino board and upload this sketch into the board.
Step 2- Programming in Visual Studio
- Open Visual Studio and create a new Windows Form application with any name you want.
- Once you have created a new form application, open the designer window of Form1.
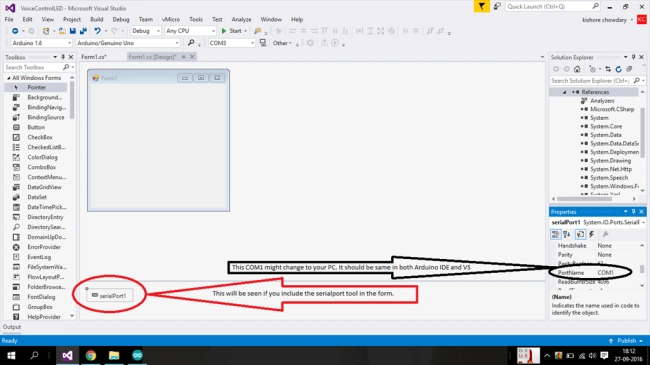
- Now, from the tools box, drag and drop the SerialPort tool into the form 1.
- This will help you communicate your program with the Arduino board.
- Now, you have to make your PC recognize your voice so that it can act as a command for the system,
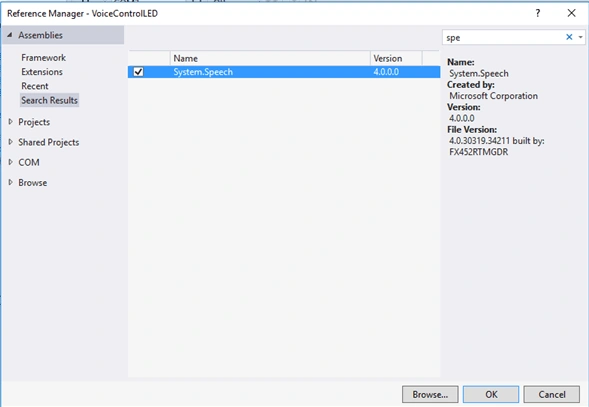
- For this, we need to include a reference file called System.Speech
- This will now help you to give a speech as an input to the computer.
Step 3 - Writing code for speech recognition
- We need to write an instance of code that will help the computer to recognize our voice input.
- So, first, we need to set a predefined command like LED ON for turning LED on and LED OFF for turning the LED off.
- Double click on the Form1 and paste the following code in there.
- using System;
- using System.Speech.Recognition;
- using System.Speech.Synthesis;
- using System.Windows.Forms;
- namespace VoiceControlLED {
- public partial class Form1: Form {
- public Form1() {
- InitializeComponent();
- }
- SpeechSynthesizer speechSynthesizerObj;
- SpeechRecognitionEngine recognizer = new SpeechRecognitionEngine();
- private void Form1_Load(object sender, EventArgs e) {
- SpeechRecognitionEngine sRecognize = new SpeechRecognitionEngine();
- Choices sList = new Choices();
- sList.Add(new string[] {
- "light on",
- "light off"
- });
- Grammar gr = new Grammar(new GrammarBuilder(sList));
- try {
- sRecognize.RequestRecognizerUpdate();
- sRecognize.LoadGrammar(gr);
- sRecognize.SpeechRecognized += sRecognize_SpeechRecognized;
- sRecognize.SetInputToDefaultAudioDevice();
- sRecognize.RecognizeAsync(RecognizeMode.Multiple);
- sRecognize.Recognize();
- } catch {
- return;
- }
- }
- private void sRecognize_SpeechRecognized(object sender, SpeechRecognizedEventArgs e) {
- {
- if (e.Result.Text == "light on") {
- serialPort1.Open();
- serialPort1.Write("a"); //send a to Arduino
- serialPort1.Close();
- } else if (e.Result.Text == "light off") {
- serialPort1.Open();
- serialPort1.Write("b"); //send b to Arduino
- serialPort1.Close();
- }
- }
- }
- }
- }
- The above code will quote an error in the serialPort1 if you don't include the serialport tool into the form1.
- Have a look over step 2 if you face this issue.
Step 4 - Connecting the LED in the Arduino board
- You must be cautious while you give connections to the board.
- A wrong connection might end up in wrecking your board.
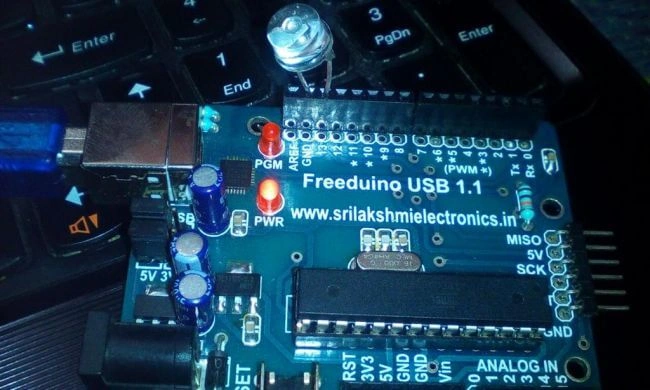
- Here, in the program for Arduino, we have used Pin 13.
- So, let us fix the LED in the 13th pin.
- Make sure to fix the Positive side of the LED in the 13th pin and the negative side of the LED in the GND pin.
- Have a look over the image.
Final Step - Executing and working with the LED
- Before you deploy and run your code, make sure that you made proper connection and coding.
- Now, simply run your application.
- When you say the command "Light On", the LED will glow.
- When you say the command "Light Off", the LED will turn off.
- That's it. You have made a lighting system that works with the voice commands.
bassel IssaPosted Sep 17, 2018, 4:44 PM
Nice work, however Arduino has to be attached with a PC all the time, and you r talking with the laptop not the iot device
Reshwanth SPosted Mar 29, 2017, 10:33 AM
Good one and easy to understand
Hussain PatelPosted Oct 31, 2016, 1:50 PM
Nice one. enjoyed reading and surely try this..
Sr KarthigaPosted Oct 3, 2016, 9:56 AM
Good one
Vignesh ManiPosted Sep 29, 2016, 12:39 PM
Nice One
Ankur VermaPosted Sep 29, 2016, 6:31 AM
Good...
Humayun Kabir MamunPosted Sep 29, 2016, 12:29 AM
Nice...