

Introduction
Hello and welcome to part 3 of "Understanding ASP.NET with Owin and Katana" series. In this series, we are learning about new Owin and Katana features in ASP.NET 4 and above. So, if you are new to OWIN, please go back and check other parts as well, where we discussed all the details about OWIN, its benefits, and why we should use it.
- Understanding ASP.Net - Part1- Owin and Katana Introduction
- Understanding ASP.Net -Part2- Building an Owin Pipeline
In this part, we will create a reusable OWIN middleware that we can configure and use in different projects and even in a different OWIN implementation other than Project Katana.
Creating Middleware
We will refactor our delegate based debugged middleware that we created in the last part and make it reusable and configurable by creating a middleware class. Now, create a folder named “Middlewares” where we’ll put our middleware classes.
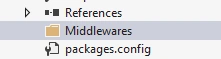
With this in place, create a class with name DebugMiddlware in Middlewares folder.
Before we turn this class into an OWIN middleware, I just want to mention that if you look around on the internet about how to implement a Katana base OWIN middleware with a reusable pattern, you’ll see a lot of people doing this by creating a class inheriting from base class OwinMiddleware. OwinMiddleware class comes with project Katana. Creating middleware using that pattern is fine but its only limitation is that you can’t use this middleware in different OWIN implementation other than project katana.
So, we are not going to use this pattern but instead, we’ll declare our very own AppFunc that takes IDictionary<string, object> and returns a Task.
- using AppFunc = Func<IDictionary<string, object>, Task>;
- public class DebugMiddleware
- {
- }
Now, we need to create constructor of this class that takes a single parameter of type AppFunc named as next.
- public class DebugMiddleware
- {
- private AppFunc _next;
- public DebugMiddleware(AppFunc next)
- {
- _next = next;
- }
- }
This next variable is used to invoke the next middleware in the pipeline so that’s why we named it to next.
Now, we need to invoke this middleware. To invoke a middleware, we need to create a public method named “Invoke” that takes IDictionary<string,object> and returns a Task . As it returns a task we’ll mark it with async keyword to tell the C# compiler this method will perform an asynchronous operation. The benefit of marking the method with async is that we don’t have to manually return the task instead await keyword will do the job for us.
- public async Task Invoke(IDictionary<string,object> environment)
- {
- //all the functionality goes here
- }
In the Invoke method, we’ll put all the logic of our middleware and will call the AppFunc to invoke the next middleware in pipeline. Since we are building a debug middleware, so let’s add some tracing logic that we have already implemented in our delegate based middleware in part2.
- public async Task Invoke(IDictionary<string,object> environment)
- {
- var owinContext = new OwinContext(environment);
- Debug.WriteLine("Request: " + owinContext.Request.Path);
- await _next(environment);//will forward request to next middleware
- /*at this point responce headers will be sent client
- /and response body is about to sent*/
- Debug.WriteLine("Responce Status Code:" + owinContext.Response.StatusCode);
- }
Now, the last thing is to plug in middleware into the pipeline using IAppBuilder from Startup.cs class
- public class Startup
- {
- /*IAppBuilder object is used to plugin middlewares
- to build a pipeline*/
- public void Configuration(IAppBuilder app)
- {
- app.Use<DebugMiddleware>();
- app.Use(async (context, nextMiddleWare) =>
- {
- await context.Response.WriteAsync("Peace be on world.");
- });
- }
- }
Finally, press F5 to run the app with debugger attached. To make sure our Debug middleware has run successfully, we need to see trace messages written to output window.
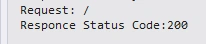
Now, we have a reusable custom OWIN middleware running in pipeline, but still we have something to add into pattern.
Configuring Middleware
Most of the time, we would like our middleware to do different things in different situations. To introduce that functionality, we need an options class. An options class is plane C# class that have name of middleware plus “options” as suffix. In our case we’ll create class named “DebugMiddlewareOptions”.
- public class DebugMiddlewareOptions
- {
- }
The options class will contain things that we need to configure in our middleware. Let’s say we need to configure two things in our middleware so we’ll have two properties in our options class.
- public class DebugMiddlewareOptions
- {
- public Action<IOwinContext> OnIncomingRequest { get; set; }
- public Action<IOwinContext> OnOutgoingResponse { get; set; }
- }
OnIncomingRequest will be called when middleware will receive request and OnOutgoingResponse will be called when response will be on its way to client. Now we need our middleware class to take this options class instance through constructor for configuration to work. We’ll have a second parameter of Options class in DebugMiddleware’s constructor that’s already taking AppFunc parameter.
- private AppFunc _next;
- private DebugMiddlewareOptions _options;
- public DebugMiddleware(AppFunc next, DebugMiddlewareOptions options)
- {
- _next = next;
- _options = options;
- }

Join the conversation! Your thoughts help the community grow.