
Introduction
In ASP.NET, there are multiple approaches developers follow to upload files to server. However, each will have its own limitations that developers find hard to fix. Here, I have detailed a simple approach to upload multiple files to server from ASP.NET MVC web application.
Getting Started
Step 1 - Create new ASP.NET MVC 4 Intranet Web Application “FileUploadDemo” with Razor engine
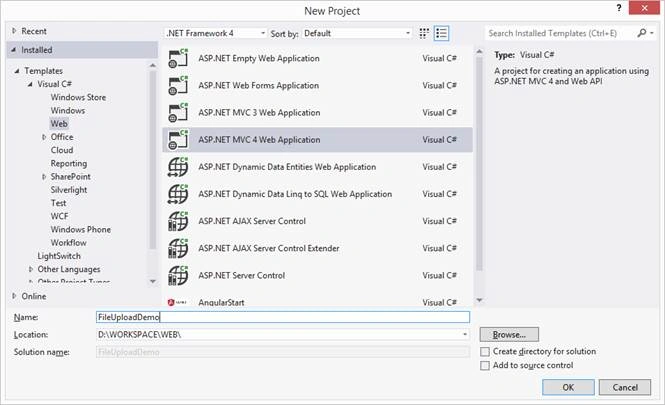
Step 2
Under FileUploadDemo project, open Views, Home, then Index.cshtml file. Delete all contents of the file and add the below lines of code,
- @Html.Hidden("FileUploadUrl", Url.Action("UploadFiles", "Home"))
- <table>
- <tr>
- <td>
- <div id="uploadMsg"></div>
- </td>
- </tr>
- <tr>
- <td>
- <div>File One: </div>
- <div>
- <input type="file" id="fileOne" name="files[0]" />
- </div>
- </td>
- </tr>
- <tr>
- <td>
- <div>File Two: </div>
- <div>
- <input type="file" id="fileTwo" name="files[1]" />
- </div>
- </td>
- </tr>
- <tr>
- <td>
- <button type="button" id="btnUpload">UPLOAD FILES</button>
- </td>
- </tr>
- </table>
Step 3
Create new Index.js file under Scritps folder and add the below lines of code.
- $(document).ready(function () {
- $('#btnUpload').click(function () {
- var fileUploadUrl = $('#FileUploadUrl').val();
- var files = new FormData();
- var file1 = document.getElementById("fileOne").files[0];
- var file2 = document.getElementById("fileTwo").files[0];
- files.append('files[0]', file1);
- files.append('files[1]', file2);
- $.ajax({
- type: 'POST',
- url: fileUploadUrl,
- data: files,
- dataType: 'json',
- cache: false,
- contentType: false,
- processData: false,
- success: function (response) {
- $('#uploadMsg').text('Files have been uploaded successfully');
- },
- error: function (error) {
- $('#uploadMsg').text('Error has occured. Upload is failed');
- }
- });
- });
- });
Step 4
Add the below statement at the first line of Index.cshtml file to include Index.js file,
- <script type="text/javascript" src="~/Scripts/jquery-1.7.1.min.js"></script>
- <script type="text/javascript" src="~/Scripts/Index.js"></script>
Add the below key value pair under <appSettings> section in web.config file,
- <add key="UPLOAD_PATH" value="D:\WORKSPACE\WEB\"/>
Open UploadFileDemo, Controllers, then HomeController.cs file and add a new action method called “UploadFiles” with [HttpPost] attribute.
- [HttpPost]
- public ActionResult UploadFiles()
- {
- bool isSuccess = false;
- string serverMessage = string.Empty;
- var fileOne = Request.Files[0] as HttpPostedFileBase;
- var fileTwo = Request.Files[1] as HttpPostedFileBase;
- string uploadPath = ConfigurationManager.AppSettings["UPLOAD_PATH"].ToString();
- string newFileOne = Path.Combine(uploadPath, fileOne.FileName);
- string newFileTwo = Path.Combine(uploadPath, fileTwo.FileName);
- fileOne.SaveAs(newFileOne);
- fileTwo.SaveAs(newFileTwo);
- if (System.IO.File.Exists(newFileOne) && System.IO.File.Exists(newFileTwo))
- {
- isSuccess = true;
- serverMessage = "Files have been uploaded successfully";
- }
- else
- {
- isSuccess = false;
- serverMessage = "Files upload is failed. Please try again.";
- }
- return Json(new { IsSucccess = isSuccess, ServerMessage = serverMessage }, JsonRequestBehavior.AllowGet);
- }
Build the solution and run the web application. Browse any files and click on “UPLOAD FILES” button. The successful file upload screen will look as below,

Darshan DSPosted May 26, 2016, 6:06 AM
Nice one
Debasis SahaPosted May 23, 2016, 1:50 PM
Good One..
Vignesh ManiPosted May 21, 2016, 9:28 AM
Nice
Nataraj Gandhi ArunachalamPosted May 19, 2016, 1:45 PM
Good one!